Quick & Chewy Chocolate Chip Cookies
Craving cookies? My quick and chewy chocolate chip cookies will satisfy your sweet tooth in just 30 minutes. Perfect for any occasion, let's bake together!

- Let’s Talk Cookies: The Chewy Chocolate Chip Delight
- Essential Ingredients Guide for Quick & Chewy Chocolate Chip Cookies
- Mastering Professional Cooking: Your Go-To Guide for Quick Chocolate Chip Cookies
- Pro Tips & Secrets
- Perfect Presentation
- Storage & Make-Ahead
- Creative Variations
- Complete Nutrition Guide
- Expert FAQ Solutions
- Recipe Card
Let’s Talk Cookies: The Chewy Chocolate Chip Delight
Oh my gosh, let me tell you a little story. a few weeks back, i was having one of those crazy days where life had me running around like a headless chicken.
After working through lunch and needing a pick-me-up, i found myself craving something sweet. you know that classic feeling—you just want to cozy up with a warm cookie fresh out of the oven! so, i thought, “why not bake chewy chocolate chip cookies quickly ?” as the sweet smell filled my kitchen, it hit me: nothing beats a homemade cookie on a hectic day.
The Cookie Journey: A Quick Overview
The origins of chocolate chip cookies go way back to the 1930s, thanks to ruth wakefield and her toll house inn.
She was trying to make a chocolate cookie and, oops, threw in bits of chocolate. and thank goodness she did! fast forward to today, and you’ll find chocolate chip cookies in just about every american household.
They’re basically a staple, right? not only are they super fun to bake, with just a prep time of 15 minutes and cook time of 10 minutes , but even beginners can whip these up with ease.
Plus, this recipe yields 24 cookies —plenty to share or hoard for yourself!
Why You’ll Love This Recipe
Now, let’s chat about why these chewy chocolate chip cookies are a must-try. they’re not just delicious; they’re downright comforting.
First off, you'll be munching on something that’s both sweet and satisfying , thanks to that combo of semisweet and milk chocolate chips .
Plus, they’re an easy way to get those warm-and-fuzzy feels, whether you’re gearing up for a movie night or celebrating a special occasion like a kid’s birthday.
A major advantage? they pack some serious nutritional punch, too. with butter, eggs, and oats (if you want to add some), you're getting a bit of everything— healthy fats, proteins , and, of course, that sugar we all adore! and don’t let anyone tell you these are just for dessert; they can jazz up your breakfast as well.
Top ‘em with some peanut butter and banana, and you’ve got a sweet breakfast treat!
Now, let’s not forget about practicality. these cookies require simple ingredients you probably already have chilling out in your pantry— all-purpose flour, brown sugar , and chocolate chips .
Plus, the costs are minimal! for the price of a fancy coffee, you get loads of warm, gooey cookies that your friends will rave about.
And honestly? who doesn’t want to be known as the one who brings cookies to the party?
A Simple Transition to Gather Your Ingredients
So, you’re ready to roll! time to grab your supplies and get ready for an adventure in baking chocolate chip cookies that’s almost perfect every time.
Grab your room temperature butter , don’t forget that vanilla extract, and let’s start mixing! trust me, once you smell these cookies baking, you won’t just be craving them; you’ll be dreaming about them too.
Ready to dive into the delicious world of homemade cookie magic? Let’s go check out that ingredient section!
Essential Ingredients Guide for Quick & Chewy Chocolate Chip Cookies
Baking cookies is like a love letter to your taste buds. and when it comes to making classic chocolate chip cookies , you want to ensure you’ve got the best ingredients in your pantry.
Trust me; the right components can elevate those easy chocolate chip cookies to legendary status!
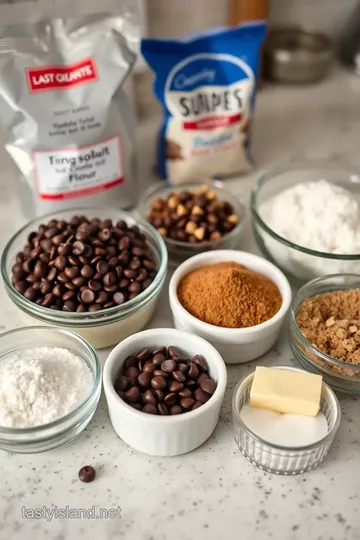
Premium Core Components
First off, let’s talk about those premium core components . Here’s a breakdown of what you really need:
- Butter : You’ll want 1 cup (226g) of unsalted butter, softened to room temperature. Look for that lovely golden color. If it’s too cold, you’re going to struggle mixing it. Ain’t nobody got time for that!
- Sugars : For that perfect sweet balance, use 3/4 cup (150g) packed brown sugar and 1/2 cup (100g) granulated sugar. The brown sugar adds that chewy texture, while the granulated sugar gives a bit of crispiness.
- Eggs : You’ll need 2 large eggs to bind everything together. Always crack those bad boys into a separate bowl first to avoid any shell mishaps.
- Flour and Baking Soda : Grab 2 1/4 cups (281g) of all-purpose flour with 1 teaspoon (5g) of baking soda. Make sure you sift it for smooth mixing; lumpy cookie dough is a big no-no.
- Chocolate Chips : And of course, 1 cup (170g) of semisweet chocolate chips (plus, if you’re feeling adventurous, throw in a cup of milk chocolate chips). Best chocolate chip cookie ingredients, am I right?
Now, let’s chat about storage guidelines . keep your butter and sugars in air-tight containers for longer shelf life. flour can sit for a while, but if it smells odd, toss it.
And always check the expiration date on those baking sodas!
Signature Seasoning Blend
Next up: We need a signature seasoning blend . This is where the magic happens.
- Vanilla Extract : A classic must-have! Just 1 teaspoon (5g) will work wonders. It lifts the flavor to the next level.
- Salt : Don’t skimp on the 1/2 teaspoon (2g) of salt. It brings out the sweetness and balances everything.
Now that we have our core flavors down, throw in some quick cookie variations by experimenting with nuts or different types of chocolate.
Go wild! feel like getting zesty? toss in some orange extract.
Smart Substitutions
We all know life happens. So here are some smart substitutions to keep on hand in case you run out of something:
- Butter : If you’re out of butter, coconut oil can be a great substitute. Just keep it in mind, it might change the flavor a tad.
- Brown Sugar : No brown sugar? Use granulated sugar, but know that your cookies won’t be as chewy.
- Gluten-Free : Need a gluten-free option? A gluten-free all-purpose flour will do the trick.
Kitchen Equipment Essentials
Let’s not overlook the kitchen equipment essentials . You don’t need a bunch of fancy gadgets here; it’s all about practicality.
- Mixing Bowls : Get two good bowls; one for wet and one for dry ingredients. It makes life easier!
- Electric Mixer or Whisk : Mixing dough by hand is a workout, so an electric mixer is a game changer.
- Baking Sheets : Line those sheets with parchment paper for easier cleanup and to prevent sticking.
- Cookie Scoop : If you want uniform cookies, invest in one of these bad boys. They make your cookie game strong!
Wrapping It Up
And there you have it—your ultimate guide to the best chocolate chip cookie ingredients and kitchen hacks to whip up some quick chocolate chip cookies that are soft, chewy, and totally irresistible.
Next up, we’ll dive into the juicy instructions to get you baking those chewy chocolate chip cookies quickly ! just imagine the smell wafting through your house as they bake.
Food heaven!
Let’s get ready to bake some delicious cookie desserts that will have your friends begging for the recipe! You'll be known as the kitchen hero in no time!
Mastering Professional Cooking: Your Go-To Guide for Quick Chocolate Chip Cookies
Let’s face it. the craving for warm, gooey cookies can hit anytime. and there’s nothing quite like these easy chocolate chip cookies to satisfy that sweet tooth.
Today, we’re diving deep into the professional methods to bake chewy chocolate chip cookies quickly — no fuss, just deliciousness!
Essential Preparation Steps
First things first: mise en place . this fancy term just means getting all your ingredients ready before you start cooking.
Measure out your 1 cup of softened butter and 2 1/4 cups of flour ahead of time. it saves a ton of stress later!
And hey, don’t forget about time management . after you’re set up, make a game plan. while your cookies bake in 9- 11 minutes , you can tidy up your kitchen or prep for your next baking adventure.
Organization is key. keep your tools like mixing bowls, cookie sheets, and measuring cups close. this way, you won’t be running around like a headless chicken searching for that cookie scoop in the middle of your mixing frenzy.
Safety considerations ? Always use oven mitts when handling hot trays, and remember to keep your workspace clean. No one wants a surprise from a sneaky flour bag detour!
Step-by-Step Process
Alright, let’s get into it. Here’s how you can whip up these classic chocolate chip cookies like a pro:
- Preheat your oven to 375° F ( 190° C) . This is a crucial step, so don’t skip it!
- Line your baking sheets with parchment paper . This prevents sticking and makes cleanup a breeze.
- In a bowl, beat together your 1 cup of softened butter with 3/4 cup of brown sugar and 1/2 cup of granulated sugar until it's fluffy— like a cloud!
- Crack in those 2 eggs one at a time along with a splash of 1 teaspoon vanilla extract . Combine it till it’s smooth.
- In another bowl, whisk 2 1/4 cups of flour , 1 teaspoon baking soda , and 1/2 teaspoon salt . Gradually mix this dry mix into your wet ingredients. You want it to be well combined but don’t overdo it!
- Finally, fold in 1 cup of semisweet chocolate chips (and optional milk chocolate chips if you're feeling adventurous).
- Using that cookie scoop, drop rounded balls onto your sheets, about 2 inches apart — they’ll spread!
- Pop those sheets in the oven and set the timer for 9- 11 minutes . The edges should be golden and the centers a bit soft. That’s your cue!
- Let them cool for about 5 minutes on the tray, then transfer them to a wire rack to cool completely.
Expert Techniques
Want to elevate your cookie game? Here are some pro tips :
- Room temperature butter is a must! It mixes better for that perfect soft cookie texture.
- Don’t forget to chill your dough before baking. It amplifies the flavors and can help with texture as well.
- The timing matters! Underbake just slightly; it leads to that irresistibly soft and chewy cookie everyone loves.
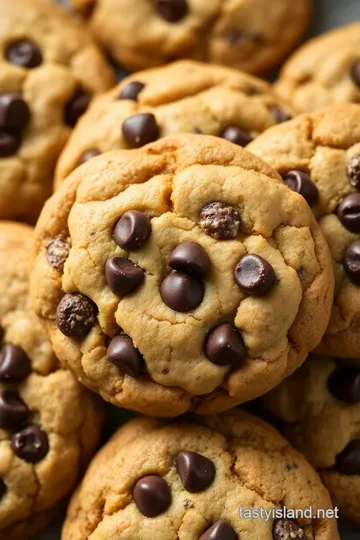
Success Strategies
Every baker has their hiccups, but you can sidestep those common mistakes. Always check if you have the best chocolate chip cookie ingredients on hand— use quality chocolate for those melty nuggets!
To ensure quality, do a quick visual check on your cookies. Look for the edges turning golden but not over-baked. Trust me, nobody wants dry cookies.
And hey, if you want a make-ahead option, you can freeze the dough. just scoop the dough balls onto a sheet, freeze them, then toss them into a ziplock.
When cravings hit, you can bake as many as you like directly from the freezer. no thawing needed!
Additional Information
In the world of baking, there’s always something new to explore. maybe you're curious about chocolate chip cookie variations or need tips for gluten-free baking.
Whatever it is, there’s a community of bakers ready to support each other in creating those timeless homemade chocolate chip cookies .
So, grab your mixing bowl, and let’s whip up some magic in the kitchen!
Pro Tips & Secrets
Let’s dive into my personal insights for making sure those cookies taste as good as they look. one thing i always do is use room temperature butter .
Trust me, it makes a big difference! when i first got into baking, i’d try to rush using cold butter, thinking it was no big deal.
Spoiler alert: it was. room temperature butter creates that dreamy, fluffy texture we all love in easy chocolate chip cookies .
Now, here’s a time-saving tip : measure out your ingredients in advance. grab a few bowls and separate your dry and wet ingredients.
It cuts down on prep time and helps avoid that last-minute scramble. oh, and if you want to amp up the flavor, don’t skip the vanilla extract .
It’s a secret weapon! a splash here and there and bang – flavor town!
For presentation , you want your cookies to shine. try to plate them nicely on a colorful dish. just stack them up and maybe sprinkle a little sea salt on top.
It adds that fancy touch and even enhances the flavor.
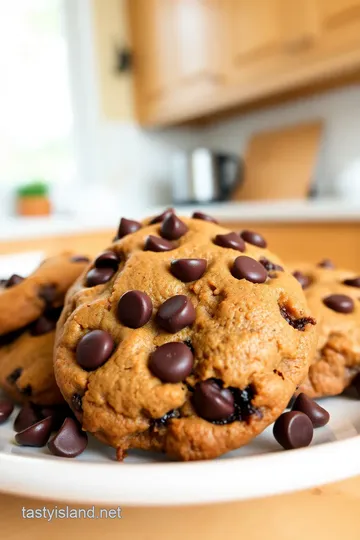
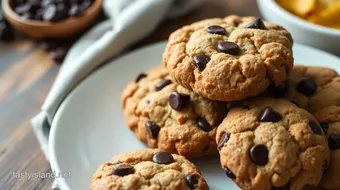
Perfect Presentation
Speaking of presentation, let's chat about how to serve these little delights. plating techniques can turn your cookie game from basic to gourmet.
I love placing my cookies on a rustic wooden board. it gives that homemade feel.
And about garnishes —a sprinkle of powdered sugar or maybe some chopped mint leaves adds a pop of color. you can even drizzle a bit of melted chocolate over the top for that “wow” factor.
People eat with their eyes first, right?
When talking about color combinations , think of using a mix of dark and white chocolate. the contrast is pretty stunning.
Visual appeal can totally elevate your homemade cookies into something that looks like a life-changing dessert.
Storage & Make-Ahead
Now, let’s get real about storing those cookies. if you somehow end up with leftovers (not likely, but hey), store them in an airtight container at room temperature.
They’ll last about 4-5 days before they start losing their magic. if you want to keep them longer, toss them in the freezer.
I recommend wrapping each cookie in plastic wrap and then sealing them in a freezer bag—this ensures they stay fresh.
Reheating tips ? pop them in the microwave for about 10-15 seconds . it’ll restore that soft, warm center, just like straight out of the oven! for those of you like me who sometimes forget about leftovers, that freshness duration is a life-saver.
Creative Variations
Who doesn’t love a little variety? if you’re itching to switch things up with your chocolate chip cookie variations , try adding in some peanut butter chips or even pretzel pieces for that salty-sweet combo.
It’s a game changer!
For those with dietary restrictions, there are easy adaptations. Use gluten-free flour for your friends who can’t have gluten. You can make chewy gluten-free chocolate chip cookies and they won’t even know the difference!
And don’t get me started on seasonal twists! Try adding pumpkin spice in the fall or some crushed peppermint during the winter holidays. These simple cookie recipes can evolve with the seasons.
Complete Nutrition Guide
Let’s get into the nitty-gritty with a nutrition guide . each cookie has roughly 180 calories . they bring happiness, and a bit of indulgence is totally okay! they pack in about 2g protein and 9g fat .
Remember, it’s all about moderation.
If you’re keeping an eye on sugar intake, you may want to add a bit less. These cookies are pretty customizable!
Expert FAQ Solutions
Got questions? i’ve been there. the most common one i hear is about baking time . always keep an eye on them! cookies are best when they’re slightly underbaked for that perfect soft and chewy texture .
If they’re crispy right out of the oven, you might have overdone it.
Another tip? if your dough is flat, check your oven settings for baking cookies . a quick google search can guide you on how to calibrate it.
Don’t fret; we’ve all been there!
So there you have it! with these quick chocolate chip cookie recipes , plus all the chewy cookie tips i shared, you’re set to impress.
Whether you’re making them for a party or just because, nothing beats the smell of baking chocolate chip cookies at home.
So, preheat that oven and let’s get to baking these delicious cookie desserts . Trust me, one bite and you’ll be saying, “Oh my gosh, I will bake chewy chocolate chip cookies quickly anytime!” Happy baking, friends!
Quick & Chewy Chocolate Chip Cookies Card
⚖️ Ingredients:
- 1 cup (226g) unsalted butter, softened
- 3/4 cup (150g) brown sugar, packed
- 1/2 cup (100g) granulated sugar
- 1 teaspoon (5g) vanilla extract
- 2 large eggs
- 2 1/4 cups (281g) all-purpose flour
- 1 teaspoon (5g) baking soda
- 1/2 teaspoon (2g) salt
- 1 cup (170g) semisweet chocolate chips
- 1 cup (170g) milk chocolate chips (optional)
🥄 Instructions:
- Step 1: Preheat your oven to 375°F (190°C).
- Step 2: Line two baking sheets with parchment paper and set aside.
- Step 3: In a mixing bowl, beat together softened butter, brown sugar, and granulated sugar until light and fluffy.
- Step 4: Incorporate the eggs one at a time, followed by the vanilla extract. Beat until well combined.
- Step 5: In a separate bowl, whisk together the flour, baking soda, and salt until evenly combined.
- Step 6: Gradually add the dry ingredients to the wet mixture, mixing until just incorporated.
- Step 7: Gently fold in the semisweet and optional milk chocolate chips until they are evenly distributed.
- Step 8: Using a cookie scoop or spoon, drop rounded balls of dough onto the prepared baking sheets, spacing them about 2 inches apart.
- Step 9: Place the sheets in the oven and bake for 9-11 minutes, or until the edges are golden but the centers are still soft.
- Step 10: Remove the cookies from the oven and let them cool on the baking sheets for 5 minutes before transferring to a wire rack to cool completely.
Previous Recipe: How to Make My Grandmother's Sautéed Kale with Garlic Delight in 15 Min
Next Recipe: How to Make Heavenly Baked Cake Donuts - Deliciously Sweet Treats