Easy Bake Creamsicle Bars: A Delicious Summer Treat
Discover how to make the ultimate Bake Creamsicle Bars: Delicious Summer Treat! Perfect for picnics and easy to whip up—get the recipe now!

- look into into Summer with Bake Creamsicle Bars: A Delicious Summer Treat
- Essential Ingredients Guide
- Unlocking the Secrets of Professional Cooking
- Pro Tips & Secrets
- Perfect Presentation
- Storage & Make-Ahead
- Creative Variations
- Complete Nutrition Guide
- Wrapping It Up!
- Frequently Asked Questions
- Recipe Card
look into into Summer with Bake Creamsicle Bars: A Delicious Summer Treat
You ever have one of those lazy summer afternoons where you just crave something cool, sweet, and a little nostalgic? i remember those summer days as a kid, sweating outside under the sun, and waiting for the ice cream truck to roll down the street.
My ultimate go-to? those creamy orange popsicles! let me tell ya, the moment i tried to recreate that vibe at home, the magic happened – enter bake creamsicle bars: delicious summer treat .
Trust me, once you take a bite, you’ll feel like a kid again.
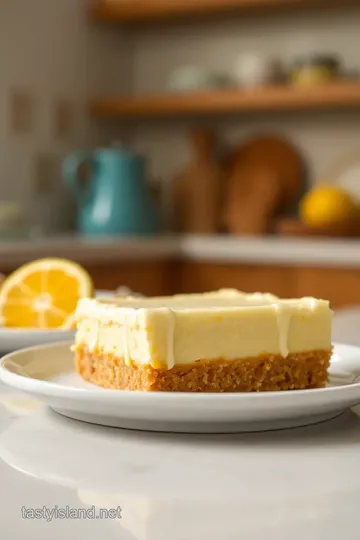
So, what’s the scoop on these bars? they’re inspired by that classic creamsicle flavor we all know and love. we're talking about a buttery crust that cradles a creamy orange filling – the kind of dessert that’ll have your friends thinking you’re the mvp of summer parties.
It's the perfect solution for those hot days – easy to whip up and even easier to enjoy.
A Quick look into into the Recipe’s Roots
These creamsicle dessert recipes take inspiration from the beloved popsicles of our childhood. you know, the ones that had us bouncing off the walls after just one lick? back in the day, these frozen treats made their grand entrance during the sunny months, and now, they’ve morphed into equally delightful baked treats.
Today, bake creamsicle bars are trending as a popular choice for summer gatherings. whether you’re heading to a picnic with friends or hosting a backyard bbq, these bars fit right in with your picnic treats and party dessert ideas .
Plus, they require less than 70 minutes from start to chill!
Why You'll Love Them: Benefits Galore
So, why should you dive into this recipe? first off, it’s kid-friendly and fits perfectly into the realm of easy dessert recipes .
They’re super simple to make, and trust me, if you can stir and press dough into a pan, you've got this!
Nutritionally speaking, you get some light summer sweets that won’t leave you feeling heavy. with a rich filling that's surprisingly lower in calories than you might think, these bars offer an indulgent treat without the guilt.
Plus, if you use dairy-free substitutions like coconut cream, you’ve got a gluten-free dessert option that everyone can enjoy!
And let’s not forget, these bars are the ultimate winning ticket for special occasions. whether it’s a birthday bash, a family reunion, or just impressing that cute neighbor you’ve been eyeing, they can truly shine on your dessert table.
Besides, who wouldn’t want to bite into a creamy bar recipe that brings together both creamy and citrus flavors?
Making It Your Own
Now that i’ve got your mouth watering, let’s chat about how you can personalize this recipe. want to switch it up? replace the orange juice with lemon or lime for a tangy twist.
You could even layer in some raspberry puree for those fruit-infused desserts vibes! just think of the possibilities!
Oh, and pro tip – don’t sweat if you’re not an expert baker. i’ve faced my fair share of baking disasters, so keep it chill.
This is an opportunity to have fun, whip out your creative side, and maybe even tackle some neat baking tips for beginners !
Let’s Get Cooking!
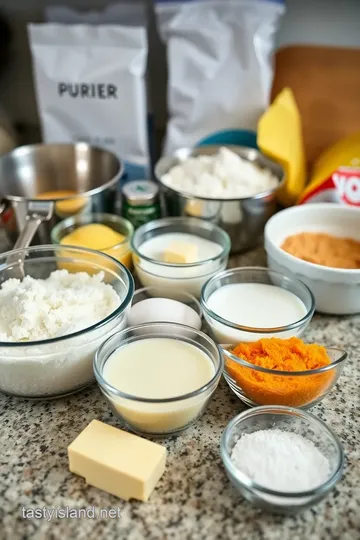
So, ready to embark on your journey of creating these delicious summer treats? start gathering your ingredients! you’ll need all-purpose flour, orange juice, heavy cream, and just a few more staples for that whipped cream topping .
Don’t worry; i'll walk you through every step.
Each bite of these bars brings back memories of those carefree summers, and i can’t wait for you to experience that too.
Let’s head to the kitchen and transform those nostalgic flavors into a fabulous dessert the whole family will love.
Stay tuned for the ingredients section, where I’ll break down everything you’ll need to whip up your own Bake Creamsicle Bars ! You're gonna love it!
Essential Ingredients Guide
Ah, the joy of baking! there's something magical about gathering all those essential ingredients and transforming them into something delicious.
If you feel like channelling your inner baker this summer, you’re in luck! whether you’re making bake creamsicle bars: delicious summer treat or another fabulous dessert, knowing your ingredients is key.
Premium Core Components
First up, measurements . for that perfect crust of your bake creamsicle bars, you'll need 1 ½ cups (180 g) of all-purpose flour, alongside ½ cup (100 g) of sugar and ½ cup (115 g) of unsalted butter.
That's classic american baking for ya! when shopping, look for fresh ingredients : your butter should be soft but cool to the touch, and that fresh orange juice? oh my gosh, don't skimp on it!
Storage guidelines matter too. your flour? it can last up to a year in the pantry, but check for bugs – gross, i know.
Sugar? forever, essentially! as for your butter, it’ll hang out in the fridge for about 1-2 months .
Quick tip: For freshness, buy whole spices instead of pre-ground ones if you can. They pack more flavor! Check that expiration date on those spices, too.
Signature Seasoning Blend
Now let’s spice things up! for luscious summer desserts, a signature seasoning blend can be your secret weapon. think cinnamon and nutmeg for that classic vibe, but let’s talk citrus.
In our bake creamsicle bars, the bursts of orange zest really bring it to life! you can also consider pairing with a hint of vanilla extract for that creamy essence.
Flavor enhancers like a pinch of salt bring out the sweetness, and the right blend of herbs adds a fabulous twist! Ever thought about a basil sprinkle on an orange dessert? Surprisingly delightful!
Smart Substitutions
Life happens. Maybe you’re out of butter, or perhaps a guest has a dairy intolerance. No problem! Here are some common alternatives .
Coconut oil works wonders as a butter substitute in creamy bar recipes. you can even swap eggs for flaxseed or applesauce in those non-bake cream bars for egg-free versions.
Got orange juice? replace it with lemon or lime for a tangy twist in your citrus dessert bars.
And during summer, grab those seasonal fruits . Think berries or peaches . Those can add a refreshing zing to your Bake Creamsicle Bars or whatever recipe you’re diving into next!
Kitchen Equipment Essentials
Let’s talk tools. the must-have for any baking adventure is definitely a good mixing bowl and a reliable whisk . a trusty baking pan is non-negotiable for easy dessert recipes like these summer treats.
Don't stress if you don’t have a fancy stand mixer; a good old mixing bowl and whisk will work wonders.
If you're eyeing those adorable bar-shaped servings, using a ruler to measure helps. seriously, friends, precision in baking is like knowing the best bbq spots in town—it can change the game!
Storage solutions are key to keeping your kitchen organized. use clear containers to keep your baking essentials visible. you’ll be more likely to whip up those creamy dessert recipes when you know where everything is.
Conclusion
So, there you go, fam! with these essentials under your belt, you’re poised for summer baking greatness. next up, it's time to dive into the instructions for those scrumptious bake creamsicle bars.
Trust me; you’re gonna want to take a bite out of summer with these! grab your ingredients and let’s make some magic happen in that kitchen!
Unlocking the Secrets of Professional Cooking
Cooking is like any good story; it has a beginning, middle, and end, and when done right, it leaves you craving for more.
Whether you're a novice or a seasoned chef, embracing the professional cooking method can take your skills to a whole new level, especially when you want to whip up something like bake creamsicle bars: delicious summer treat .
So, let’s dive into the essential preparation steps, the step-by-step process, and some expert techniques!
Essential Preparation Steps
Mise en place is a fancy french term meaning "everything in its place." it’s all about prep. before starting any cooking adventure, gather your ingredients and tools.
For our creamsicle bars, you’ll need everything from oranges to the baking pan ready to go. it’s that simple! set yourself up for success.
Staying organized is another game-changer. keep your workspace tidy. trust me – a cluttered kitchen will have you running in circles like a dog chasing its tail.
A little organization helps keep your focus where it needs to be: on your tasty creation!
And let’s not forget safety considerations . always keep your hands, and your workspace, clean. have a towel at the ready for spills and handle all utensils with care.
It’s one thing to burn the cookies; it's another to cut yourself while trying to salvage them!
Step-by-Step Process
Alright, let’s get cooking! Here’s a quick checklist for whipping up our Creamsicle Bars:
-
Preheat your oven to 350° F ( 175° C) . An empty oven is like a movie without a plot – it just doesn’t work!
-
Make the crust : mix 1 ½ cups all-purpose flour, ½ cup sugar, and a pinch of salt . toss in ½ cup softened butter and 1 egg .
Once it’s cookie dough consistency, press it into the pan and pop it in the oven for 15 minutes .
-
While that’s baking, let’s make the filling! whisk together 1 cup heavy cream, 1 cup orange juice, 2 eggs, ½ cup sugar, 1 tablespoon cornstarch , and some zest in a bowl.
The aroma will have you dreaming about summer!
-
Once that crust is lightly golden, pour the filling on top and bake it for another 25 minutes or until it’s set - it should look beautifully golden around the edges.
-
Finally, cool it off! Let it chill for about 30 minutes at room temperature , then toss it in the fridge for 2 hours . This sets the bars perfectly!
Expert Techniques
Now, if you're looking to impress, focus on temperature control and timing precision . each step has its magic number – it’s important! keep an eye on your filling; every oven acts differently, and trust me, you don’t want it to overbake and turn into rubber.
A visual cue is key. The filling should be slightly jiggly but not wobbling around like jelly. A good tip? Insert a toothpick; it should come out clean if it’s ready!
Success Strategies
Let's avoid those common pitfalls, alright? A huge mistake is overmixing your filling. Gently combine everything! You want a light and airy filling – we’re going for creamy bar recipes , not a brick!
Quality assurance is about taste-testing, my friend! Give a small spoonful of that cream mixture a try before baking. Easy adjustments can make a world of difference.
And if you're prepping for a picnic treat or party, fear not! make-ahead options are here to save the day.
You can bake the day before and let those flavors meld overnight in the fridge. trust me; it’s a game-changer for summer desserts!
As we seek the perfect balance of flavors and textures, remember these tips, and your Creamsicle Bars will shine like a summer sun!
Transitioning from here, let’s dive into some Additional Information . It's all about refining flavors, understanding ingredient properties, and getting even more creative in your kitchen adventures!
Pro Tips & Secrets
Alright, buckle up! Here are a few personal nuggets of wisdom I've gathered while mastering the art of making these Bake Creamsicle Bars: Delicious Summer Treat .
First off, here’s a little secret: use fresh orange juice and zest! it makes a world of difference. store-bought stuff can’t even touch the bright, zesty flavor of fresh-squeezed joy.
Honestly, you wouldn’t want to miss out on that burst of orange cream desserts flavor. it’s like sunshine in a bite!
Now, let's talk time-saving techniques. pretend you’re in a cooking show and have all your ingredients prepped. it can save you those precious moments when the timer's ticking down.
And let’s be real, who wants to be scrambling for eggs when you could be sipping lemonade instead?
For flavor enhancement – try adding a splash of vanilla to that filling. it’s subtle, but it just elevates the whole vibe of the bar! also, a pinch of salt in sweets ain’t new, but it can really amplify the cream and citrus combinations .
When it comes to presentation , i always say "think color!" the natural orange mellowed with white from the creamy top is already a beauty.
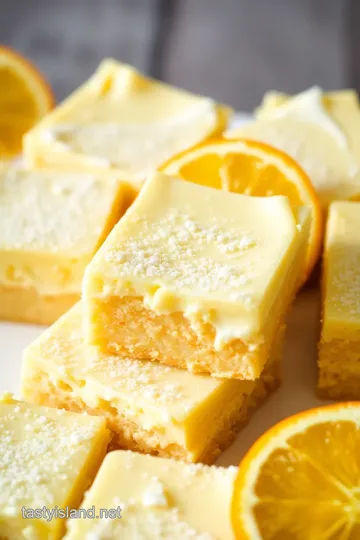
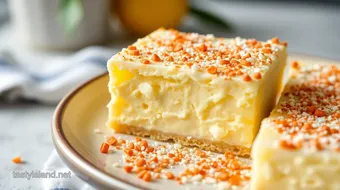
But, sprinkle some colorful zest on top or a few mixed berries for an eye-popping display that’ll have everyone snapping pics for their socials!
Perfect Presentation
You know how they say you eat with your eyes first? well, i live by that motto. here’s how to make those bars not just tasty but also a feast for the eyes.
One easy way? Plating techniques! I mean, cut those bars with a sharp knife after dipping it in hot water for clean edges. That’s the way to impress, my friends!
Garnish ideas are next! think fresh mint leaves or even a little dusting of powdered sugar. not only does it look fancy, but you also inject a bit of flavor too.
And if you want to go all out, whip up a little whipped cream topping to drizzle on the side.
Let’s not forget color combinations. contrast is key! the bright orange filling against the golden crust is gorgeous. toss in some berries or even edible flowers, and bam! your dessert is the star of the picnic spread.
Storage & Make-Ahead
If you're planning to whip up these bars for a gathering, you’re in the right zone!
Storage guidelines are pretty simple. if you’ve got any leftovers (which i doubt, let’s be real), store ‘em in an airtight container in the fridge.
They'll keep for up to five days, but believe me, they’re best within the first 72 hours. after that, they lose that fresh zing!
When it comes to reheating , these are best enjoyed chilled. if you need to, just take them out of the fridge for about 10 minutes before serving to soften slightly.
Perfect texture, every single time!
Creative Variations
Let's shake things up a bit! This recipe is a great base for a ton of creative variations.
Flavor adaptations could mean swapping out the orange juice for lemon or even a seasonal fruit sauce ! how about cherry or berry-infused layers instead? you could even fold through some chopped citrus dessert bars or zest of a lemon.
For those needing dietary modifications , going dairy-free is super easy! just grab that coconut cream for the filling and you’re golden! if gluten's a no-go for you, sub that flour for a gluten-free blend, and watch these bars still shine.
Seasonal twists are just waiting to happen! Throw in some fresh raspberries during the summer or ignite the fall spirit with some pumpkin spice and everything nice during the autumn months.
Complete Nutrition Guide
Now, in the world of easy dessert recipes , let’s not forget the nutrition aspect. These bars come in at around 210 calories per serving, not too shabby for a creamy treat!
The breakdown is simple: 3g of protein , 10g of fat , and 29g of carbs . It’s a light dessert that won’t leave you feeling heavy afterward, just bright-eyed and joyful!
These bars are packed with vitamin c, thanks to the vibrant orange juice. plus, the creamy filling gives you that indulgent feel without overdoing it in the calorie department.
A win-win for all those light summer sweets seekers!
Wrapping It Up!
So there you have it. you’re now fully equipped to whip up the bake creamsicle bars: delicious summer treat with style and joy.
These fruity, zesty bars are perfect for summer picnics or backyard barbecues.
And remember, cooking is all about having fun. so don’t stress too much about making it perfect – everyone loves a little imperfection, don’t they? look into in, get creative, and share them with friends and family.
They’ll be a hit! happy baking!
Frequently Asked Questions
What are Bake Creamsicle Bars: Delicious Summer Treat, and how are they different from traditional dessert bars?
Bake Creamsicle Bars are a vibrant take on the classic orange and cream popsicle, featuring a creamy orange filling and a buttery crust. Unlike traditional dessert bars, they showcase a unique citrus flavor that’s perfect for summer, evoking nostalgia while providing a refreshing treat during warm days.
Can I use other fruits instead of orange for these creamsicle bars?
Absolutely! You can swap orange juice for lemon, lime, or even berry juices for different flavor profiles. Each fruit will bring its own unique taste and acidity, allowing you to customize the bars to your preference while still maintaining the creamy texture.
How can I store Bake Creamsicle Bars: Delicious Summer Treat, and how long do they last?
To store your Bake Creamsicle Bars, keep them covered with plastic wrap or in an airtight container in the refrigerator. They should last about 4-5 days, but for the best texture and flavor, consume them within the first couple of days as the crust may soften over time.
Can I make Bake Creamsicle Bars ahead of time?
Yes! These bars can be made a day in advance, making them a perfect choice for parties or picnics. Just ensure they are properly chilled and covered to maintain freshness. For best results, slice them just before serving.
What are some tips for achieving the perfect texture in my Bake Creamsicle Bars?
To achieve a delightful texture, ensure that you mix the filling gently just until combined to keep it airy. Additionally, allowing the bars to chill thoroughly in the refrigerator is key for a firm texture that holds its shape when cut. Using fresh ingredients like freshly squeezed orange juice will also enhance flavor and texture.
Are Bake Creamsicle Bars suitable for gluten-free diets?
Yes, you can easily make these bars gluten-free by substituting all-purpose flour with a gluten-free baking blend. Ensure you check that all other ingredients are also gluten-free, and your friends with dietary restrictions can enjoy this delicious summer treat just like everyone else!
Easy Bake Creamsicle Bars: A Delicious Summer Treat Card
⚖️ Ingredients:
- 1 ½ cups all-purpose flour
- ½ cup granulated sugar
- ½ cup unsalted butter, softened
- 1 large egg
- ½ teaspoon baking powder
- Pinch of salt
- 1 cup heavy cream
- 1 cup orange juice, freshly squeezed
- 2 large eggs
- ½ cup granulated sugar
- 1 tablespoon cornstarch
- 1 teaspoon vanilla extract
- Zest of 1 large orange
🥄 Instructions:
- Step 1: Preheat the oven to 350°F (175°C) and line a 9x9-inch baking pan with parchment paper, leaving a slight overhang.
- Step 2: In a mixing bowl, combine flour, sugar, baking powder, and salt. Add softened butter and egg, then mix until a dough forms. Press the dough into the prepared pan evenly. Bake for 15 minutes until lightly golden.
- Step 3: In a separate bowl, whisk together heavy cream, orange juice, eggs, sugar, cornstarch, vanilla extract, and orange zest until well combined.
- Step 4: Pour the filling evenly over the baked crust. Bake in the oven for an additional 25 minutes, or until the filling is set and the edges are lightly golden.
- Step 5: Remove from the oven and allow to cool at room temperature for 30 minutes, then refrigerate for at least 2 hours to set completely.
- Step 6: Once chilled, lift the bars out of the pan using the parchment overhang. Cut into 12 equal bars using a sharp knife, wiping it clean between cuts for neat edges.
Previous Recipe: Easy & Flavorful Quick Chicken Stir-Fry with Crisp Veggies: Your New Weeknight Favorite!
Next Recipe: Easy & Vibrant Mix Water Moccasin Shot for Fun Cheers: My Party Favorite!