Bake Tasty Puffs with Creamy Cheese Delight
Craving a cozy snack? Discover my secret for Bake Tasty Puffs with Creamy Cheese Delight that always get rave reviews! Perfect for any gathering!

- look into Into Deliciousness: Bake Tasty Puffs with Creamy Cheese Delight
- The Story Behind These Heavenly Puffs
- Why You’ll Love These Baked Treats
- Time to Gather Your Ingredients
- Essential Ingredients Guide for Bake Tasty Puffs with Creamy Cheese Delight
- Get Ready to Bake Tasty Puffs with Creamy Cheese Delight!
- Pro Tips & Secrets
- Perfect Presentation
- Storage & Make-Ahead
- Creative Variations
- Complete Nutrition Guide
- Expert FAQ Solutions
- Wrapping it Up
- Recipe Card
look into Into Deliciousness: Bake Tasty Puffs with Creamy Cheese Delight
You ever had one of those moments that just sticks with you? like, i remember the first time i took a bite of a flaky pastry stuffed with delicious cheese.
Oh man, it was like biting into a soft cloud of yum! i was at this little european café, and they had these bake tasty puffs with creamy cheese delight that totally blew my mind.
Ever since, i’ve been on a mission to replicate that creamy goodness at home.
Let me tell you, these cheesy appetizers are not just snacks; they’re a whole experience! they mix the elegance of european pastry techniques with the cozy vibes of home cooking.
And guess what? you don’t need to be a master baker to whip these up. so whether you’re planning a dinner party or just want a cozy night in, this recipe is just the ticket!
The Story Behind These Heavenly Puffs
The beauty of these cheese-filled pastries lies in their history. they have roots tracing back to traditional european pastry , where flaky layers of dough are crafted into delightful bites.
Today, they’re everywhere – from fancy restaurants to that random bakery down the street. people love them because they’re versatile.
You can serve them as appetizers, snacks during movie night, or even a light meal.
Worried about the timing? relax! this recipe takes about 75 minutes total . you’re looking at about 20 minutes of active prep followed by 25 minutes in the oven.
Doesn’t get much easier than that! sure, they might be a tad tricky at first for beginners because of the puff pastry, but that’s what makes the victory so delicious.
Now let’s talk costs. You can whip up about 12 puffs for under $15, which, let’s be real, is kind of a steal for homemade snacks that impress.
Why You’ll Love These Baked Treats
These tasty bites are not just easy on the eyes – they’re laced with health benefits too! packed with cream cheese and cheddar, they offer a decent dose of calcium and protein.
Plus, if you sneak in some sautéed spinach with your cheese mix, well, that’s just a cherry on top of your healthy endeavor, right?
So when should you make these beauties? these puffs steal the spotlight at parties, game nights, or even just casual dinners.
They’re super simple, absolutely delightful, and can outshine other puff pastry snacks on the table. think about it: why serve boring chips when you could have baked cheese puffs instead?
And let’s not forget the versatility! you can fill them with all sorts of goodies – from savory herbs to every cheese under the sun.
It’s like a blank canvas for your culinary imagination!
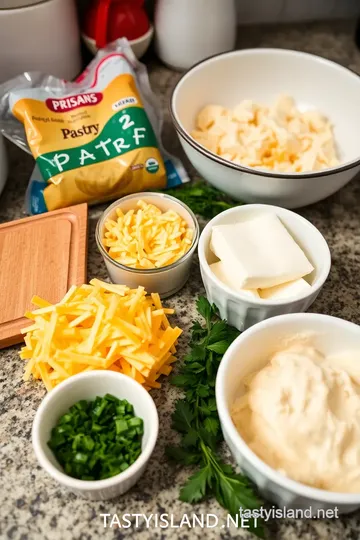
Time to Gather Your Ingredients
Alright, friends, are you ready to make some magic happen in your kitchen? before you start flinging flour and melting cheese everywhere, let’s break down what you’re gonna need.
You’ll want to grab 1 sheet of puff pastry , some cream cheese , and your favorite cheeses. fresh chives, garlic powder, and a sprinkle of salt and pepper will round things off nicely.
Next up, we’ll dive into the step-by-step guide on how to create these cheesy wonders, but trust me, you won’t need to be a pro.
Just follow me, and soon enough, you’ll be serving these beauties like a kitchen wizard with expert flair!
Stay tuned for the next section, where I'll share exactly how to bring these light, flaky pastries to life. You’ve got this!
Essential Ingredients Guide for Bake Tasty Puffs with Creamy Cheese Delight
Welcome to the essential ingredients guide! if you’re diving into the world of bake tasty puffs with creamy cheese delight , you’ll need to know what you’re getting into.
Trust me, starting with fresh, quality ingredients makes all the difference. we’re talking about those golden brown pastries that’ll have your friends begging for the recipe.
Premium Core Components
Let’s chat about those premium core components you need. If you're anything like me, you'll want every ingredient to shine, right?
Measurements are key here. most recipes use standard u.s. measurements, but i know it’s also handy to have the metric system in your back pocket.
For instance, a sheet of puff pastry usually weighs 14 ounces (400 grams) .
When it comes to quality indicators for each ingredient, think creamy, fresh, and fragrant. for your cheeses, look for a rich aroma and firm texture.
I can’t stress enough how vital fresh herbs like chives are - they can make your creamy cheese puffs sing!
Signature Seasoning Blend
Now, let’s sprinkle in some flavor with that signature seasoning blend . a dash of garlic powder and some fresh herbs can make your cheese-filled pastries pop.
And don’t forget about the different regional variations . you could throw in some gruyère or even pepper jack for a kick!
Mixing it up with spices and herbs is the key to great savory pastry ideas . honestly, experimenting here can lead you to some game-changing results.
You might even stumble upon your own signature taste!
Smart Substitutions
We’ve all been there – in the middle of a recipe and realize we’re missing something. this is where those smart substitutions come in handy.
If you’re out of cream cheese, try mascarpone or even ricotta . they’ll give you a different vibe but keep it rich and creamy.
In terms of dietary modifications , if you’ve got a vegan friend coming over, nutritional yeast can be a great cheese-like substitute.
Keep it simple, and don’t stress. you can totally tackle whatever comes your way in the kitchen!
Kitchen Equipment Essentials
Alright, let’s chat about what you need in your kitchen to whip up these delightful puffs. first off, having a rolling pin is essential, but you can use a wine bottle if you don’t have one at your fingertips.
A pizza cutter for pastries also helps in cutting those puff pastry squares quickly and neatly.
For the baking part, a solid baking sheet and some parchment paper will save you from major cleanup. trust me; nobody wants a messy kitchen after a baking spree! lastly, consider how you will store leftovers.
Using airtight containers will keep those puffs tasting fresh longer, should there be any left!
Transition to Instructions
Now you're equipped with all the knowledge you need for success. Get ready to dive into the joy of cooking as we create some delightful cream cheese puffs .
Next, we’ll dive into the step-by-step instructions to really take this from an idea to a mouthwatering reality. Are you ready to Bake Tasty Puffs with Creamy Cheese Delight? Let’s go!
Get Ready to Bake Tasty Puffs with Creamy Cheese Delight!
Oh my gosh, have you ever tried those creamy cheese puffs ? they’re an absolute game-changer when it comes to appetizers.
We’re talking about delicious little bursts of cheesy goodness enveloped in flaky pastry. seriously, if you want to wow your friends at the next gathering (or just treat yourself!), you need to learn how to bake tasty puffs with creamy cheese delight .
Let's break it down!
Essential Preparation Steps
Before diving into the cooking, let’s get prepped.
First up, mise en place . it’s a fancy french term, but it just means getting everything ready before you start.
Chop your chives, measure out your cheeses, and have your puff pastry nice and thawed. it saves a lot of time later!
Next, let’s talk about time management . the key is to keep an eye on the clock. you’ll want about 20 minutes to prep, 30 minutes chilling, and then 25 minutes in the oven.
Stick to the timeline, and you'll be golden.
When it comes to organization , have your ingredients lined up and your baking sheet prepped. a clutter-free space helps keep your mind clear.
Trust me; i once made a mess of my kitchen, and cleaning took longer than the cooking!
And don’t forget safety ! Make sure you’re handling the oven mitts right. I’ve accidentally burned my hand before trying to pull out a hot tray. Ouch!
Step-by-Step Process
Now onto the fun part! Here’s your step-by-step guide to crafting these delightful puffs.
-
Preheat your oven to 400° F ( 200° C) and line a baking sheet with parchment paper. You want that oven hot to get those puffs nice and fluffy!
-
Roll out the thawed puff pastry on a floured surface. Smooth is the name of the game.
-
Cut the pastry into squares about 3x3 inches . Use a pizza cutter—it makes it so much easier!
-
Prepare the filling . grab a mixing bowl and throw in your softened cream cheese, cheddar, parmesan, chives, garlic powder, and season with salt and pepper.
Mix it all up until it's a creamy dream.
-
Fill the pastry squares. place a spoonful of that cheesy goodness in the center of each square. then, fold it over to create cute little triangles or rectangles.
Make sure to seal those edges so none of that filling escapes.
-
Egg wash time! Whisk that egg and brush it over the tops for a beautiful golden color.
-
Bake in your preheated oven for about 20- 25 minutes . Keep an eye on them until they’re golden brown and flaky.
-
Cool for a few minutes before indulging. Nothing worse than burning your mouth on a hot cheesy puff!
Expert Techniques
Let’s get into the nitty-gritty of achieving that perfect puff.
A big tip? keep the pastry as cold as possible before it hits the oven. if it starts getting warm, pop it in the fridge for a minute.
This helps it to rise properly.
Also, be sure to seal those edges like your life depends on it. A well-sealed puff won’t leak cheese during baking, and no one wants a flat puff!
Don’t overcrowd your baking sheet; give those puffs room to grow. They need space to expand and be their best selves!
If you taste one and think, "Oops, a little bland!"—this is where you can troubleshoot. Experiment with seasonings! Throw in some herbs or spices to kick it up a notch.
Success Strategies
Let’s wrap it up with some handy tips to ensure you're a puff pastry pro.
First off, avoid the common mistakes . Don't rush—give each step the attention it deserves. You want those puffs to be perfect!
For quality assurance , take a peek inside when pulling them out. They should be crispy and have that golden brown hue we all love.
Consider make-ahead options . you can assemble the puffs ahead of time and keep them in the fridge for a few hours before baking.
Just remember to add an extra couple of minutes to your bake time.
Serve these bad boys alongside a zesty marinara for dipping, and you’ve got yourself a party hit. Light and flaky, perfect as a snack or even a light meal idea!
Additional Information...
So there you have it! with these easy puff pastry recipes and tips, you’re on your way to making the ultimate cheese-filled pastries.
Enjoy those bake tasty puffs with creamy cheese delight, and watch them vanish like they never existed! happy cooking, friends!

Pro Tips & Secrets
Alright, let’s dive into the nitty-gritty of making the ultimate bake tasty puffs with creamy cheese delight . first of all, a little insider scoop : keep your puff pastry cold while you work.
This is super important ! cold pastry rises better, giving you those light and flaky results we all dream about.
Now, about that cheese filling—mix it until it’s nice and smooth. trust me , nobody wants to bite into a clump of unblended cheese.
Have fun with flavors! add some garlic powder for a kick or toss in fresh herbs like chives or parsley.
They elevate the whole dish to a new level!
When it comes to time-saving techniques, try prepping the filling the day before. let it chill out in the fridge overnight.
This makes your puff pastry snacks even tastier when baked. and for that golden brown finish? don’t skip the egg wash! it’s like a spa day for your puffs.
Perfect Presentation
Now, on to the fun part—presentation! once those puffs are out of the oven, you’ll want to plate them just right.
Start with a nice base like a rustic wooden board or a colorful plate. lay your cheesy appetizers artfully on the platter.
Trust me , it makes a difference.
For garnish, sprinkle some fresh herbs on top, like chopped chives or a little sprinkle of paprika for color. this adds a pop that’s visually appealing and makes your dish look irresistible.
You might even want to use a pizza cutter for easier slicing if you’re serving these at a party. it’s all about those chef-like touches!
Storage & Make-Ahead
Who doesn’t love make-ahead recipes? you can make these puffs a day in advance. just store the unbaked puffs in the refrigerator, then pop ’em in the oven right before your guests arrive.
If you’ve baked leftovers (which is rare!), let them cool completely before sealing them in an airtight container. they’ll last for about two to three days in the fridge.
When it comes to reheating, just pop them back into the oven at 350° f ( 180° c) for about 10 minutes .
They’ll regain their crispy magic. note : microwaving will zap that glorious flakiness—just saying!
Creative Variations
Feeling adventurous? the beauty of easy puff pastry recipes is their versatility! why not switch up the cheese? try a blend of gruyère and sautéed spinach for a delightful spin.
If you’re feeling spicy, toss in some finely chopped jalapeños with pepper jack cheese.
And depending on the season, add some fresh herbs like basil in the summer or roasted veggies in the fall.
You can even make dessert versions filled with sweet cream cheese and berries. the sky’s the limit when it comes to flavor adaptations!
Complete Nutrition Guide
Let’s chat about the health aspect. each homemade cheese puff is about 190 calories. they pack a bit of fat but bring the protein as well.
If you're counting macros or just want to eat healthier, consider how many you’re munching on, especially if you use cream cheese bi-products.
Remember to balance these goodies with a salad or fruit on the side to round out your meal. they’re perfect as a light meal idea , especially when paired with a refreshing dip or chilled wine pairings .
Cheers to that!
Expert FAQ Solutions
Got questions? you’re not alone! a lot of folks wonder how to keep their puffs from becoming soggy. my best piece of advice? make sure your filling isn’t too wet—nobody likes a mushy puff.
If something doesn’t turn out just right, don’t sweat it. baking is all about trial and error. and remember, every failed attempt is a step closer to perfection.
If you’re curious about other variations, just look at what you have on hand. Leftover roasted veggies? Toss ‘em in! You can always get creative.
Wrapping it Up
To wrap things up, making bak tasty puffs with creamy cheese delight is not just about the food; it's about sharing moments.
These delightful little bites can turn any gathering into a delicious feast or even just brighten up a quiet night at home.
Trust me, your friends and family will be raving when they taste these heavenly puffs!
So roll up those sleeves, grab some dough, and get ready to impress. Happy baking!

Bake Tasty Puffs with Creamy Cheese Delight Card

⚖️ Ingredients:
- 1 sheet of puff pastry (about 14 ounces / 400 grams, thawed)
- 1 large egg (for egg wash, optional)
- 1 cup (8 ounces / 225 grams) cream cheese, softened
- 1/2 cup (60 grams) grated cheddar cheese
- 1/4 cup (30 grams) grated Parmesan cheese
- 1 tablespoon fresh chives, chopped (or 1 teaspoon dried)
- 1/2 teaspoon garlic powder
- Salt and pepper to taste
🥄 Instructions:
- Step 1: Preheat your oven to 400°F (200°C) and line a baking sheet with parchment paper.
- Step 2: Roll out the puff pastry on a lightly floured surface to smooth out creases (if necessary).
- Step 3: Cut the pastry into squares (about 3x3 inches or 7.5x7.5 cm).
- Step 4: In a mixing bowl, combine cream cheese, cheddar cheese, Parmesan cheese, chives, garlic powder, salt, and pepper. Mix until smooth and well blended.
- Step 5: Place a spoonful of cheese filling in the center of each square. Fold over the pastry to create triangles or rectangles, sealing edges well by pressing with a fork or fingers.
- Step 6: In a separate bowl, whisk the egg and brush it over the tops of the filled pastries for a golden finish.
- Step 7: Bake in the preheated oven for 20-25 minutes until puffs are golden brown and flaky.
- Step 8: Cool for a few minutes before serving. Enjoy warm!
Previous Recipe: How to Bake Puff Pastry Bites with Flavorful Herbs: My Family's Ultimate Snack
Next Recipe: Ultimate Quick Beef Tacos with Avocado Cream Sauce: A Family Favorite!