Chocolate Smash Cake
Looking for sweet inspiration? Discover 7 delightful smash cake designs chocolate that will make your child's birthday unforgettable! Learn fun cake decorating tips here.

- Are You Ready to Smash Some Cake?
- A Sweet Slice of History
- Master the Art of Chocolate Smash Cake
- What Makes This Recipe Special?
- Recipe at a Glance
- Premium Ingredients Guide
- Kitchen Equipment Essentials
- Essential Preparation Steps
- Professional Cooking Method
- Expert Techniques
- Success Strategies
- Success Guaranteed Tips
- Perfect Presentation
- Storage and Make-Ahead
- Creative Variations
- Complete Nutrition Guide
- Expert FAQ Solutions
- Recipe Card
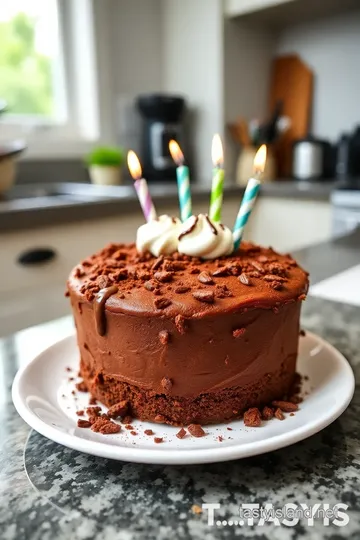
Are You Ready to Smash Some Cake?
Have you ever wondered what it feels like to demolish a cake? not in a destructive sense, but in a celebratory way? picture this: a beautifully layered chocolate confection, decorated to the nines—with the thrill of digging in and smashing it apart to reveal all that delectable chocolatey goodness inside.
That’s the magic of a chocolate smash cake! in just about 50 minutes, you can whip up this show-stopper with a medium level of difficulty that guarantees big smiles (and possibly a few giggles) at your next birthday bash.
A Sweet Slice of History
The tradition of cake-eating has roots as ancient as the anglo-saxon era, where hearty cakes were often made for religious celebrations.
Fast forward through historical eras, and cakes evolved into delightful treats for every occasion—from feasts to festivities. chocolate, in particular, became a cherished ingredient, with recipes evolving over time to embrace a rich, dark, and luscious flavor that pairs perfectly with sweet buttercream frosting.
Today, the chocolate smash cake stands out amidst the plethora of chocolate cake recipes, thanks to its showy presentation and the interactive experience it offers during celebrations.
Master the Art of Chocolate Smash Cake
This isn’t just any old cake; it's a rich culinary treasure that brings together various cultural influences and modern baking techniques.
Originating from creative kiddos' birthdays, smash cakes have become a staple in milestone celebrations. those adorable little cakes meant for little hands have grown up, crossing over into fabulous designs for all ages—because who says smashing cake is just for kids? the chocolate smash cake, with its captivating taste and funky appeal, has become a beloved centerpiece at many a birthday party, making everyone young at heart.
What Makes This Recipe Special?
Let’s just say this cake isn’t just about looks. the unique flavor combinations of deep cocoa paired with a buttery, sweet frosting are guaranteed to win hearts.
It comes with foolproof techniques that even the most novice of bakers can tackle. i speak from experience! i once mixed up my flour measurements and panicked, but hey, it turned out delicious in the end! this recipe is expert-tested, making sure you can conjure up a scrumptious cake without feeling like a culinary wizard.
Plus, you’ll find that it doesn’t require hours of labor—making it quite the time-saving hero in your baking adventures.
Health and Nutrition Highlights
Now, let’s chat a bit about nutrition—because we can't just ignore that scrumptious slice of joy, right? each serving of this delightful dessert packs a punch with not just flavor but also certain nutritional benefits.
While it does come with a bit of sugar and fat, remember to enjoy it mindfully. it’s worth pondering whether a treat is just that—an indulgence to celebrate life’s little milestones.
Recipe at a Glance
- Total Preparation Time: 20 minutes
- Cooking Time: 30 minutes
- Serving Size: 8 servings
- Difficulty Level: Medium
- Cost Efficiency: Reasonably priced—this cake gives you a wow factor without breaking the bank!
Now, before you roll up your sleeves and dive into the fun world of cake magic, let’s gather everything you need.
In the next section, we’ll talk about ingredients. get ready to make those smash cake designs chocolate come to life! trust me; you won’t regret it when you see the joy on everyone's faces as they dig into that decadently rich, chocolatey delight!
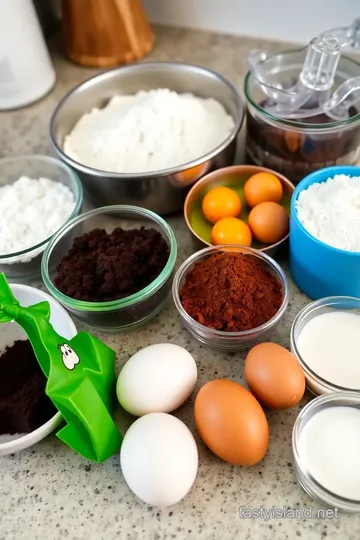
Premium Ingredients Guide
Creating the perfect chocolate smash cake starts with choosing top-notch ingredients. trust me, they make all the difference! it’s a bit like picking apples from a tree; go for the freshest ones, and your cake will shine.
Premium Core Ingredients
- All-purpose Flour : 1 ¾ cups. Look for brands that have a finely milled texture. It should feel soft, not gritty. You want that smooth cake structure, right?
- Granulated Sugar : 2 cups. Make sure you’re using pure cane sugar. It should be dry and free-flowing, not clumpy!
- Unsweetened Cocoa Powder : ¾ cup. I prefer Dutch-processed cocoa for a deeper chocolate flavor. Check for a rich, dark hue—if it looks bright red, keep looking.
- Baking Powder & Baking Soda : 1 ½ teaspoons each. Always check expiration dates, as these are vital for that fluffy cake rise!
- Salt : 1 teaspoon. A good quality sea salt enhances all the flavors, trust me on this one.
- Eggs : 2 large. Go for organic or free-range if you can. They make everything richer!
- Whole Milk : 1 cup, at room temp. Fresh and creamy is what you’re after for a flavorful batter.
- Vegetable Oil : ½ cup. I usually reach for canola or sunflower, but you can even use melted coconut oil.
- Vanilla Extract : 2 teaspoons. Pure vanilla extract is key! Fake stuff just won’t cut it here.
- Boiling Water : 1 cup. Don’t skip this step! It helps the cocoa bloom and makes everything ultra-moist.
Signature Seasoning Blend
While our cake is focused on chocolate, seasoning will elevate it to the next level. Think of this as your secret weapon!
- Herbs : For fun, consider a hint of crushed mint leaves or a sprinkle of ground cardamom for a unique twist. Just a pinch.
- Flavor Enhancers : A dash of espresso powder really kicks up the chocolate flavor.
- Aromatic Additions : Whipped egg whites can add extra fluffiness if you want a light texture.
Smart Substitutions
Life happens, and we need alternatives sometimes.
- Instead of all-purpose flour , you could use gluten-free flour for a fantastic gluten-free version that doesn’t sacrifice flavor.
- Chocolate bars can easily be swapped for milk, dark, or even white chocolate depending on your preference for frosting decoration.
- If you're out of vegetable oil , melted butter works fine too, but expect a slightly different texture.
- Seasonal variations can also be fun! Try adding zesty orange zest during summer.
Kitchen Equipment Essentials
Now that we've talked ingredients, let’s get into some must-have gadgets. No one wants to be caught out at the wrong moment!
- Mixing Bowls : A good set of mixing bowls is essential. I prefer glass—they're easy to clean, and I can see what's in ‘em!
- Electric Mixer : Honestly, you could get by with a whisk, but your arms will thank you for a hand mixer or stand mixer.
- Cake Pans : Two 9-inch round pans are the perfect size for layered cakes, but you could also use square pans if the mood strikes you!
- Spatula : A silicone spatula is a game changer, making it easy to scrape down the sides of the bowl and frost your cakes.
Pro Ingredient Tips
Okay, here’s where I spill the tea on ingredient selection.
- When selecting cocoa powder , look for Dutch-processed for a nice depth of flavor. If you see “natural,” skip it for this cake!
- For butter, get unsalted—you can control the salt content better that way.
- Storage : If you’re not using your flour or sugar often, keep them in airtight containers to maintain freshness.
- And here’s a money-saving tip: buy in bulk! Larger bags of flour and sugar are often cheaper per pound.
Now that you’ve got all your glorious ingredients lined up and ready, let's transition to the fun part—how to bring it all together! our next section is filled with easy-to-follow steps for assembling this decadent chocolate smash cake that’s perfect for birthdays and celebrations.
Let's dive into the deliciousness!
Essential Preparation Steps
Alright, let’s get this baking adventure rolling! before diving into the chocolatey goodness, we need to do some prep work, which the fancy folks call mise en place .
Basically, it means “everything in its place.” grab your ingredients and tools: flour, sugar, cocoa powder—you’ll want them on your counter so you’re not rushing around like a headless chicken.
Not a fan of a messy kitchen? me neither! get some bowls lined up and a good workspace cleared. i like to measure out everything first; it saves time and avoids any last-minute scrambling when you realize you're out of eggs.
Believe me, it’s a bummer to have to make an emergency run to the store in your flour-covered apron!
Prep Techniques
For this smash cake, whisking the dry ingredients is key. use a sifter to avoid any lumps that might muck up that smooth batter.
I used to skip this step, thinking it was a waste of time, but then i made a lumpy cake once—never again! also, make sure your butter for the frosting is softened to room temperature.
It’s like the warm-up act before the big show, and you want your frosting to be perfectly creamy.
Time Management
The total time for this glory is about 50 minutes , but let’s break it down. the prep? about 20 minutes tops.
And the baking? that’ll take 30-35 minutes . don’t forget about cooling time! let your cakes chill out for about 10 minutes before yanking them from the pans.
Organization Tips
As you work, keep a clean area. wash off your hands after handling sticky bits, keep your knives and spatulas handy, and don’t overload your counter.
Cooking is fun, but a chaotic space can lead to accidents—or worse, a forgotten ingredient!
Professional Cooking Method
Step-by-Step Process
Now, onto the good stuff! preheat your oven to 350°f (175°c) . grab those 9-inch round pans and give them a good greasing and flouring—this helps our cake not fall apart when it’s time to take it out.
Great tip i learned: line the bottom with parchment paper for an easy release.
Once that’s sorted, let’s get into the cake batter. sift all dry ingredients into a big bowl, then toss in the eggs, milk, oil, and vanilla.
Mix it up for about 2 minutes on medium speed, and don’t fret; it’ll look a little funny. careful now, the boiling water is next! pour it in slowly; the batter will be quite thin, but trust me—it’s part of the magic.
Temperature Control and Timing Precision
When pouring the batter into the pans, divide it evenly. they’ll bake for 30-35 minutes . the real test? stick a toothpick into the center.
If it comes out clean, you're golden! if not, pop it back in for a bit longer. remember, every oven has its quirks, so keep an eye on those cakes!
Success Indicators
While they bake, it’s a good time to whip up that mouthwatering chocolate buttercream. beat the softened butter until it’s creamy, then gradually mix in the powdered sugar, cocoa powder, salt, and heavy cream.
You want it fluffy—about 3 minutes on high should do it. you know you’ve hit the jackpot when it’s smooth and spreading like a dream.
Expert Techniques
Professional Methods
When it's time to assemble your smash cake, don’t skip the cooling process. letting those layers cool completely is crucial—frosting melted cake is just no fun! i learned that the hard way, and oh boy, it was a sloppy mess.
Precision Points
Now, when you frost, spread a nice thick layer of buttercream on the first cake layer before stacking on the second.
The goal? an even coating that can hold up to all those fun decorations you’ll add later. and don’t fret about perfection; a little messy can be charming!
Quality Checks
When you drizzle melted chocolate on top for decoration—stand back! it’s a beautiful sight as it drips down the sides.
If your chocolate clumps up, give it a quick stir and add a splash of cream; it should smooth right out.
Success Strategies
Troubleshooting Tips
If your cakes rise unevenly, don’t worry too much; you can level them off with a serrated knife. Not everyone gets it perfect the first time! I didn’t know this until I had a very “lopsided” cake for my niece’s birthday—let's just say it was a smash cake design fail the first round!
Quality Assurance
Taste as you go! if that frosting needs a little more cocoa or sugar, don’t hold back. a pinch of salt can also elevate it.
The key is to make something you love.
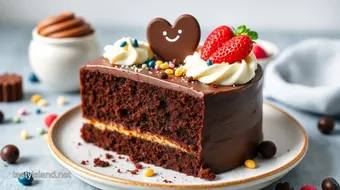
Perfect Results Guide
Your final creation should be tall and proud, layers of cake battling it out with rich frosting—truly a treat for smashing! just wait for your party guests to dive into this beauty; it’s a crowd-pleaser.
With these methods and a sprinkle of love (and perhaps a little chaos), your Chocolate Smash Cake will be the star of the celebration!
Keep those spatulas ready because we’ve got even more fun ideas coming your way in the next section!
Success Guaranteed Tips
When it comes to making a chocolate smash cake , having a few handy tips can be the difference between a tasty treat and an absolute masterpiece.
I've been there—overmixing, undercooking, you name it! first off, always use fresh ingredients . i learned this the hard way when an old bottle of baking soda turned my cake into a dense brick instead of the fluffy delight it was meant to be.
Your cake’s success truly hinges on the buttercream . a great technique? start with slightly softened butter—think of it as the goldilocks principle , not too hard, not too soft.
Oh, and when combining your powdered sugar and cocoa, do so on low speed; otherwise, you’ll end up with a confectionery blizzard in your kitchen! finally, remember, patience is key.
Let your cakes cool fully before frosting, or you’ll be stuck scraping gooey buttercream off a hot cake.
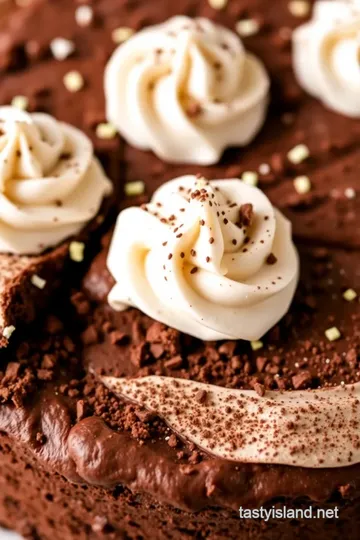
Perfect Presentation
Alright, let's dish about plating techniques —how you present your cake can elevate its appeal dramatically! once you’ve assembled your layered cake, the first step to a great presentation is making sure your cake stand or plate is clean.
I often wipe it down with a damp cloth for that extra polish (and yes, it makes all the difference).
For garnishes , consider fresh fruit, chocolate shavings, or even edible flowers. sprinkling some colorful candies on top can really embrace that festive vibe, especially with smash cake designs chocolate ! you want your cake to shout “celebrate!”! i’ve also found that playing with heights—like adding some candies on one side—adds a dynamic element to the visual.
So don’t shy away from making it look fun and inviting!
Storage and Make-Ahead
Now, let’s chat about how to keep your cake fresh and flavorful. if you're preparing your cake ahead of time, store it in an airtight container at room temperature for up to three days.
If you need it to last longer, you can absolutely freeze layers—just wrap them tightly in plastic wrap and then foil.
I promise, after a little thawing, they taste as good as fresh!
When it comes to reheating, that’s where some of my biggest mistakes have come from. i usually recommend defrosting cakes overnight in the fridge when you’re ready to serve them.
As for frosting , avoid microwaving, which can lead to melting—stick to letting it sit at room temp to soften.
Creative Variations
Don’t be afraid to make this cake your own! flavor adaptations are endless. you can swap out traditional chocolate with rich coffee or even espresso powder for a brilliant twist.
For dietary modifications, using almond milk instead of whole milk can also work wonders if you want a lighter cake without sacrificing flavor.
This can be a wonderful way to reflect the seasons too! How about adding some pumpkin spice to your cake in autumn or swapping a few ingredients in the frosting for a peppermint theme during the holidays? And, let’s not forget regional variations—adding a hint of orange zest can bring a delightful kick!
Complete Nutrition Guide
If you're a numbers person, you might be interested in the complete nutrition breakdown . each serving of this decadent chocolate smash cake packs a punch with about 480 calories.
It’s essential to balance your sweet treat with other nutritional choices throughout the day, so perhaps enjoy it with some fresh fruit on the side.
Speaking of health, chocolate actually has its benefits (thanks to flavonoids)! You could very well say you're indulging wisely. Just be sure to pay attention to portions—maybe bring in a before-and-after slice comparison to add some giggles at parties!
Expert FAQ Solutions
Before you dive into that baking adventure, here's a quick troubleshooting guide . if your cake doesn’t rise, did you double-check your leavening agents? the old baking soda/ baking powder dilemma strikes again! and what if your buttercream seems too thin? a sprinkle of powdered sugar should thicken it right up.
Did you know it’s common to overmix cake batter? trust me, i’ve done it! stick to the instructions, and that light and airy texture will come through.
For all those common concerns that pop up, a simple search or friendly kitchen chat with a seasoned baker can be your best friend.
Baking is as much an art as it is a science, and don’t forget—you’re allowed to divert from the recipe a bit! Explore and let that creativity shine!
In conclusion, making a chocolate smash cake is not just about following a recipe; it’s about diving into a joyous experience.
Your kitchen will become a magical realm of flavors where you can play, experiment, and have a blast with friends and family.
Get messy, have fun, and enjoy every bite! after all, baking is more than just flour and eggs; it’s about building memories.
Happy baking!
Chocolate Smash Cake Card
⚖️ Ingredients:
- 1 ¾ cups all-purpose flour
- 2 cups granulated sugar
- ¾ cup unsweetened cocoa powder
- 1 ½ teaspoons baking powder
- 1 ½ teaspoons baking soda
- 1 teaspoon salt
- 2 large eggs
- 1 cup whole milk
- ½ cup vegetable oil
- 2 teaspoons vanilla extract
- 1 cup boiling water
- 1 cup unsalted butter, softened to room temperature
- 3 ½ cups powdered sugar
- 1 cup unsweetened cocoa powder
- ½ teaspoon salt
- 2 teaspoons vanilla extract
- ½ cup heavy cream
- 4-5 chocolate bars (milk, dark, or a mix)
- Various small candies or treats (e.g., M&Ms, sprinkles, or gummy candies)
🥄 Instructions:
- Step 1: Preheat your oven to 350°F (175°C). Grease and flour two 9-inch round cake pans.
- Step 2: In a large mixing bowl, sift together the flour, sugar, cocoa powder, baking powder, baking soda, and salt.
- Step 3: Add the eggs, milk, vegetable oil, and vanilla extract to the dry ingredients. Mix on medium speed for about 2 minutes until combined.
- Step 4: Carefully stir in the boiling water (the batter will be thin). Mix until smooth.
- Step 5: Pour the batter evenly into the prepared cake pans.
- Step 6: Bake in the preheated oven for 30-35 minutes, or until a toothpick inserted in the center comes out clean.
- Step 7: Allow the cakes to cool in the pans for 10 minutes. Then, remove from pans and transfer to wire racks to cool completely.
- Step 8: In a large bowl, beat the softened butter with an electric mixer until creamy.
- Step 9: Gradually add the powdered sugar and cocoa powder, mixing on low speed until combined.
- Step 10: Add salt, vanilla extract, and heavy cream. Beat on high for 3 minutes, until the frosting is light and fluffy. Adjust with more heavy cream if the frosting is too thick.
- Step 11: Place one cooled cake layer on a serving plate. Spread a thick layer of chocolate buttercream over the top.
- Step 12: Carefully place the second cake layer on top and frost the top and sides with the remaining buttercream, smoothing it out as desired.
- Step 13: Melt the chocolate bars in a microwave or double boiler until smooth.
- Step 14: Pour the melted chocolate over the top of the cake allowing it to drip down the sides. Use a spatula to create swirls and patterns.
- Step 15: Top the cake with candies or treats of your choice for a fun and colorful appearance.
- Step 16: Use a knife or cake server to cut into the cake and allow everyone to smash into the delicious layers of cake and frosting.
Previous Recipe: Daily Delight Dates n' Cashew Cake: 7 Best Tips for a Guilt-Free Treat
Next Recipe: Easy cake pink cake: 10 Delightful Steps for a Fluffy Treat!