Ultimate Campfire Chili Recipe
Ever craved a hearty dish? My Cook Campfire Chili - Easy & Delicious comes straight from my Sunday kitchen adventures! It's perfect for camping or cozy nights in!

look into Into Comfort with Campfire Chili
Oh my gosh, let me tell you about the first time i made campfire chili ! i was camping with friends, and it was the kind of night where the chill in the air had us bundled in blankets, pondering life or whatever nonsense we could come up with.
We were craving something hearty, and i thought, why not whip up a batch of chili? i had no recipe, just a bunch of random ingredients, but that turned into one of the best meals of our trip.
In those moments, i realized just how much cook campfire chili - easy & delicious means. it’s more than just food; it’s a memory foundation.
So, grab your campfire cooking gear or a pot in your kitchen—let’s dive into this chili adventure!
A Taste of History
Chili isn't just for cozy nights or camping under the stars. it has roots stretched way back to cowboy days in the american west.
This simple yet robust dish, often made in one pot, came from the heart of outdoor cooking. i mean, what’s a cowboy without their chili, right? fast forward to today, and chili is everywhere—think tailgates, family barbeques, and even the cozy nights in when netflix is calling your name.
Time requirements? you're looking at about 45 minutes total. prep is quick, taking around 15 minutes, and then it cooks for about 30 minutes.
As for the difficulty level? honestly, it's easy-peasy! anyone can pull this off. cost-wise, chili is usually pretty budget-friendly, especially if you go for ground beef or even a vegetarian option with beans.
It’s also perfect for feeding a crowd with about 4 to 6 servings.
Chili Benefits Galore
You might be wondering, “what’s so special about this chili?” well, first off, it’s a fantastic comfort food recipe . you’ll get hearty warmth with every bite.
Packed with protein from ground beef or beans, this dish isn’t just filling; it’s also nutritious . plus, it’s super versatile.
You can easily whip up a vegetarian chili for those meat-free evenings. also, who doesn’t love a good chili topping? from cheese to sour cream, the options are endless!
This chili shines during special occasions, whether you’re gathering for a game day or sitting around a breakfire with friends.
Chili storage tips ? it tastes even better the next day! this meal is perfect for meal prep , too—make a batch, freeze some, and you’ve got quick dinner ideas ready for busy weekdays.
Oh, and let’s not forget the unique selling points. unlike a lot of similar recipes, this one is super adaptable.
Want to kick up the heat? throw in some jalapeños! prefer it thicker? just let it simmer longer. the possibilities are as endless as your cravings!
Get Started with Ingredients
Ready to get your hands dirty? the next part is a delightful journey into gathering ingredients. you'll need things like ground beef , chili seasoning, beans, tomatoes, and whatever else your heart desires.
Think of the colors and flavors blending together in that pot—they create something magical!
From here, we’ll slide right into defining what you need to get this chili cooking. trust me, whether you’re a campfire champ or making this in your cozy kitchen, this chili will surely become a family favorite.
Just picturing the steam rising and the aroma filling the air makes me hungry already. so, what are you waiting for? let’s gather those ingredients and create something delicious together!
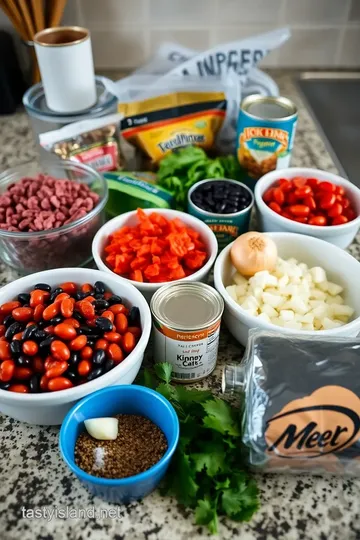
Essential Ingredients Guide
Let’s kick off this culinary adventure with the essentials for a delicious campfire chili . you know, i believe every great dish starts with quality ingredients.
Trust me—a little extra effort in selection goes a long way. so, what do you need in your pantry?
Premium Core Components
Start with detailed measurements —both in us & metric systems. for instance, when using 1 lb (450 g) of ground beef , make sure it’s 80/20 for that perfect balance of flavor and juiciness.
A killer tip: look for beef with a bright red color and a bit of marbling. it means more flavor!
For storage guidelines , ground beef usually lasts 1-2 days in the fridge and can go up to 4 months in the freezer.
Freshness matters, folks! when selecting, go for that bright red hue. if it’s brown, that might be a sign to steer clear!
Signature Seasoning Blend
Now that you got your core ingredients down, let’s chat about the signature seasoning blend . the backbone of your chili will be a mix of spices.
You can’t go without 2 tbsp (30 ml) of chili powder and 1 tsp (5 g) of cumin . these are the flavors that punch up your chili.
Consider adding some fresh herbs too. chopped cilantro can really brighten things up, while parsley brings a nice touch for garnish.
And let’s not forget the local influences—texans often lean toward a bolder flavor profile than traditional midwesterners.
Smart Substitutions
Oh, and here’s where it gets fun— smart substitutions . maybe you've got a vegetarian in the crowd? swap that ground beef for lentils or mushrooms .
Need something gluten-free? make sure your chili seasoning brand doesn’t sneak in any gluten. the best part? most of these swaps still deliver a hearty chili experience.
Forgot your kidney beans? no worries! use pinto beans instead. it’s all about improvisation—keeping it simple for those quick dinner ideas .
Cyclists prepping for the long haul will appreciate the nutritious meals they can prepare while camping; just find your favorite meal prep chili recipe and be on your way!
Kitchen Equipment Essentials
Let’s move on to the kitchen equipment essentials you’ll need to whip up this chili masterpiece. honestly, you don’t need to break the bank here.
A good large pot or dutch oven always works. check your local thrift shop for some vintage finds—those pots have stories to tell!
Use a wooden spoon for stirring; it adds a little rustic charm. and for those in the field, a simple can opener and a good knife will help you feel like a pro in outdoor cooking .
Entering the Comfort Zone
All of these tips and tricks lead us to the cozy comfort of your kitchen or a campfire setting. there’s something magical about cooking outdoors, feeling the breeze as you prepare a warm, family-friendly meal like campfire chili.
It’s hearty, fulfilling, and perfect for sharing.
Now that you've got your ingredients and essentials prepped, it’s time for the fun part—making this delicious one-pot meal . Get ready to dive into Cook Campfire Chili - Easy & Delicious that will warm your hearts and fill your bellies!
Stay tuned for step-by-step instructions coming up next!
Mastering the Art of Cooking: Professional Techniques for Every Home Chef
When it comes to whipping up a hearty chili or any other dish, knowing a few professional cooking methods can take your kitchen game to the next level.
Whether you’re aiming for that perfect campfire chili - easy & delicious or any other comfort food recipes, let’s break it down step by step!
Essential Preparation Steps
Let’s start with the basics. mise en place , fancy french for “everything in its place,” is your best friend.
Chop, measure, and gather all your ingredients before you start cooking. trust me, you don’t want to be scrambling for the chili seasoning once the meat is already browning!
Time management is another key player in the kitchen. set a timer for each task. this way, you won’t lose track of how long the beef’s been sizzling.
A quick 15 minutes of prep, and you’re ready to roll!
Stay organized, too. keep your workspace clutter-free. it’ll help you think and cook better. speaking of safety, always keep a cutting board under your ingredients.
No one needs a slip-up with a sharp knife!
Step-by-Step Process
Now, let’s make this happen. Here’s how to make your Campfire Chili :
-
Prepare Ingredients:
- Chop your onion, garlic, and bell pepper. Have ‘em ready to go!
-
Brown the Meat:
- Heat your pot over medium-high heat . Add 1 lb of ground beef and cook until it’s brown all over—about 5- 7 minutes .
-
Sauté Vegetables:
- Toss in your chopped veggies. Sauté until they soften, around 3- 4 minutes . You want the kitchen to smell incredible!
-
Add Spices and Tomatoes:
- Stir in 2 tbsp of chili powder and the diced tomatoes. Let those flavors mingle!
-
Simmer the Chili:
- Pour in 1 cup of beef broth and simmer uncovered for about 20 minutes . This is where the magic happens.
-
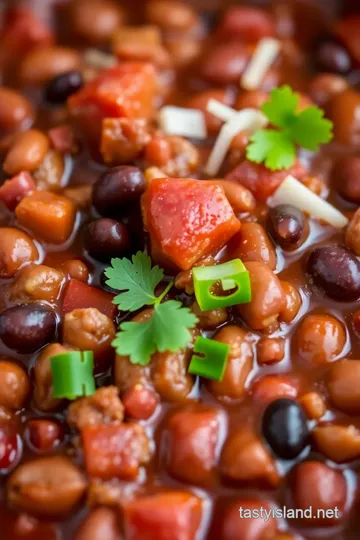
Add Beans:
- Toss in your drained kidney beans and warm ‘em up for 5 more minutes .
-
Taste and Adjust:
- Seriously, taste it! Add more salt, pepper, or maybe a little sugar if it's too acidic.
-
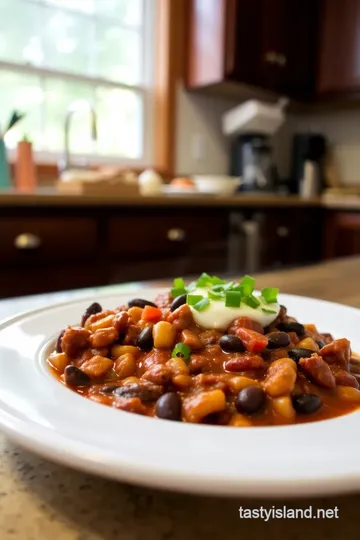
Serve:
- Ladle it into bowls and go wild with chili toppings like shredded cheese or chopped green onions!
Expert Techniques
Alright, folks, want your chili to be the star of the show? Let’s talk expert techniques.
Make sure that meat gets nice and browned because that’s where the flavor is! if you’re using canned tomatoes, don’t forget to include the juice; it’s liquid gold! and hey, if your chili seems too thin? just simmer uncovered a bit longer.
Keep an eye on those timing points! a minute can mean the difference between a flop and masterpiece. visual cues matter, too.
The oil should be separating when your chili is done bubbling away.
Success Strategies
Now, it’s time for the fun part—avoiding common mistakes! don’t rush the browning stage; it builds flavor. for any spicy chili recipe , remember that it’s easy to spice up, but hard to dial it down.
Add spices gradually, and always taste.
If you want the perfect results, allow your chili to rest before serving. the flavors will become best buds overnight—seriously, it's like chili magic! you can even make this dish ahead of time and freeze leftovers.
Additional Information
In conclusion, mastering those professional cooking methods makes the journey to create that easy chili recipe smoother and more enjoyable.
Plus, who doesn’t love a big bowl of delicious chili with cornbread on a chilly evening? so, gather your friends and family around this robust dish, and watch as everyone digs in.
Trust me, it’ll be a hit!
As a reminder, don’t skimp on those chili storage tips for meals later in the week. and if you’re on the road with the fam, consider these nutritious meals for camping .
With the right techniques and a dash of creativity, every recipe you try can be a shared triumph. happy cooking!
Pro Tips & Secrets for Cook Campfire Chili - Easy & Delicious
Oh my gosh, if you’re about to dive into making cook campfire chili - easy & delicious , let me share some insider tips.
These nuggets of wisdom can take your chili from “meh” to “wow!” faster than you can say “cowboy chili.”
First things first, brown the meat properly ! this step is crucial. seriously, when you let that ground beef sizzle to perfection, it’s like you’re opening up a treasure chest of flavor.
Don’t rush it! about 5- 7 minutes should do the trick.
Next, you wanna make sure your spices sing . i always say, "taste as you go." if you think it needs a pinch of sugar, toss some in! it can help balance out that acidity from the tomatoes and bring out the depth.
Speaking of spices, after i sprinkle in my chili seasoning, i like to let it sit for a bit . this gives those flavors time to mingle, kind of like inviting your friends over and letting them chat a while before serving snacks.
Perfect Presentation is Key
Let’s chat about how to make that chili pop on the plate. plating matters! grab a ladle and dollop that chili into your bowl with a flair.
It’s all about the visuals, right? a sprinkle of shredded cheese on top? yes, please! and don’t underestimate the power of garnish .
Chopped green onions or a dollop of sour cream can elevate your chili from basic to instagram-worthy.
Want a little something extra? try color combinations ! you can throw in diced avocados or some colorful bell pepper strips as a topper.
It adds not only taste but also that eye-catching appeal.
Storage & Make-Ahead Madness
Hey, meal prep warriors! chili is a game-changer for storage . it’s one of those hearty soups that tastes even better the next day because all those flavors get a chance to meld together like old friends catching up.
If you know you’re gonna need nutritious meals for camping or just busy weeknights, whip up a big batch and store it.
Wanna freeze it? that’s cool too! make sure it’s cooled first, then stash it in an airtight container. you can keep that flavorful chili delicious for up to three months .
And when you're ready to eat, just reheat on the stove or microwave , and voilà! dinner is served.
Creative Variations Galore
You're feeling adventurous? let’s add a twist or two. how about a vegetarian chili ? swap out the ground beef for lentils or a mix of mushrooms.
Trust me; it’s just as tasty. or if you're aiming for something spicy, toss in some diced jalapeños or a sprinkle of cayenne pepper for that extra oomph!
Seasonal twists are fun too! in the fall, add some sweet potatoes or black beans to amp up the comfort factor.
If you're feeling really creative, regional variations can come into play, like a southwest-style chili with corn and black beans.
Complete Nutrition Guide
Let’s get down to the nitty-gritty of why chili is so darn good for you. this dish is packed with protein-rich meals thanks to that hearty ground beef.
It’s super satisfying without making you feel like you just ate a brick. the beans bring in fiber, keeping you full longer and helping in digestion.
And don’t overlook the health benefits of spices! chili powder and cumin can kick your metabolism into gear. just remember, like everything in life, portion control is key.
Aim for about 1.5-2 cups per serving, especially if you’re pairing it with cornbread.
Expert FAQ Solutions
Now, let's tackle some common questions. a lot of folks ask how to adjust the seasoning if it’s too bland.
Taste, taste, taste! add a little more chili powder, or even a splash of hot sauce. not enough beans? go ahead and toss a can of black beans in there!
If your chili comes out too watery, don’t panic! simmer it uncovered for a few extra minutes. and if you need inspiration, look into making chili with beans or even experimenting with stew recipes .
So friend, whether you're gathered around the campfire or cozied up at home, chili is the ultimate comfort food recipe .
With some practice and these pro tips, you’ll be the chili-making champion in no time. grab your ingredients, gather your crew, and let’s make this homemade chili that everyone will be raving about!
Ultimate Campfire Chili Recipe Card

⚖️ Ingredients:
- 1 lb ground beef (preferably 80/20)
- 1 medium onion, chopped
- 2 cloves garlic, minced
- 1 bell pepper, diced (any color)
- 1 can (14 oz) diced tomatoes, undrained
- 1 can (15 oz) kidney beans, drained and rinsed
- 1 cup beef broth (or water)
- 2 tbsp chili powder
- 1 tsp ground cumin
- ½ tsp smoked paprika
- Salt and pepper to taste
- Optional toppings: shredded cheese, sour cream, chopped green onions, tortilla chips
🥄 Instructions:
- Step 1: Chop the onion, garlic, and bell pepper. Drain and rinse the kidney beans.
- Step 2: Heat the pot over medium-high heat. Add ground beef and cook until browned, breaking it apart with a spoon (about 5-7 minutes).
- Step 3: Add chopped onion, bell pepper, and garlic to the pot. Sauté until vegetables are softened (about 3-4 minutes).
- Step 4: Stir in chili powder, cumin, smoked paprika, salt, and pepper. Add diced tomatoes with their juice and mix well.
- Step 5: Pour in the beef broth and bring the mixture to a simmer. Reduce heat to medium-low and let simmer uncovered for 20 minutes.
- Step 6: Stir in the rinsed kidney beans and cook for an additional 5 minutes until heated through.
- Step 7: Taste the chili and adjust seasoning if necessary.
- Step 8: Ladle into bowls and top with optional toppings as desired.
Previous Recipe: Ultimate Sautéed Shrimp Citrus Salad | Fresh & Zesty: 5 Delicious Secrets
Next Recipe: How to Make Grilled Pineapple Skewers - Sweet & Juicy Treat