Decadent Yodel Cake with Fluffy Chocolate Cream Filling
Have you ever craved the ultimate chocolate dessert? This Yodel Cake recipe, inspired by my grandmother's kitchen, is a rich, fluffy dream that will satisfy all your sweet tooth desires. Let's bake together!

look into into the Decadence of Yodel Cake
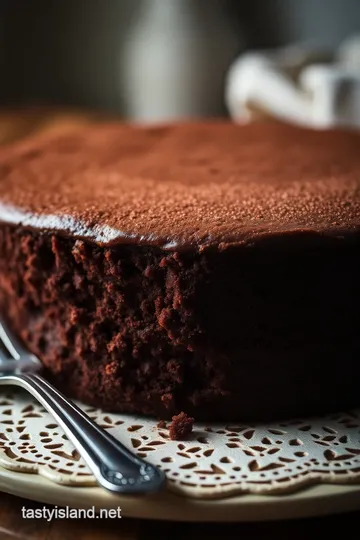
Have you ever been hit by a sudden craving for something sweet, rich, and downright delightful? picture this: your kitchen filled with the aroma of baking chocolate, and there, waiting for you, is a moist chocolate cake layered with airy chocolate cream filling.
Yup, i'm talking about the ever-popular yodel cake . trust me, one slice will whisk you right back to childhood birthday parties and family celebrations.
Honestly, who doesn’t love the gooey goodness of chocolate?
A Slice of History
Let me take you back for a sec. the yodel cake has roots that trace back to the classic swiss roll cakes.
Those rolled wonders were all the rage, but we’ve made it even better! fast forward to today, and the yodel cake recipe has become a staple for any chocolate lover or sweet tooth looking for a celebration dessert.
It’s the kind of cake that can make a random wednesday feel like a party, and honestly, there's no wrong time for a piece of moist chocolate cake!
When it comes to baking, you don’t have to be a pro in the kitchen to whip this up. i mean, it’s got a medium difficulty level with a few baking techniques involved, like mastering those egg separation techniques to whip egg whites into fluffy peaks.
But hey, that's part of the fun! it might take around two hours from start to finish—just enough time to put on some music and let the good vibes roll.
Budget-Friendly Fun
Okay, let’s talk dollars and cents. making this layered chocolate dessert won’t break the bank. you might have a few ingredients already, like flour and sugar.
The total cost is pretty reasonable considering you get a whole cake that serves ten people ! just think of all the smiles you'll get—definitely worth it!
Why Yodel Cake Rocks!
Now let’s get into what makes this cake so special. first off, it’s packed with health benefits (eh, maybe not health food, but you know what i mean—it's better than a candy bar!).
It's made with high-quality cocoa and fresh cream, giving you that rich chocolate flavor you crave without all the artificial junk.
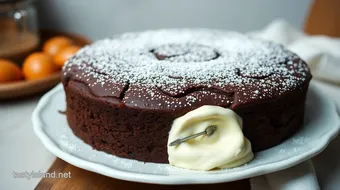
Not only is this cake perfect for birthdays, but it also shines on occasions like anniversaries, holidays, or just a random “I deserve cake” kind of day! And let's be real—who wouldn’t want to show off a gorgeous homemade chocolate cake topped with silky chocolate ganache ? The presentation ideas are endless!
Plus, here's a little secret: this yodel dessert can cater to those who are gluten-free! simply swap out regular flour for a gluten-free blend, and you have a crowd-pleaser everybody can dive into.
Honestly, that’s what i love about this cake—its adaptability means you can cater to anyone's dietary needs while keeping the chocolately goodness intact.
Speaking of ganache, if you feel adventurous, you can experiment with chocolate flavor variations and complete the cake’s layers with whipped cream filling—it turns this classic into a creamy chocolate dessert masterpiece!
Turning to the Ingredients
Alright, enough chatting about how amazing this yodel cake is; let’s get cooking! gather your ingredients and let’s dive deep into making this rich chocolate recipe! you'll be surprised by how simple it really is once you get going.
Stay tuned because I’ll walk you through every step of the way, making sure that your cake assembly is on point and your ganache topping shines! So grab your mixing bowls and get ready, because a decadent Yodel Cake is about to become your new favorite dessert!
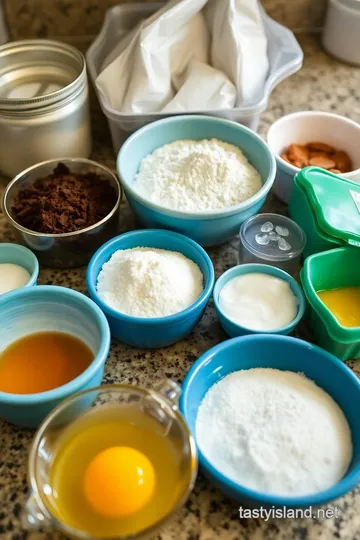
Essential Ingredients Guide
So, you’re ready to dive into baking, huh? whether you're whipping up a classic yodel cake or embarking on a new chocolate dessert adventure, knowing your ingredients is key.
Let’s break down some essential components that will set you up for success in the kitchen.
Premium Core Components
First things first—let’s talk about quality ingredients . you want to opt for the best to make that moist chocolate cake you’ve been dreaming of.
When shopping, look for indicators that reflect quality. for example, always check the cocoa powder —it should be a rich dark brown, not faded or dusty.
Now, where are you storing those goodies? gotta keep everything fresh! here’s a tip: store flour in an airtight container in a cool place, like a pantry.
You’d be amazed how fast it can go stale. shelf life for most dry ingredients is about 6-12 months, but check for funky odors—that’s your nose telling you it’s time to toss.
Signature Seasoning Blend
Okay, let’s spice things up! a great cake isn't just about the cake itself; it’s the signature blend of spices and herbs that takes it over the top.
Classic salt is a must. it enhances flavor like no other. but don’t stop there—think about adding a pinch of cinnamon , or maybe even a dash of espresso powder for that depth when you’re making a chocolate roll cake.
Then there’s the herbs and aromatics —like using vanilla extract. a real vanilla bean? now we’re talking! and don't forget about regional alternatives; maybe you want your yodel cake to have a little twist with some local flavors.
Smart Substitutions
Now, life happens, right? you may run out of an ingredient or your friends have dietary restrictions—don’t sweat it! there are always smart substitutions .
For example, if you’re out of eggs, unsweetened applesauce can work wonders in many recipes. seriously, don’t underestimate the power of common pantry ingredients.
Got a gluten-free friend? not a problem! you can swap all-purpose flour for gluten-free options. and remember, in cake assembly instructions, weigh your alternatives.
You might discover a new favorite in a creamy chocolate dessert you weren’t even expecting!
Kitchen Equipment Essentials
Finally, let’s get to the tools of the trade. a well-stocked kitchen is crucial. you don’t need a million gadgets, but you’ll want a few must-have tools like mixing bowls, a good electric mixer, and rubber spatulas—they transform your mixing experience.
And if you're improvising with what you've got? no stress! a whisk can serve instead of an electric mixer in a pinch.
Just be prepared for a mini arm workout; that'll get your heart racing faster than the cake baking time!
Wrapping It Up
Alright, you now have the essential ingredients and tools to whip up a delightful yodel cake. but remember, the journey doesn’t stop at just knowing what to use; it's about experimenting and having fun in the kitchen.
So, roll up your sleeves, unleash your inner baker, and let’s move into those delicious instructions for assembling your decadent treat next.
You’re going to crush it!
Mastering Professional Cooking: Your Guide to Cooking Like a Star
Cooking can feel like a dance, right? you want everything flowing smoothly, with ingredients falling into place like an old favorite song.
And if you are ready to step it up a notch, professional cooking methods can help. let's dive into some essential preparation steps, a handy step-by-step process, expert techniques, and strategies for culinary success.
Essential Preparation Steps
First things first, let's talk mise en place . this french term translates to “everything in its place.” it means before you start cooking, gather and prep all your ingredients.
Chop those veggies, measure your spices, and have everything within arm’s reach. this helps you cook efficiently and avoid those last-minute panics.
Time management is like keeping a rhythm while cooking. set up a comfortable kitchen space and watch the clock. for instance, if you're whipping up a decadent yodel cake, you might need 25 minutes for prep followed by 30 minutes for chilling.
Planning out your timeline helps things run smoothly.
Next up, organization strategies. this can be as simple as grouping similar ingredients together. baking a chocolate roll cake? keep your dry ingredients in one bowl and the wet in another.
This not only speeds things up but also keeps your mind focused.
And hey, don’t forget about safety considerations . Keep things clean, and use separate cutting boards for veggies and proteins. Less chance of cross-contamination means better food for all, and you avoid the dreaded food poisoning!
Step-by-Step Process
Cooking doesn’t have to be chaotic. Following a structured plan can take your dishes from good to irresistible. Here’s a handy list of clear, numbered instructions:
- Preheat your oven to 350° F ( 175° C) .
- Prepare your cake pans : grease them if you’re baking a classic Yodel cake. Trust me, you don’t want to wrestle with a stuck cake later.
- Mix your dry ingredients together in one bowl.
- Separate your egg yolks from the whites. This is key! The egg whites give your cake that light, airy texture.
- Beat those egg yolks with some sugar until they are pale and fluffy.
- Combine your wet and dry ingredients.
- Whip the egg whites until they form stiff peaks, then gently fold them into your batter. This is where the magic happens.
And remember: timing and temperature matter! bake your cake for 25- 30 minutes or until a toothpick comes clean from the center.
It’s all about those visual cues ; a risen, golden top means you’re headed in the right direction!
Expert Techniques
Now, let’s get into some expert tips, shall we? a professional technique often used is keeping an eye on quality checkpoints .
As you mix, taste! it’s not just for savory dishes. chocolate cake layers can be beefed up by adjusting flavors.
Think about adding a splash of vanilla or even a hint of coffee to deepen that rich chocolate flavor!
Troubleshooting tips are your best friends, too. Did your ganache not come out right? Maybe it seized while cooling. No worries! Just add a bit of hot cream to rescue it.
Success Strategies
We all mess up sometimes, so avoid common mistakes like skipping the chilling times or not following cake assembly instructions. Your Yodel cake will thank you!
Quality assurance tips are simple: check your ingredients’ freshness. And when it comes to serving? Consider pairing your Yodel dessert with whipped cream filling and the most luscious chocolate ganache topping.
If you're making this for a special occasion or a birthday cake, think about some make-ahead options . you can prepare the cake layers a day ahead and chill them covered.
Then your assembly and ganache topping become a breeze.
Wrapping it Up with Additional Information
Once you’ve mastered the art of the yodel cake, you can experiment with variations and explore deeper into the world of chocolate dessert recipes.
Remember, whether you're celebrating something special or just satisfying that sweet tooth, cooking should definitely feel rewarding. use all those techniques and tips we've discussed to grace your table with a show-stopping chocolate dessert that will have everyone swooning.
So go ahead, take your cooking to the next level, and remember — practice makes perfect. Happy baking, friends!
look into Deep into Yodel Cake Goodness
If you're anything like me, dessert is life! i mean, who doesn't love a sweet treat that makes your taste buds dance? today, we’re digging into an all-time fave, yodel cake —a chocolate lover's dream come true.
So let's break down some additional recipe information to help you nail this delightful dessert, shall we?
Pro Tips & Secrets from My Kitchen to Yours
Oh my gosh, where do i even start? first off, when whipping those egg whites for the cake, make sure they're at room temperature.
Seriously, you'll get a better volume that way—trust me on this one. if you want to save time, prep your chocolate cream filling while the cake is baking.
Multitasking makes life easier, you know?
Now, for that rich ganache topping , chop your chocolate finely. this helps it melt beautifully when you pour that hot cream over it.
And hey, if you want that cake to scream “look at me!” when it hits the table, consider adding a drizzle of melted chocolate on top or some freshly whipped cream around the edges.
That visual appeal will blow your guests away!
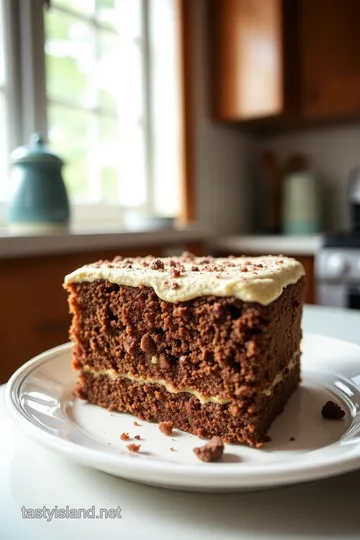
Perfect Presentation: Make It Instagram Worthy
Let’s talk about plating techniques . i love to layer my cake slices on a pretty plate, maybe with a sprinkle of cocoa powder on the side, and a couple of fresh berries tossed in for color.
Remember, we eat with our eyes first! why not go for a pop of color by contrasting the dark chocolate with some bright raspberries? it’s all about those color combinations.
When it comes to garnish ideas , whipped cream is always a winner. pipe some on top of your yodel dessert, and you’ve got yourself a masterpiece.
Just be sure to slice your cake smoothly; a clean edge creates that neat look that always impresses.
Storage & Make-Ahead: Beat the Clock
Now, if you’re making this yodel cake ahead of time—good thinking! you can store your leftover slices (if there are any—please!) in an airtight container in the fridge for about 3-4 days .
If you want to keep it fresher longer, wrap and freeze it. just make sure to let it chill for at least 30 minutes before serving to get that ganache nice and set.
When you’re ready, just thaw in the fridge overnight. easy peasy!
Creative Variations: Switch It Up!
Okay, this is where it gets fun! if you’re feeling adventurous, try swapping out the chocolate flavor variations . you could use a vanilla cream filling instead of chocolate for a lighter touch.
Want to mix it up for the seasons? toss in some crushed peppermint for a festive flair during the holidays! there’s no limit to the cake decorating ideas you can experiment with.
And hey, let’s not forget about dietary considerations—try a gluten-free Yodel cake using a 1:1 gluten-free flour blend. Your friends with dietary restrictions will thank you!
Complete Nutrition Guide
Now, let’s get real for a second—desserts are usually packed with indulgence (and calories!). a slice of this moist chocolate cake is around 380 calories .
But it’s not just all about the calories. the health benefits of using whole ingredients like high-quality cocoa powder can make you feel a little less guilty.
Plus, chocolate is rich in antioxidants—so treat yourself in moderation!
Expert FAQ Solutions: Got Questions?
You might be wondering, “why isn’t my cake rising?” oh, buddy, i’ve been there! make sure you are using fresh baking powder and not mixing your batter too long.
Also, how do you get a clean slice? chill that bad boy first! trust me, waiting just a little can save you from a jumbled-up mess of cake.
At the end of the day, making a decadent yodel cake is all about enjoying the process. it’s a celebration dessert that brings everyone together, whether it’s a birthday party or just a regular tuesday night.
So roll up your sleeves and get ready to impress your family and friends with a layered chocolate dessert that'll have them coming back for seconds.
Happy baking!
Decadent Yodel Cake with Fluffy Chocolate Cream Filling Card
⚖️ Ingredients:
- 1 cup (125g) all-purpose flour
- ½ cup (50g) unsweetened cocoa powder
- 1 tsp baking soda
- ½ tsp baking powder
- ¼ tsp salt
- 3 large eggs, separated
- ¾ cup (150g) granulated sugar
- ½ cup (120ml) buttermilk
- ½ cup (120ml) vegetable oil
- 1 tsp vanilla extract
- ½ cup (120ml) heavy cream
- 1 cup (125g) powdered sugar
- ½ cup (50g) unsweetened cocoa powder
- 1 tsp vanilla extract
- 8 oz (225g) bittersweet chocolate, chopped
- 1 cup (240ml) heavy cream
🥄 Instructions:
- Step 1: Preheat the oven to 350°F (175°C).
- Step 2: Prepare cake pans by greasing and lining with parchment paper.
- Step 3: Whisk dry ingredients (flour, cocoa powder, baking soda, baking powder, salt) in a bowl.
- Step 4: Separate egg yolks and whites in two large bowls.
- Step 5: Beat egg yolks with ½ cup sugar until pale and fluffy; add buttermilk, oil, and vanilla.
- Step 6: Combine dry ingredients into the wet mixture until just incorporated.
- Step 7: Whip egg whites in a separate bowl until soft peaks form; gradually add remaining sugar until stiff peaks form.
- Step 8: Fold egg whites into the batter gently.
- Step 9: Divide the batter evenly between prepared pans and bake for 25-30 minutes.
- Step 10: Cool the cakes in pans for 10 minutes, then transfer to cooling racks.
- Step 11: Prepare the filling by whipping heavy cream until soft peaks form; fold in cocoa, powdered sugar, and vanilla.
- Step 12: Assemble the cake by spreading the filling between the layers.
- Step 13: Make ganache by heating cream until steaming; pour over chopped chocolate in a bowl and stir until smooth.
- Step 14: Cover the cake with ganache, smoothing it evenly.
- Step 15: Chill the cake for at least 30 minutes to set before serving.
Previous Recipe: My Sunday Morning: Velvety kind of cold brew coffee with foamy bubbles
Next Recipe: My Grandmother's Electric Skillet Secrets: 5 Disadvantages to Consider