Heartfelt Chocolate Cake
Discover the ultimate heart for cake with this Heartfelt Chocolate Cake recipe, perfect for celebrations with rich flavors and delightful ganache frosting.

- Have You Ever Wondered What Makes a Cake Truly Special?
- A Piece of Culinary History
- The Secrets Behind Perfect Heartfelt Chocolate Cake
- What Makes This Recipe Special
- Health and Nutrition Highlights
- Recipe at a Glance
- Quality Ingredients Breakdown
- Foolproof Cooking Steps for Heartfelt Chocolate Cake
- Success Guaranteed Tips
- Perfect Presentation
- Storage and Make-Ahead
- Creative Variations
- Complete Nutrition Guide
- Expert FAQ Solutions
- Recipe Card
Have You Ever Wondered What Makes a Cake Truly Special?
Picture this: you're at a celebration, and the cake arrives. it’s not just any cake; it’s a heartfelt chocolate cake.
As the rich aroma wafts through the air, it beckons you closer. what is it about this cake that promises not just flavor but an experience? is it the moist layers drenched in velvety ganache or perhaps the joy it brings to those sharing it? if you’re curious about what sets this cake apart, and why it’s ideal for romantic occasions or festive gatherings, then keep reading!
This recipe is a delightful mix of ease and elegance. in just 50 minutes —with 20 minutes of prep and 30 minutes of baking—you can whip up a cake that looks and tastes like it came straight from a bakery.
It’s rated a medium difficulty level , making it accessible to home bakers who are looking to impress, whether it's for a birthday or an anniversary.
Trust me, your loved ones will definitely think you have a heart for cake after they taste this!
A Piece of Culinary History
The heartfelt chocolate cake isn’t just a treat; it has roots tracing back to english baking traditions. chocolate has been a beloved ingredient in desserts since the 17th century.
From the decadent chocolate tortes served in grand english houses to today’s layered cakes, chocolate desserts have stood the test of time.
This recipe carries that rich culinary heritage forward.
What sets this cake apart? oh, let me count the ways! first off, its unique flavor combinations —think layers of chocolatey goodness paired with a luscious ganache, leaving you with a soft yet rich mouthfeel.
Then there’s the fun of decorating! whether it’s sprinkles, fruits, or even elegant edible flowers, the finishing touches can be as creative as you wish.
What’s even better? it’s not just a feast for the taste buds; it’s also a delight for the eyes, perfect for those special moments where you want to impress.
The Secrets Behind Perfect Heartfelt Chocolate Cake
Now let's get into those little secrets that have people raving about this cake! its fascinating origin story lies in the heart of celebration—the classic chocolate dessert has found its way into homes across generations.
This cake taps into the emotions of those gatherings, becoming a symbol of togetherness and joy. plus, in modern times, its popularity has exploded, becoming a go-to recipe for those searching for romantic dessert ideas.
Who doesn’t love a dessert that’s not only delicious but also makes you feel connected to tradition? this cake carries with cultural significance , often gracing tables during birthdays and valentine’s day celebrations.
You can taste the love baked into it, one layer at a time.
What Makes This Recipe Special
Let’s talk about the taste explosion waiting for you! the combination of flavors in this cake is nothing short of heavenly.
Using boiling water in the batter might seem strange, but it actually enhances the chocolate flavor and creates a light and fluffy cake texture .
It’s truly a foolproof technique i learned the hard way after trying to skip it—what a disaster that turned out to be!
For those who worry about cake baking time or achieving that perfect ganache frosting, i’ve got you covered! this expert-tested method has been perfected over time, with straightforward steps you can follow.
And if you’re someone who usually runs out of time (like yours truly), don’t fret! there are time-saving tips i’ll share with you that can be game-changers.
Health and Nutrition Highlights
Of course, who says you can’t indulge while being mindful? the heartfelt chocolate cake contains key nutritional benefits. for example, it’s rich in protein from eggs and has healthful fats from the vegetable oil.
If you’re looking for dietary considerations, i’ll throw in options for gluten-free cake recipes and discuss possible sugar substitutions that won’t compromise on that beautiful flavor we crave.
Believe it or not, enjoying a slice of this cake can also lead to happiness! eating rich chocolate desserts has been shown to encourage the release of endorphins, so treat yourself without the guilt.
Recipe at a Glance
Before we roll up our sleeves and dive into the ingredients, here’s a quick snapshot of what you’re getting into:
- Total Preparation Time: 20 minutes
- Cooking Time: 30 minutes
- Total Time: 50 minutes
- Serving Size: 8 generous slices
- Difficulty Level: Medium
Now, let’s move on to the fun part! grab your apron because it’s time to gather the ingredients, which i promise will be worth it once you savor that first divine bite of cake.
Happy baking!
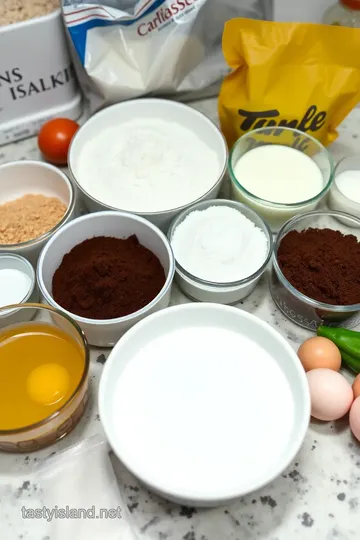
Quality Ingredients Breakdown
When it comes to baking a heartfelt chocolate cake, using quality ingredients is like putting your heart for cake into each layer.
Let’s break down what you need for this delightful treat, starting with the essentials that will help you create a moist chocolate cake that folks will rave about.
Premium Core Ingredients
-
All-purpose flour (1 ¾ cups) : look for a finely milled flour. i always reach for the one in a resealable bag—you know, the type where you can almost hear the freshness.
When selecting, check for a soft texture—if it feels gritty, keep looking!
-
Granulated sugar (1 ¾ cups) : regular sugar works fine, but i’ve used raw sugar for a subtle caramel flavor.
Make sure it’s dry and free from clumps. store it in an airtight container so it doesn't turn into a sticky brick.
-
Unsweetened cocoa powder (¾ cup) : this is where the magic happens! i usually grab a good brand, which feels rich and dark—trust me, it makes a world of difference.
Store this in a cool, dark cupboard to keep it from going stale.
-
Baking powder & baking soda (1 ½ teaspoons each) : always double-check read the expiration dates. i learned this the hard way; my cake was flat as a pancake once because of old leavening agents.
Store these in a dry spot to keep them potent.
-
Salt (1 teaspoon) : A must for balancing flavors! Use fine sea salt for better dissolution. I keep an extra small container handy for easy access—it's good to have when you need a pinch!
-
Eggs (2 large) : fresh is best! i prefer to use organic eggs; they definitely enhance the flavor and color of the cake.
Keep 'em in the fridge but bring to room temp before mixing for that light and fluffy texture .
-
Whole milk (1 cup) : opt for full-fat milk if you want that creamy goodness. just ensure it’s not past the expiration date.
No one wants sour cake batter—yikes! keep it sealed, and use it right after opening for the best flavor.
-
Vegetable oil (½ cup) : this keeps the cake moist and tender. i used to use olive oil, but it changes the flavor.
Stick with neutral oils. store it in a cool place, away from sunlight.
-
Vanilla Extract (2 teaspoons) : Go for pure vanilla rather than imitation; it makes a noticeable difference. Store it in a cool cupboard, and it’ll last for ages!
-
Boiling water (1 cup) : this sounds odd, but trust me, it makes the cake sooo moist! just boil enough water and let it cool for a second before adding to your batter.
Signature Seasoning Blend
Now, let's chat about that rich chocolate ganache that will crown your cake.
-
Heavy Cream (1 cup) : Go for the thick stuff. It’s what makes that ganache dreamy! Store it in the fridge, but check for freshness before using.
-
Semi-sweet chocolate (8 oz, chopped) : the better the chocolate, the better the ganache. i typically buy good-quality chocolate bars and chop them myself.
Make sure to store it properly in a cool place, wrapped up tight.
-
Butter (1 tablespoon) : standard unsalted butter is what you want here. i like to keep mine in the fridge but always set it out a bit before using; room temperature butter blends smoother.
Smart Substitutions
Sometimes, you may find you don’t have everything on hand, and that’s okay!
-
Flour : If you’re avoiding gluten, just swap in a gluten-free flour blend. It’s surprisingly good these days!
-
Sweetener : Coconut sugar or agave syrup work in a pinch. Just adjust your measurements accordingly.
-
Eggs : Flaxseed meal makes a good egg substitute too—mix 1 tablespoon with 2.5 tablespoons of water and let it sit for a few minutes.
Kitchen Equipment Essentials
Now, don’t you worry about the gadgets needed. Here are a few must-haves.
-
Mixing Bowls : A good set that nests together makes life easier! Trust me; you’d rather scramble around looking for different sizes at the last minute.
-
Whisk/Electric Mixer : A sturdy hand whisk can work in a pinch, but if you have an electric mixer, it’s a game-changer for that fluffy batter!
-
Cake Pans (9-inch) : Getting good quality, non-stick pans means less cleanup time—because nobody wants a cake disaster, right?
-
Spatula : A good silicone spatula is essential for scraping down the sides and transferring the batter without losing too much.
Pro Ingredient Tips
A few secrets I learned over the years while dealing with baked goods...
-
Always check freshness—not just for flavor but for safety. An old egg or expired milk can ruin your whole vibe.
-
Storage solutions : keep your dry ingredients in airtight containers; it makes a world of difference in freshness. i also put labels on mine—it’s a small effort but helps keep my pantry organized.
-
Money-Saving Tips : Buy in bulk! You’ll save money on flour, sugar, and cocoa powder. Just be sure to store them right!
Alright, friends, now that we’ve got the ingredients down, let’s dive into the instructions! i can't wait to share how to bring this cake to life.
Hang tight; it’s going to be delicious!
Foolproof Cooking Steps for Heartfelt Chocolate Cake
This heartfelt chocolate cake is everything you want in a dessert—rich, moist, and oh-so-chocolatey. getting it just right can seem a bit daunting, but fear not! i've got your back with these foolproof cooking steps.
Let’s dive into the details.
Essential Preparation Steps
Mise en place: start by gathering all your ingredients in one spot. it might sound basic, but trust me, it saves time and helps avoid that last-minute scramble.
You’ll need 1 ¾ cups of flour, 1 ¾ cups of granulated sugar, cocoa powder, baking powder, baking soda, and quite a few other goodies.
Prep techniques: measure ingredients carefully. i have learned the hard way that a heaping scoop of flour can lead to a dry cake, and nobody wants that.
Use a kitchen scale if you've got one—it's a game changer. also, go ahead and break out the whisk to combine your dry ingredients first.
It makes everything blend better.
Time management: give yourself about 20 minutes to prep before you even think about turning on the oven. this is your "zen time," where you can bond with your ingredients.
Once your cake is in the oven, you’ve got about 30 minutes to tidy up, enjoy a cup of tea, or sneak a piece of chocolate!
Organization tips: keep your workspace tidy. i often find that when i’m in the zone, i'll create a mini battleground of baking supplies.
However, cleaning as i go keeps my mind clear, making it much less stressful at the end.
Professional Cooking Method
Step-by-Step Process:
-
Preheat the oven: setting the oven to 350°f (175°c) is your first step to success. don’t skip this! prepare two 9-inch round cake pans by greasing and flouring them or lining them with parchment paper.
-
Prepare the cake batter: in a large bowl, mix your dry ingredients—flour, sugar, cocoa powder, baking powder, baking soda, and salt.
Whisk it all together until it’s even. it’s like making a dry jungle, all wild and airy before adding the wet stuff.
-
Add wet ingredients: time for the fun part! add in the eggs, whole milk, vegetable oil, and vanilla extract. mix it all together on medium speed for about 2 minutes.
The batter should be smooth and luxurious.
-
Add boiling water: yes, you’re adding boiling water! it’s a little strange, but it thins the batter for a light, fluffy cake.
Carefully stir it in until it's just combined. avoid over-mixing here; trust me, i’ve been there.
-
Bake the cakes: divide the batter evenly between your prepared pans. sheesh, this is where the patience part comes in—bake for 30-35 minutes.
Use a toothpick to check; if it comes out clean, you’re golden.
-
Cool the cakes: let the cakes chill in the pans for about 10 minutes. i once tried to remove them too early and totally wrecked one.
A big bummer. after the pans, turn them onto wire racks to cool completely.
-
Make the ganache: while the cakes cool, let’s whip up that gorgeous ganache. heat heavy cream in a saucepan over medium heat until it just starts to simmer.
Pour it over your chopped chocolate and let it sit for a couple of minutes before whisking it smooth. don’t forget to mix in that dab of butter and vanilla!
-
Assemble the cake: use a spatula to spread some ganache on one layer of the cooled cake. stack the second layer on top.
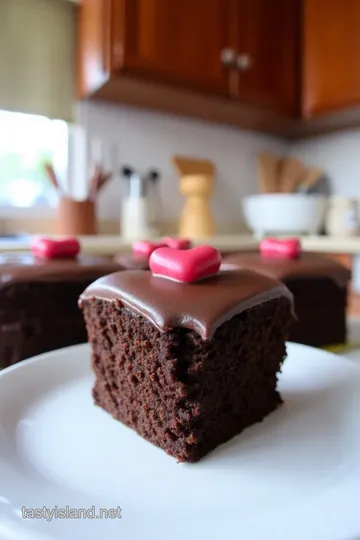
Then, cover the entire thing in that decadent ganache. it’s the pièce de résistance.
-
Decorate (Optional): Spruce up your cake with shavings of chocolate, juicy berries, or even edible flowers. You know, really put your heart into it!
Expert Techniques
Professional methods: ensure your eggs and milk are at room temperature. trust me, i’ve made cakes that just didn’t rise because i was too hasty.
Also, be gentle! overmixing leads to dense cakes.
Timing Precision: Timing is critical—don’t start the assembly until your cake layers are completely cool. Otherwise, you risk a drippy disaster!
Success Indicators: The toothpick test is your very best friend. You want it to come out clean, indicating those heavenly layers are baked just right.
Success Strategies
Troubleshooting tips: if your cake domes too much on top, just level it off with a serrated knife. it’s perfectly normal.
And, should you happen to burn your ganache (no judgment!), just toss it gently in the microwave in bursts of 10 seconds.
Quality assurance: always taste before serving. i mean, taste-testing is practically a requirement in my kitchen. it’s also a good way to ensure you didn't accidentally forget an ingredient (your mouth will be the judge).
This heartfelt chocolate cake is more than just a dessert. it’s a little love story folded into each bite. now that we’ve tackled the baking part, stay tuned for additional information on flavor pairings and decorative ideas that will make your cake the centerpiece of any occasion.
Bake on, my friend!
Success Guaranteed Tips
When it comes to baking, especially with something as delightful as our Heartfelt Chocolate Cake , the secret to success lies in a few tried-and-true techniques.
Professional Insights
First off, let’s start with room temperature ingredients . i learned this the hard way after a couple of not-so-great cakes.
The eggs and milk blend so much better, making your batter light and fluffy—just what we want to achieve!
Expert Techniques
This might sound quirky, but using boiling water in your cake batter is a game-changer. it keeps the cake moist, which is essential for that inviting, rich texture.
Believe me, when i first tried this, i was taken aback by how much it transformed the outcome.
Kitchen Wisdom
And don’t forget to level your cake layers ! i usually place my cake on a cutting board and carefully trim the tops for that straight, flat finish.
It sounds a bit finicky, but it makes a world of difference when it comes to stacking and decorating.
Success Guarantees
Lastly, trust your instincts while you bake. if a cake feels a little too heavy when you mix in the flour, don’t hesitate to add a splash of milk.
Cooking is often about adapting and tweaking on the fly.
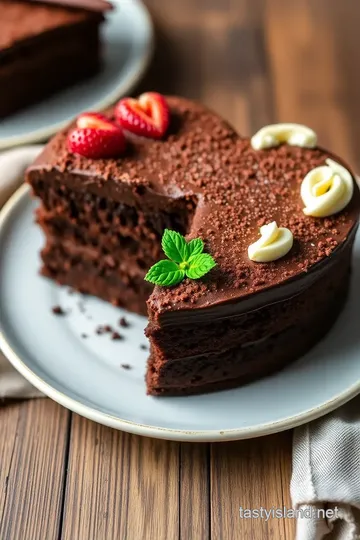
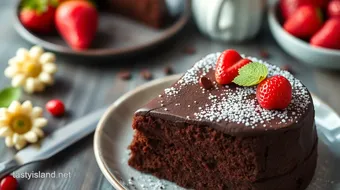
Perfect Presentation
Let’s talk about the icing on this chocolate cake. No one wants a drab dessert.
Plating Techniques
Using a cake stand can elevate your presentation so much. There’s just something about having that height that makes everything look fancier, right?
Garnish Ideas
For garnishing, i absolutely adore edible flowers . they not only complement the heart theme but also add a pop of color.
It's like a mini garden on your plate, which is just delightful!
Serving Suggestions
Consider serving each slice alongside fresh berries . The tartness of raspberries or strawberries provides a refreshing contrast to the rich chocolate flavor.
Visual Appeal Tips
And here’s a small tip from me: drizzle some ganache on the plate before you set down the slice. It creates an inviting little masterpiece that folks just can’t resist.
Storage and Make-Ahead
I often make this cake a day ahead for gatherings, and here’s how I keep it fresh.
Storage Guidelines
Once your cake is frosted, cover it with a cake dome or wrap it in plastic wrap—make sure to keep it in a cool place. This helps maintain that lush moisture!
Preservation Methods
If you have leftovers (not likely, but just in case!), you can store individual slices in the fridge. Just make sure to wrap them well.
Reheating Instructions
To rejuvenate a slice, pop it in the microwave for about 10-15 seconds . It’ll taste like it’s just come out of the oven!
Freshness Tips
Honestly, this cake just gets better the next day, as the flavors continue to meld and develop. Just keep it wrapped to avoid drying out.
Creative Variations
Baking is all about being creative, and I’m a firm believer in experimenting!
Flavor Adaptations
For instance, want a twist? Add a splash of almond extract to the batter. It’s completely unexpected but oh-so-delicious.
Dietary Modifications
If you’re catering to dietary preferences, no worries! I’ve made this with gluten-free flour, and it worked splendidly—just as delightful.
Seasonal Twists
In the fall, try mixing in some pumpkin spice . It’ll give the cake a seasonal character, perfect for cozy get-togethers.
Regional Variations
And if you feel adventurous, consider adding a hint of lavender for a unique flavor profile. It seems unusual but pairs beautifully with chocolate.
Complete Nutrition Guide
Before we dive into those scrumptious slices, a quick nutritional overview is always handy.
Detailed Breakdown
For each serving of this decadent cake, you’re looking at approximately 400 calories , with a mix of protein and good fats.
Health Benefits
Don’t let the chocolate scare you off! Cocoa is known for its heart-healthy properties, providing antioxidants and beneficial flavonoids.
Dietary Information
This cake is rich, yes, but that richness means you can enjoy a smaller slice without feeling deprived.
Portion Guidance
Cut it into 8 wedges and share—believe me, it’s rich enough that a little goes a long way!
Expert FAQ Solutions
Let’s tackle some common concerns I hear from friends about baking.
Common Concerns
“Why is my cake dense?” Well, it might be that the batter was overmixed. When adding the boiling water, mix just enough to combine.
Expert Answers
For frosting: “How do I get my ganache shiny?” After the cream simmers, let it sit before whisking. I promise the gloss is worth it!
Troubleshooting Guide
If your cake rises but then collapses, it’s likely due to too much air in the batter or too much leavening agent.
Success Tips
Always trust your instincts—if something seems off, it probably is!
In conclusion, this heartfelt chocolate cake is a delightful treat that combines love and creativity in every bite. whether you're celebrating a birthday or an anniversary, it’s bound to impress.
Now, gather your loved ones, make some memories, and savor this chocolate goodness! happy baking!
Heartfelt Chocolate Cake Card
⚖️ Ingredients:
- 1 ¾ cups all-purpose flour
- 1 ¾ cups granulated sugar
- ¾ cup unsweetened cocoa powder
- 1 ½ teaspoons baking powder
- 1 ½ teaspoons baking soda
- 1 teaspoon salt
- 2 large eggs
- 1 cup whole milk
- ½ cup vegetable oil
- 2 teaspoons vanilla extract
- 1 cup boiling water
- 1 cup heavy cream
- 8 oz semi-sweet chocolate, chopped
- 1 tablespoon butter
- 1 teaspoon vanilla extract
🥄 Instructions:
- Step 1: Preheat your oven to 350°F (175°C). Grease and flour two 9-inch round cake pans, or use parchment paper for easy removal.
- Step 2: In a large mixing bowl, combine flour, sugar, cocoa powder, baking powder, baking soda, and salt. Whisk together until well combined.
- Step 3: Add eggs, milk, vegetable oil, and vanilla extract to the dry ingredients. Mix on medium speed for 2 minutes until well combined.
- Step 4: Gradually stir in boiling water to the batter. This will thin out the batter, which is expected. Mix until just combined.
- Step 5: Pour the batter evenly into the prepared cake pans. Bake for 30-35 minutes or until a toothpick inserted into the center comes out clean.
- Step 6: Once done, remove the cakes from the oven and let them cool in the pans for 10 minutes. Then, turn them out onto a wire rack to cool completely.
- Step 7: While the cakes are cooling, prepare the ganache. Heat the heavy cream in a saucepan over medium heat until it starts to simmer. Remove from heat and pour over the chopped chocolate in a bowl. Let it sit for 2-3 minutes, then whisk until smooth. Stir in butter and vanilla extract until well combined.
- Step 8: Once the cakes are completely cool, place one layer on a serving plate. Spread a layer of ganache on top. Place the second layer on top and cover the entire cake with the remaining ganache, smoothing it out with a spatula.
- Step 9: For an extra special touch, decorate the top with chocolate shavings, fresh berries, or even edible flowers to emphasize the heart theme.
Previous Recipe: Baptism Cake: 5 Best Tips for an Elegant Vanilla Creation
Next Recipe: Strawberry Earthquake Cake: 7 Irresistibly Delicious Variations