Lattice-Topped Apple Pie
Craving a comforting dessert? My Grandmother's lattice trim apple pie, bursting with sweet and tart flavors, is guaranteed to impress. Let's bake!

- A Slice of Tradition: Lattice-Topped Apple Pie
- Recipe Overview
- Key Benefits
- Essential Ingredients Guide to Crafting a Lattice-Topped Apple Pie
- look into into Professional Cooking: Mastering the Art of Pie-Baking
- Pro Tips & Secrets to Nail that Lattice-Topped Apple Pie
- Storage & Make-Ahead: Keep That Pie Fresh
- Creative Variations: Shake It Up!
- Complete Nutrition Guide
- Recipe Card
A Slice of Tradition: Lattice-Topped Apple Pie
Opening hook
oh my gosh, can i just take a moment to rave about apple pie? it’s like the warm hug of the dessert world! i remember the first time i attempted to make one — i was a nervous wreck! picture this: a teenage me, flour flying around the kitchen, the smell of sweet cinnamon filling my home, and my little brother sneaking spoonfuls of the filling when he thought i wasn’t looking.
The anticipation was real! that’s the magic of a lattice-topped apple pie , folks. it’s more than just a dessert; it’s cholesterol-filled memories of loving and a sprinkle of chaos.
The beauty of this classic dessert recipe is in its simplicity. it celebrates apples, particularly those sweet and tart varieties like granny smith and honeycrisp, tossed in a cinnamon apple filling that sings autumn in every bite.
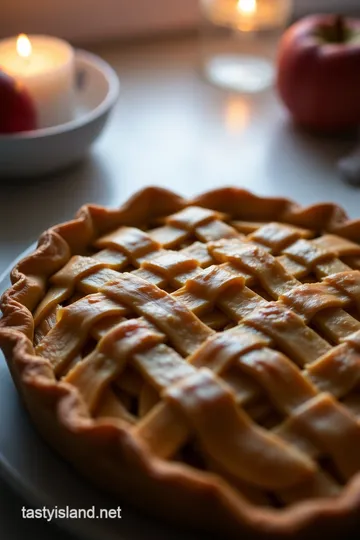
And don’t get me started on that lattice pie crust ! with its charming lattice trim , not only does it look fancy, but it also lets the delicious steam escape to keep the filling perfectly melded and bubbly.
Recipe Overview
Historically, pies have woven their way through american kitchens since the early settlers. they were practical, utilizing local ingredients for a meal and a dessert all in one go.
Fast forward to today, and lattice-topped apple pie remains a beloved staple at family gatherings, birthday bashes, and holiday feasts.
It's a crowd-pleaser and oh-so-comforting.
Time-wise, you’re looking at about an hour and 45 minutes total for prep and bake. yes, there’s a bit of work involved, especially when you’re learning the pie baking techniques , but trust me, it’s totally worth it.
The difficulty level? i’d say medium—once you get the hang of it, you might find yourself whipping this pie up for every potential opportunity! and let's not forget the cost; while it’s cheaper than store-bought goodies, you also get those homemade desserts that boast flavor and love!
Key Benefits
So why should you dive into this recipe, you ask? well, let me give you the scoop! first off, when baked with those vibrant, tart apple varieties , this pie becomes a powerhouse of nutrition.
Apples bring their a-game with fiber and antioxidants, making this dessert feel a little less guilty. sure, it’s still a treat, but if you want to indulge, why not enjoy something vaguely decent for you too?
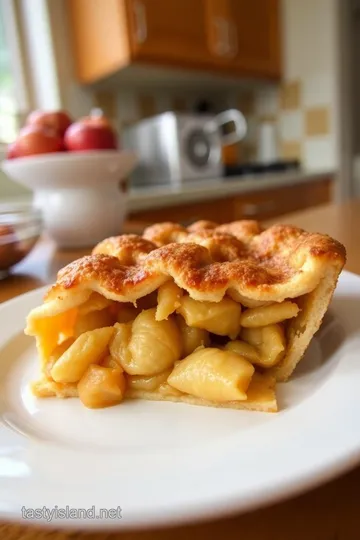
On the flip side, those lattice designs aren’t just for show! they create a delightful contrast between the outer golden pie crust and the tender filling inside, making each slice a feast for both the eyes and the stomach.
Plus, serving a slice at your next gathering will have folks raving about your gourmet dessert ideas long after the last crumb has disappeared.
Whether you’re celebrating thanksgiving or just want a slice of joy on any given tuesday, nothing beats a warm piece of apple pie topped with a dollop of whipped cream.
It’s perfect for any occasion, really. from picnics in the park to cozy dinners, it’s a universal winner! and let’s be real, who doesn’t love saying they made a decorative pie topping ?
Now that I've got your taste buds tingling, let's dive into the ingredients to whip up this flaky pie crust for your new favorite apple pie recipe !
Essential Ingredients Guide to Crafting a Lattice-Topped Apple Pie
Oh my gosh! there's something so comforting about baking, especially when it comes to a classic american dessert like apple pie.
Seriously, it's like a warm hug! if you want to nail that lattice pie crust look while keeping the flavors spot-on, you’ve gotta know your ingredients.
Let’s break it down, shall we?
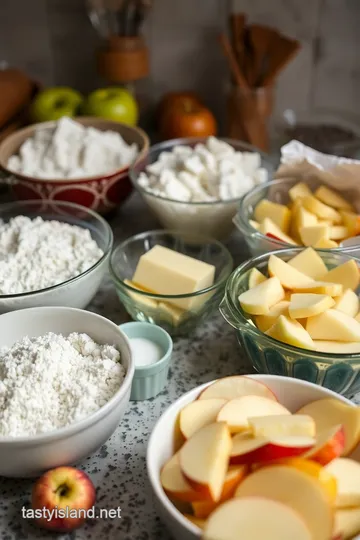
Premium Core Components
First things first, let's talk about those premium core components that make your pie a true notable. You want to give your pie the best, and it starts with quality ingredients.
Measurements matter! for the crust, grab 2 ½ cups (that's 320 g ) of all-purpose flour. it’s the backbone of your pie dough.
Then, toss in 1 tsp of salt and 1 tsp of sugar to bring out that sweetness.
When selecting butter, don’t skimp —you're gonna need 1 cup (or 227 g ) of unsalted, chilled butter, diced up.
Quality matters here; you want that creamy goodness for a flaky pie crust . for storage, keep your butter in the fridge until you’re ready to use it.
And listen, freshness is key! Always opt for fresh apples—think Granny Smith and Honeycrisp for that perfectly sweet and tart balance. Aim for about 6 cups when they’re peeled and sliced.
Signature Seasoning Blend
A pie is only as good as its flavor! the star of our lattice-topped apple pie is the cinnamon apple filling .
You’ll need ¾ cup sugar, 2 tbsp flour for thickening, 1 tsp ground cinnamon, and a pinch of nutmeg to really amp up those warm flavors.
Honestly, just the smell of cinnamon in your kitchen will make everyone’s mouth water.
But wait, there’s more! mixing in 1 tbsp of lemon juice brightens the filling’s flavor. sometimes, i even sneak in a touch of vanilla extract or even a drizzle of caramel for that gourmet touch.
Smart Substitutions
Now, let’s chat about when you’re running low on supplies. we've all been there! if you're out of flour, you can use cornstarch as a thickener, or swap the apples for pears if you want to mix it up.
For dietary needs, try coconut oil instead of butter for a dairy-free pie crust. need to make it gluten-free? use a certified gluten-free flour mix instead.
So many apple pie variations are at your fingertips!
Emergency replacements are totally a thing too! If you can't find the right spices, a bit of pumpkin pie spice can work wonders in a pinch!
Kitchen Equipment Essentials
Before you dive in, let’s make sure you have the right tools. You’re gonna want:
- Mixing bowls
- A pastry cutter or fork (to cut in that butter!)
- A rolling pin for rolling out your chilled pie dough
- A pie dish (your bestie for pie baking!)
- A sharp knife or dough cutter for those beautiful lattice strips
Trust me: it makes all the difference to have the right gear on hand. and remember! store your dough properly in the fridge to keep it chilled before rolling.
Chilled dough means a perfect, flaky crust!
Now that you know all about your core ingredients and smart subs, let’s get ready to roll out that homemade lattice crust ! we’re just about ready to dive into the step-by-step of this traditional american dessert.
Happy baking, my friend! can't wait to see those lattice design techniques in action!
look into into Professional Cooking: Mastering the Art of Pie-Baking
When it comes to baking classic desserts like apple pie , there’s something so comforting about knowing the ins and outs of the process.
Let’s talk about the essential steps that’ll elevate your game and make those homemade lattice crusts shine.
Essential Preparation Steps
First up, let’s chat about mise en place . it sounds fancy, but it just means having everything in its place.
So, gather all your ingredients—like those sweet and tart apples and that flaky pie crust dough. you want to see everything laid out before you dive in.
It’ll make the process smoother. trust me on this one!
Next, let’s get into time management . if you're juggling multiple recipes, or heaven forbid, a screaming toddler, keeping an eye on your clocks is a must.
Set a timer for those 45- 50 minutes of baking. you don’t want your pie to become a scorched disaster!
Now, organization is key. Keep your workspace tidy. A clutter-free kitchen makes everything easier, especially when you start weaving that gorgeous lattice trim .
And don't forget about safety ! sharp knives and hot ovens can be a recipe for disaster. always use oven mitts when handling hot trays, and keep that workspace clear of unnecessary stuff.
Step-by-Step Process
Now, let’s break this down into bite-sized pieces.
-
Prepare your dough : mix your flour, salt, and sugar, and then cut in chilled unsalted butter until it’s crumbly.
Add ice water and form a dough. don’t forget to chill it for 30 minutes !
-
Make your filling : toss those tart apple varieties like granny smith with sugar, cinnamon, and a hint of lemon juice.
This step helps them get nice and soft while adding flavor. let them sit for about 15 minutes to macerate .
-
Roll it out : roll your bottom crust into a 9-inch pie dish and that second disk into strips for your lattice.
Remember to preheat that oven to 425° f ( 220° c) while you're rolling.
-
Weave it : This part might seem tricky, but it’s worth it. Lay your strips across the apples, weaving them back and forth to create that classic lattice look.
-
Bake : Pop it in the oven for 45- 50 minutes until your crust is golden brown. You’ll want to bring it out when the filling is bubbly and delicious.
Expert Techniques
Alright, here’s where i spill the good stuff. the secret to a golden pie crust is all about the butter temperature.
It must be super cold! oh my gosh, that golden color you see? brush it with an egg wash before baking for that perfect sheen.
Check your pie during baking. if you see the crust browning too quickly, cover it loosely with foil to prevent burning.
And always trust your eyes. if it looks divine, it probably is!
Success Strategies
Avoid common pitfalls. don’t overwork your dough—this leads to tough crusts. and make sure to let your pie cool before slicing.
I know waiting is hard, but if you cut too soon, that cinnamon apple filling will ooze everywhere.
Quality assurance? Always taste your filling. Adjust sugar, especially if you’re using best apples for baking that might be less sweet. Remember, a well-balanced filling makes for the best results!
And about make-ahead options, you can easily prepare your dough a day in advance. Just keep it chilled in the fridge. Just remember, chilled pie dough means less shrinkage during baking.
Final Thoughts
Baking pies can feel like a bit of an art. but with these pie baking techniques , you’ll be serving up gourmet dessert ideas that shine at every gathering.
Once you’ve mastered that lattice design , your apple pie will become a staple at every fall gathering, and you’ll be the hero of the dessert table.
So grab your rolling pin and those apples—the fun is just about to begin! now that we've nailed the basics of pie baking, let’s dive deeper into those seasonal dessert recipes for every occasion.
Pro Tips & Secrets to Nail that Lattice-Topped Apple Pie
Oh my gosh, where do i even begin? making a lattice pie crust can feel a bit daunting at first, right? trust me, i’ve been there.
But here’s the scoop: pro tips can really save the day! for starters, when making that flaky pie crust, make sure your butter is super cold.
Like, cold enough to make your hands shiver! this helps achieve that melt-in-your-mouth texture.
Now, if you're low on time, here’s a little trick i swear by: chill your pie dough ahead of time.
Seriously, about 30 minutes in the fridge works wonders. it also makes your dough easier to handle, which is really great when you're cutting those strips for your lattice trim.
Speaking of strips, don’t stress if they’re not perfect—homemade always has a dash of charm!
Perfect Presentation for Your Apple Pie
Can we talk about presentation? this is where we can get fancy but in a fun way! first up, plating techniques —always place your pie on a simple, nice plate.
It’s like putting your favorite dress on for a night out!
Garnishing can take your dessert to the next level. try some fresh mint leaves or a sprinkle of powdered sugar for an elegant touch.
And let's not forget about the color! a gorgeous golden pie crust with bright red apples peeking through the lattice? total showstopper! oh, and if you drizzle some cinnamon icing on top? game changer, trust me.
Storage & Make-Ahead: Keep That Pie Fresh
Now, let’s talk logistics. if you’re planning ahead, you can definitely make this pie the day before. once it's cooled completely (at least two hours, y’all!), cover it well and pop it in the fridge.
It'll be good for about 3-4 days . if you've got leftovers, an airtight container is your best friend! just remember, piping hot apple pie loses its charm when served cold.
And here’s a pro tip for reheating: low and slow in the oven at about 350° f ( 175° c) for around 15- 20 minutes is best.
You want it warmed through but not dried out—nobody likes a sad pie.
Creative Variations: Shake It Up!
Feeling adventurous? There are endless ways to jazz up this classic dessert! Instead of sticking with the usual sweet and tart apples like Granny Smith or Honeycrisp, why not experiment with some local seasonal fruit? Have some ripe peaches lying around? Toss them in!
For a fun twist, try adding a splash of bourbon or a scoop of maple syrup to your apple filling.
It gives that cinnamon apple filling a whole new dimension that’s just so gourmet!
You can also tweak your crust. Want a gluten-free option? There are some great pie crust alternatives using almond flour or a gluten-free blend. Seriously, the possibilities are endless!
Complete Nutrition Guide
So what about the health stuff? let's break it down real quick! each slice of your beloved lattice-topped apple pie packs about 320 calories .
Not too shabby for a dessert, right? it gives you a little bit of everything: carbs, sugars, and, um, happiness.
You can enjoy your pie guilt-free, as long as you’re also including a salad or something healthy on the side.
Expert FAQ Solutions: You’ve Got Questions, We’ve Got Answers!
I know you’ve got questions—don’t worry, i got you covered. if your pie isn’t bubbling, it might need a few extra minutes in the oven.
Stubborn filling? try stirring the fruit a bit more while you’re mixing it up.
And if your lattice design feels like it’s giving you a hard time, don’t sweat it! think of it as an art project.
Just keep playing until it looks fab. the key is to have fun while baking—after all, it’s just dessert!
All right, folks! whether this is your first apple pie recipe or number fifty, just remember: practice makes perfect! get in that kitchen, show that dough who’s boss, and wow your friends and family with a stunning pie.
Enjoy every slice, and keep bringing those classic dessert recipes to life! happy baking!
Lattice-Topped Apple Pie Card

⚖️ Ingredients:
- 2 ½ cups (320 g) all-purpose flour
- 1 tsp salt
- 1 tsp granulated sugar
- 1 cup (227 g) unsalted butter, chilled and diced
- 6-8 tbsp ice water
- 6 cups (900 g) peeled, cored, and sliced apples (such as Granny Smith and Honeycrisp)
- ¾ cup (150 g) granulated sugar
- 2 tbsp all-purpose flour
- 1 tsp ground cinnamon
- ¼ tsp ground nutmeg
- 1 tbsp lemon juice
🥄 Instructions:
- Step 1: In a bowl, combine flour, salt, and sugar.
- Step 2: Cut in chilled butter until mixture resembles coarse crumbs.
- Step 3: Stir in ice water, one tablespoon at a time, until dough forms.
- Step 4: Divide into two disks, wrap in plastic, and chill for 30 minutes.
- Step 5: In a large bowl, toss sliced apples with sugar, flour, cinnamon, nutmeg, and lemon juice.
- Step 6: Set aside for 15 minutes to macerate.
- Step 7: Preheat oven to 425°F (220°C).
- Step 8: On a floured surface, roll out one dough disk for the bottom crust and transfer it to the pie dish.
- Step 9: Roll out the second dough disk for the lattice top.
- Step 10: Pour apple filling into the bottom crust.
- Step 11: Cut the rolled-out dough into strips for the lattice.
- Step 12: Weave the strips to create a lattice pattern over the filling.
- Step 13: Trim and crimp edges as desired.
- Step 14: Place the pie on a baking sheet to catch drips.
- Step 15: Bake for 45-50 minutes, until crust is golden and filling is bubbly.
- Step 16: Allow to cool for a minimum of 2 hours before slicing.
Previous Recipe: How to Create Amazing Recess Mocktails: 5 Refreshing Recipes!
Next Recipe: My Sunday Morning: Velvety kind of cold brew coffee with foamy bubbles