Quick Honey & Cheese Platter for Delightful Snacking
Craving something simple yet indulgent? My Quick Honey & Cheese Platter for Delightful Snacking is the perfect choice for gatherings or solo enjoyment! Discover how to assemble this vibrant and versatile platter with rich flavors.

Have you ever found yourself scrambling for a snack that feels fancy but is oh-so-simple to put together? i once had friends over, and i was totally out of ideas.
I mean, pizza again? nah! that’s when i threw together a quick honey & cheese platter for delightful snacking . you know, the kind where sweet meets savory, and your guests think you’re some gourmet chef.
Seriously, with just a few ingredients, you can have a stunning cheese board that’s perfect for every occasion. let’s dive into this scrumptious world of flavors!
Recipe Overview
Now, let’s chat about the history behind cheese platters. they’ve been around longer than your grandma’s secret cookie recipe! originating from europe, the art of cheese boards has made its way to america, and boy, does it know how to throw a party.
Today, cheese boards are more than just a snack; they’ve become a staple for entertaining. whether it’s a holiday gathering or just a movie night, nothing says “i’m fancy” like a well-arranged spread.
As for prep, you’re looking at about 15 minutes . no cooking required—just some simple assembly! it’s so easy that even your cat could do it (well, maybe not).
The cost? totally budget-friendly, with enough servings to keep your friends satisfied. you could whip this up for under $30!
Key Benefits
So, why should you dive into the world of cheese platters? for starters, it’s all about the health benefits . cheeses are a great source of protein and calcium.
Pair that with some nuts and fruits, and you’ve got a snack that’s not just delicious but nutritious too. you can wow your friends with unique combinations that’ll get everyone's taste buds dancing.
Perfect for special occasions , this platter is versatile. whether it’s a summer barbecue or a holiday celebration, you can easily adapt it.
Speaking of versatility, you could swap in seasonal cheese options or even incorporate some gourmet cheese selections that’ll make your platter shine.
How about adding a bit of fresh herbs for that final touch?
Now, let's talk about an important part: this isn’t just any platter. it’s all about those flavor combinations for cheese .
The pairing of honey with cheese is like the peanut butter and jelly of the food world—totally iconic! and trust me, the sweet and savory contrasts will have everyone raving about your culinary skills.
Honestly, this is more than just a snack; it’s an experience. Think of it as entertaining made easy . Guests can mix and match their bites, making it a fun way to help everyone get involved!
Transition to Ingredients
Ready to dive headfirst into the deliciousness? grab your cheese knife and let's look at the ingredients you’ll need. this diy cheese board is all about creativity, so feel free to swap in some of your favorite ingredients.
Get your cheese selections and accompaniments lined up, because you’re about to impress!

Your Essential Ingredients Guide to a Quick Honey & Cheese Platter
Getting ready to throw together a quick honey & cheese platter for delightful snacking ? well, let me share with you some essential ingredients and tips that will make your snack game strong.
This isn't just any old cheese platter; we’re talking about a luxurious combination of flavors that will impress your guests or just make a cozy night in feel a bit more special.
Let’s dive deep!
Premium Core Components
First things first, you need to know your ingredients. Here are the detailed measurements for each item , both in the US and metric :
-
Cheese Selection :
- 4 oz (113 g) Brie
- 4 oz (113 g) aged cheddar
- 4 oz (113 g) goat cheese
-
Accompaniments :
- 1/2 cup (120 ml) honey
- 1 cup (150 g) assorted nuts
- 1 cup (150 g) fresh fruits
When you're shopping, keep an eye out for quality! look for fresh cheeses with no weird odors. aged cheeses should have a rich, nutty aroma.
And trust me, fresh fruits should feel firm and smell fragrant!
Storage guidelines? wrap leftover cheese tightly and keep it in the fridge; most will last a week or so if stored properly.
And don't forget freshness tips! always sniff before you slice. if it smells funky, it's time to toss that cheese.
Signature Seasoning Blend
Now, onto some signature seasoning to elevate your platter. a great honey is a must! you want it rich and floral, something that pairs beautifully with the cheese .
Try out different local honeys if you can. they all have different flavor notes.
Here’s a pro tip: Mix up your herbal game . Fresh herbs like rosemary or thyme can bring a whole new dimension. Sprinkle them around your board for aesthetic and flavor.
You know you can also play with regional variations ! If Italian cheeses are calling your name, get some Pecorino or Gorgonzola—oh my gosh, heavenly!
Smart Substitutions
Let’s be honest. Sometimes, life gets in the way, and you might not have everything on hand. That’s when smart substitutions come into play.
-
Common Alternatives : If you’re out of Brie, consider soft alternatives like Camembert for that creamy texture.
-
Dietary Modifications : Got a vegan friend? Just swap out the cheese for some vegan options like cashew cheese, and use maple syrup instead of honey for sweetness.
-
Emergency Replacements : Out of nuts? Use seeds like pumpkin or sunflower seeds for the crunch that everyone loves.
And hey, don’t forget about seasonal options ! In summer, strawberries are fantastic; in fall, how about some sliced apples?
Kitchen Equipment Essentials
Now that you know your ingredients, let's chat about some kitchen equipment essentials . You’ll need:
- Cutting board : To slice and arrange.
- Cheese knife : The right knife makes cheese prep easy.
- Serving platter : Go big or go home! A larger board gives you space to play.
- Small bowls : For honey and nuts; this keeps the presentation neat.
Here’s a quick prep tip : if your cheese is super hard, let it sit out for about 30 minutes before serving.
It’s so much easier to slice when it’s a little warmer.
Putting It All Together
So there you have it, your ingredients and tools to create the ultimate cheese platter arrangement . remember, it’s all about personal touches, whether that's your favorite wine pairing or some fancy breadsticks.
Plus, how you assemble your platter can really make it pop. think clusters of cheese, a sprinkle of fruits, and swirling honey— platter presentation tips will go a long way!
Before we jump into the step-by-step instructions, keep in mind that a quick honey & cheese platter is more than just food.
It's an experience. and you have the power to make it uniquely yours! ready to impress? let’s get into how to assemble your stunning board!
The Art of Professional Cooking: Tips and Tricks
Cooking isn’t just about slapping together some ingredients and calling it a day. it’s an art! to whip up something delicious every time, it’s essential to know a few professional cooking methods .
So, let’s dive into how you can elevate your cooking game through some killer strategies and techniques!
Essential Preparation Steps
First off, let’s talk about mise en place —a fancy french term for “everything in its place.” this means prepping all your ingredients before you start cooking.
Chop, dice, and measure everything out first. trust me, you’ll save yourself from running around like a chicken with its head cut off once you get cooking.
Time management tips? oh, they’re essential! i like to use a timer to keep myself on track, setting it for specific tasks.
For instance, when i'm baking, i’ll set a timer for 15 minutes to check on whatever’s in the oven.
It’s super handy!
And don't forget about organization strategies . keep your kitchen tidy—clean as you go. this way, you avoid a mountain of dirty dishes looming over you when you’re starving.
Lastly, safety considerations are super important! always keep your knives sharp (a dull knife is more dangerous!) and use oven mitts when handling hot stuff.
Step-by-Step Process
Now, here’s the nitty-gritty on how to do it!
- Prepare your ingredients : Get your knives ready. Always cut away from your body; safety first!
- Temperature control points : If you’re roasting meat, aim for that golden internal temperature of 165° F for poultry. Use a meat thermometer to check!
- Timing precision : If you’re baking bread, keep an eye on those 30- 35 minutes in the oven. Nothing worse than burnt bread!
- Visual cues for doneness : Learn to trust your eyes. For veggies, the vibrant colors usually mean they’re done.
Expert Techniques
Let’s jazz it up with some expert techniques ! for example, if you want to make a quick honey and cheese platter for delightful snacking, it helps to understand some critical steps .
Knowing how to pair cheeses with honey is key. soft, creamy cheeses like brie love honey, while sharp aged cheddar pairs great with a sweet finish.
Keep an eye on quality checkpoints. are your ingredients fresh? are they stored properly? these are crucial to making sure your dish turns out fab.
If something seems off—don’t hesitate to troubleshoot ! use your senses to adjust flavors with a pinch of salt or a splash of vinegar.
Success Strategies
Alright, here’s where the magic happens! to avoid common mistakes: don’t overcrowd your pan! if you’re roasting or sautéing, leave some space for the food to breathe.
Also, make sure to check the expiration dates on your cheese before assembling!
For quality assurance tips , always taste as you go. this will help fine-tune your flavors. and let’s face it, who doesn’t like to double-check if a dish is party-ready? if you want perfect results for gatherings, deduce how much time you need to assemble a quick party platter in advance.
And don’t forget about those make-ahead options. You can prep a flavorful charcuterie board the night before!
Wrapping It Up with a Little Flair
All this talks about planning and preparation is important! when you master these professional cooking methods, you’ll not only cook better but also feel more confident in the kitchen.
It’s about enjoying the process, after all! so, whether you’re creating a fabulous diy cheese board or crafting seasonal cheese options, remember to have fun!
Next, let’s jump into some additional information to explore even more about cooking techniques and fun recipes you can try out. Keep checking back for new ideas and seasonal inspiration!
Tips and Tricks for a Quick Honey & Cheese Platter for Delightful Snacking
Oh, hey there! if you’re looking to whip up something super simple yet delish for your next gathering, the quick honey & cheese platter for delightful snacking is where it’s at.
Let’s dive into some pro tips , presentation hacks , and more, so you can impress your friends (or just yourself) without breaking a sweat!
Pro Tips & Secrets
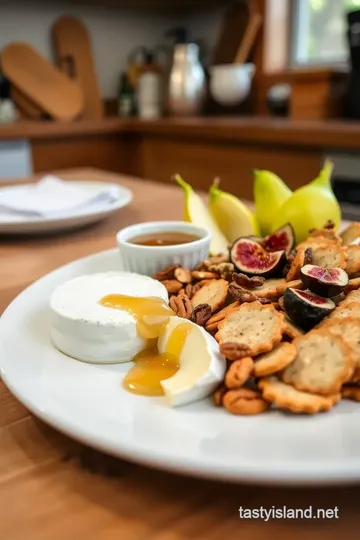
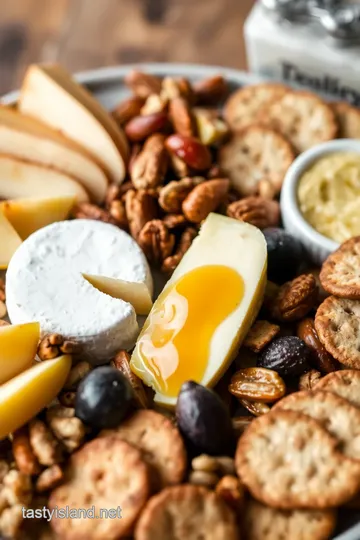
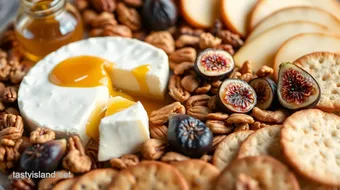
Here’s the deal. cheese board ideas are all about balance. you want a mix of textures and flavors, right? so grab a soft cheese like brie, a sharp aged cheddar, and maybe a tangy goat cheese.
Trust me, it’s like a flavor fiesta!
To save time, slice your cheeses before you start arranging. and for flavor enhancement , don’t skimp on that honey.
A generous drizzle brings everything together. seriously, that sweet stuff works wonders, especially when paired with cheese!
Wanna make it pretty? always use a large serving platter (or a cutting board—whatever floats your boat!) and group your cheeses together.
It looks more inviting that way, not to mention it makes your platter presentation tips shine.
Perfect Presentation
Now, let’s talk visual appeal. when you’re laying out your cheeses, think color combinations! a sprinkle of fresh fruits like grapes or figs adds a pop of color.
Place them next to your cheese like they’re in a loving embrace.
And garnishes? Try throwing some fresh herbs like rosemary on there. Talk about gourmet cheese selections ! Plus, they smell amazing.
If you want to impress, consider plating techniques . Use small bowls for honey and nuts to break up the space. It's like creating little hubs of yumminess!
Storage & Make-Ahead
You can totally make your quick honey & cheese platter ahead of time. just wrap it up in plastic and chill in the fridge.
You’ll wanna serve it up fresh, but it’ll keep for about 24 hours.
When you’re ready to dig in, let it sit out for a bit. bring it to room temperature for the best flavor .
Trust me, biting into a cold cheese is not the same as one that’s nice and soft!
Creative Variations
Feeling adventurous? mix things up with some seasonal cheese options . in the fall, add a little pumpkin spice cheese or get into the festive spirit with cranberry-infused cheddar.
If it’s summertime, try fresh peaches or cherries for that extra sweetness.
You can also adapt to dietary needs! Use vegan cheeses, and swap honey for agave nectar for a plant-based twist. Your friends will be swooning over your creative cheese platter !
Complete Nutrition Guide
Alright, we can’t ignore the health side of things. This platter is pretty balanced! The cheeses give you protein and fats, while fresh fruits add fiber and vitamins.
Dietary considerations ? it can fit into various eating styles, from light snackers to hearty munchers. just keep an eye on portion sizes—mixing it up with nuts and fruits can turn your snack into a full meal if you’re not careful.
Expert FAQ Solutions
Got questions? Here are some common ones.
What if my cheese is too hard? Let it sit out for about 20 minutes before serving. It’ll soften up nicely.
And how do I get the honey to stick? Simply drizzle it right onto the cheese or mix it into the nuts—such a sweet surprise!
For quick bites and gatherings, make sure to keep your cheese at room temperature. Cold cheese is like a bummer at parties, you know?
Wrap It Up!
So there you have it—your ultimate guide to assembling a quick honey & cheese platter for delightful snacking . with these tips and tricks, you’ll have everyone asking for seconds.
Explore different charcuterie board variations or stick to the classic, whatever vibe you’re going for! remember, entertaining is all about having fun—don’t stress.
Just grab your cheese, some fruit, and a drizzle of honey, and you’re good to go. happy snacking!
Quick Honey & Cheese Platter for Delightful Snacking Card
⚖️ Ingredients:
- 4 oz Brie, cut into wedges
- 4 oz aged cheddar, sliced
- 4 oz goat cheese, crumbled
- 1/2 cup honey (or to taste)
- 1 cup assorted nuts (e.g., almonds, walnuts)
- 1 cup fresh fruits (e.g., grapes, apple slices, figs)
- Fresh herbs (like rosemary or thyme) for garnish (optional)
🥄 Instructions:
- Step 1: Slice the Brie and aged cheddar into wedges and slices, respectively. Crumble the goat cheese into small pieces. Cut fresh fruits into bite-sized pieces if necessary.
- Step 2: Place the cheese wedges and slices on the serving platter, ensuring variety in types.
- Step 3: Drizzle honey in a small bowl and place it next to the cheeses. Scatter nuts around the cheese. Cluster the fresh fruits in one area of the platter.
- Step 4: Optionally, add fresh herbs around the platter for a pop of color and aroma.
- Step 5: Encourage guests to pair their cheese with honey and fruits using toothpicks or small cheese knives.
Previous Recipe: Why I Love to Bake Chocolate Kidney Bean Brownies Fast: It's a Game Changer!
Next Recipe: How to Blend Fresh Basil for Tasty Pesto Delight: 10 Amazing Tips!