Strawberry Earthquake Cake
Craving a show-stopping dessert? Try this Strawberry Earthquake Cake, featuring creamy swirls and juicy strawberries. Discover tips for baking perfection!

Have you ever tried a cake that tastes as good as it looks, causing a delightful earthquake of flavors in every bite? if not, let me introduce you to something special: the strawberry earthquake cake .
It’s like a playground for your taste buds, with layers of moist cake mingling with sweet strawberries and a cream cheese swirl that's simply to die for.
The best part? you can whip this up in just about an hour, and with a medium difficulty level, it's perfect for both seasoned bakers and those still finding their way around the kitchen.
Now, let’s sink our teeth into the juicy history of this cake. originating from the love of layered cakes, this dessert brings memories of family gatherings, summer picnics, and bake sales.
The combination of strawberry flavors with a plush vanilla base has become a staple in many households, especially during strawberry season.
Back in the day, folks would use whatever fruit was in season, and strawberries were always a crowd favorite. this cake is not just a treat; it’s a comfort food that evokes nostalgia for many of us, bringing us back to simpler times.
What makes the strawberry earthquake cake so unique, you ask? for starters, its rich culinary heritage—think of it as a mash-up of classic strawberry desserts combined with an eye-catching visual appeal.
The name “earthquake” reflects the chaotic beauty of the layers colliding in the baking process, almost like the delightful mess that life can be.
Every slice offers a burst of fresh strawberries smothered in that dreamy cream cheese swirl, creating a culinary delight that dances on the palate.
Let’s talk about flavor. this recipe boasts an exceptional blend, with the sweetness of strawberries and the tangy cream cheese really complementing each other.
I’ve experimented a lot in the kitchen, and trust me, this is a foolproof method even for the most hesitant bakers out there.
Over the years, i’ve learned a thing or two about baking techniques, and if you follow this method, you’ll get a superbly moist cake—fingers crossed, there won’t be a crumb left behind once you pass it around!
Nutritious and delicious? it’s true! the strawberry earthquake cake is not only about indulgence but also packs some serious nutritional benefits.
Fresh strawberries bring a punch of vitamin c and antioxidants, while the cream cheese adds protein to the mix. plus, this cake is an option for those wanting to embrace seasonal fruit desserts.
You can adjust the recipe to fit various dietary needs by opting for gluten-free cake mix or swapping in lighter ingredients if you're counting calories.
Here’s a quick snapshot of what you’ll need for the Strawberry Earthquake Cake :
- Preparation time: 20 minutes
- Cooking time: 40-45 minutes
- Total servings: 12
- Difficulty: Medium
- Cost efficiency: Pretty friendly on the wallet!
Now that you’re all pumped up to bake this beauty, let’s dive into the ingredients . you’ll need a few basic items, most of which you might already have in your pantry.
Grab yourself a box of white or vanilla cake mix, some fresh strawberries, and cream cheese, and we’ll get started on this delicious journey together.
Prepare to enjoy a slice of nostalgic delight that everyone will be talking about long after dessert is done!
Perfect Ingredients Selection
Premium Core Ingredients
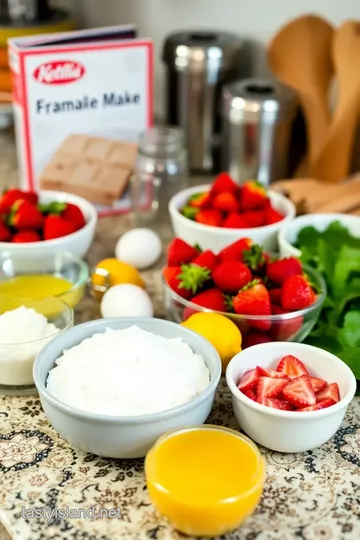
Let’s dive into the heart of our strawberry earthquake cake . the core ingredients play a huge role in the flavor and texture.
Start with one box (15.25 oz) of white or vanilla cake mix. it’s the base that sets everything in motion, and i always look for brands that have a simple, clean ingredient list.
Sometimes, they can be a bit sneaky and throw in questionable fillers. you want to go with something you recognize - think of it as the difference between a hearty roast on a sunday and a microwaved dinner.
Next up, we’ve got 1 cup of water and ½ cup of vegetable oil . and here's a tip: oil can make or break your cake's moisture level.
Research a bit and pick a good quality oil – it matters! now for the eggs – we’re using 3 large eggs .
Go for organic or free-range if you can; it just feels like a better choice, right?
For storage, keep any leftover ingredients in a cool, dry place. and if you happen to have leftover cake mix, seal it tightly and stash it away for another day.
You never know when you might want a late-night slice!
Signature Seasoning Blend
Here we come to the sweet stuff! in the strawberry layer , we need 2 cups of fresh strawberries, hulled and sliced , ½ cup granulated sugar , and 1 tablespoon of lemon juice .
When picking strawberries, go for the vibrant red ones that smell divine; those are usually the tastiest. a quick tip? press them lightly – if they give a little, they’re fresh!
Now onto our cream cheese swirl . use 8 oz of softened cream cheese , ½ cup of sugar , 1 egg , and ½ teaspoon of vanilla extract .
This adds a rich, creamy layer that takes your cake to the next level. softening the cream cheese is key; otherwise, it becomes a lumpy mess.
Let it sit out for a bit before mixing; learn from my mistakes here!
Smart Substitutions
Life isn’t always perfect and neither is baking. if strawberries aren't in season, fear not! you can easily sub them out with blueberries or raspberries for an equally delectable cake.
It’s like an adventure in your kitchen. need to swap out the cream cheese? ricotta works beautifully, lending a lighter texture.
And for those watching the gluten – grab a gluten-free cake mix, and you’re all set.
For last-minute emergencies, vanilla pudding mix can save you in a pinch if you short the cake mix. just remember to adjust the liquid accordingly so it doesn’t turn into a pudding catastrophe.
Kitchen Equipment Essentials
You don’t need a fancy kitchen to whip up this dish. however, there are a few must-have tools for your strawberry earthquake cake .
A sturdy mixing bowl and an electric mixer are your best friends in this endeavor. if you don’t have a mixer, no worries! a whisk and good old-fashioned elbow grease do the trick.
You’ll want a trusty 9x13 inch baking pan . this is where the magic happens, allowing all those layers to meld together.
As for gadgets, a silicone spatula is great for scraping the bowl without leaving bits behind – it’s like that loyal friend who helps you finish your slice of pie.
Pro Ingredient Tips
So, how do i pick the best ingredients? well, i always trust my nose and my eyes. i learned the hard way that fresh is key, especially for strawberries.
If they look a bit sad in the store, they probably won’t brighten your cake.
For storage, keep your strawberries in the fridge and use them quickly, as they don’t last long. and when it comes to buying ingredients, i often hit up local markets.
Fresh, seasonal produce not only tastes better but supports local farmers – win-win, right?
Money-saving tip: buy in bulk when you find good sales on cake mix or oils. they have a long shelf life, plus it’s always nice to have backup ingredients for those sudden baking cravings.
Alrighty! now that we’ve got the perfect components to create our delightful strawberry earthquake cake , let’s jump right into the fun part—baking! we'll layer, swirl, and bake until our kitchens smell simply irresistible.
Stay tuned for the next part where i’ll guide you through each step, making sure your cake turns out divine!
Professional Cooking Guide
Baking can be a bit like telling a story, can’t it? each step is a page—some parts are sweet, while others might be a little nutty (like my baking adventures).
Today, we’re diving into how to craft a strawberry earthquake cake , a delightful dessert that's perfect for summer picnics or cozy gatherings.
So, let me share how to get this cake baking like a pro—even if your kitchen skills are still a work in progress!
Essential Preparation Steps
First off, let’s talk mise en place —a fancy french term that just means getting all your ingredients ready before starting to cook.
If i had a pound for every time i forgot an ingredient halfway through, well, i could probably buy fancy kitchen gadgets!
-
Gather ingredients : for our cake, that’ll be a box of white or vanilla cake mix, fresh strawberries, cream cheese, and the usual suspects: eggs, oil, and sugar.
Get out your measuring cups because a little precision goes a long way!
-
Prep techniques : slice those strawberries like a pro. i like to hull them so there’s no bitterness and cut them into thick slices.
Trust me, every bite of fresh strawberry is worth it in this cake.
-
Time Management : Set your timer for 10-15 minutes as you let those strawberries mingle with their sugar. This way, while they’re releasing their juices, you can get everything else prepped.
-
Organization Tips : Clean as you go! I can’t stress this enough. It makes the whole experience less daunting and keeps your workspace from looking like a post-bake sale war zone.
Professional Cooking Method
Alright, now onto the exciting part—actually baking this beauty!
-
Preheat oven : set that oven to 350°f (175°c). no cake should meet a cold oven; it leads to sad baking outcomes.
Grease a 9x13 inch baking pan because nobody wants their cake stuck!
-
Cake Batter : In a large bowl, mix the cake mix, water, oil, and eggs on medium speed for about 2 minutes. Aim for a smooth consistency.
-
Cream Cheese Layer : Whip that cream cheese in another bowl. It should be soft and creamy without lumps—think of it like a comforting hug for your cake.
-
Layering : here’s where the excitement (and slight chaos) happens. pour half of the cake batter into the pan, coax that cream cheese mixture over it, and then add the second half of the batter on top.
Finally, layer those sweet, juicy strawberries right over. it’s like giving your cake a fruity crown!
-
Bake : toss it into the preheated oven for 40-45 minutes. you’ll know it’s ready when a toothpick comes out clean (or mostly clean).
This is where patience wears a bit thin, but believe me, it’s worth it!
-
Cool and Serve : Let it cool for about 15 minutes before diving in—this will save you from a potentially messy cake disaster.
Expert Techniques
As I’ve learned through my baking blunders, precision matters :
-
Make sure that cream cheese is really soft . If it’s still a bit cool, it won’t swirl nicely.
-
When making your cake batter, overmixing can lead to a tough texture. Just mix ’til combined—it’ll turn out better, trust me!
-
You can switch out the strawberries for whatever berries you like! Experiment a bit—blueberries or raspberries could totally be fun.
Success Strategies
Now, let’s cover how to avoid those common issues:
-
Troubleshooting tips : if your cake isn't rising, double-check that your baking powder (if added) is fresh. old leavening agents can do funny things, like bring a cake down before it even rises.
-
Quality Assurance : Look for a nice golden top when it comes out of the oven. Use that toothpick test, and remember—some moist crumbs are okay!
-
Perfect Results Guide : For a heavenly final touch, serve it warm with whipped cream or your favorite vanilla ice cream—totally the cherry on top of this cake!
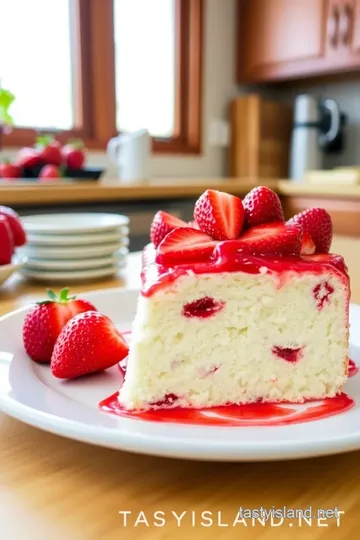
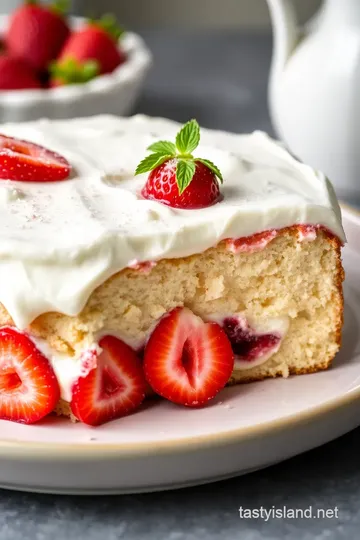
And just like that, you've crafted a gorgeous strawberry earthquake cake that’s bound to be the star of any gathering.
It’s super moist, packed with fresh strawberries, and that cream cheese swirl—oh boy, it’ll have you coming back for seconds.
If you're curious about some fun variations or how to pair this cake with seasonal fruits and flavors, stay tuned! you'll get ideas that can guide you through crafting perfect desserts for any occasion.
Professional Secrets
When whipping up a Strawberry Earthquake Cake , there’s so much you can do beyond just following the recipe. Here’s a bit of kitchen wisdom I’ve gathered over the years!
Professional Insights
Bakers often say, “it’s all in the mix.” and boy, were they right! using a quality cake mix, whether it’s white or vanilla, makes a world of difference.
I remember once, i grabbed a store-brand mix in a rush, and let’s just say, it sank faster than my hopes for a good cake.
Stick with a well-known brand, and you’ll dodge that disaster.
Expert Techniques
One technique i swear by is not to overmix the batter. sure, it’s tempting to just keep mixing until it’s silky smooth, but that can lead to a dry cake.
You want to stop when the ingredients are just combined. think of it like a nice, warm hug rather than a wrestling match!
Kitchen Wisdom
Here’s a nifty tip: when mixing the strawberries with sugar and lemon juice, give them about 10-15 minutes to release their juices.
This really helps intensify the flavor. remember, patience is key (even if you’re itching to lick the spoon)!
Success Guarantees
If you follow these basic rules but still find yourself in a cake conundrum, here’s your safety net: always have an emergency dessert! a few cookies or a quick pan of brownies stashed away can save the day.
It's like having a fire extinguisher in the kitchen, just in case!
Perfect Presentation
Now that your cake is baking to perfection, it’s time to chat about making it look downright irresistible.
Plating Techniques
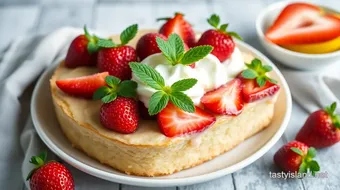
When you take this beautiful cake out of the oven, gently place it on a rustic wooden board or a vintage cake stand.
A pop of color with fresh berries around the edge can make it instagram-ready!
Garnish Ideas
A light dusting of powdered sugar on top adds an air of sophistication. and if you’re feeling fancy, a sprig of mint right at the center can elevate the cake to new heights.
I mean, who wouldn’t want to feel like a master baker with plants on their dessert?
Serving Suggestions
Serve it warm with a scoop of vanilla bean ice cream. the melty goodness paired with the moist cake is pure magic.
And trust me, it’s comforting in a way only dessert can be.
Visual Appeal Tips
Take a cue from food photographers: natural light is your friend! slice the cake and shoot it in soft sunlight for that pinterest-worthy snap, or just use your phone’s snack cam in the kitchen.
.. no one has to know!
Storage and Make-Ahead
Sometimes, you want the deliciousness now but have a busy week ahead.
Storage Guidelines
Once the party is over, cut any leftover cake into pieces, layer them between parchment paper in an airtight container, and pop it in the fridge.
Trust me, it’ll still be lovely for a few days, and even better when warmed!
Preservation Methods
For longer-term storage, you can freeze the cake. just wrap slices tightly in plastic wrap before placing them in a freezer bag.
I did this once and lost a good 1/4 of my cake to science, thanks to freezer burn—ugh!
Reheating Instructions
When it’s time to dig in again, just pop it in the microwave for about 15-20 seconds. It’ll be warm and ready to enjoy, just like the first time around.
Freshness Tips
A simple trick: always keep a slice wrapped in foil or plastic so it doesn’t dry out. It’s like giving your cake a cozy blanket just before bedtime!
Creative Variations
If you're like me, you love a twist on the classics.
Flavor Adaptations
Ever thought of playing with the flavor? Swap strawberries for raspberries or blueberries for a delicious berry medley. I did this once by accident and found it to be so good!
Dietary Modifications
For those needing a gluten-free option, grab yourself a gluten-free cake mix. You won’t sacrifice any of the deliciousness—even I could hardly tell the difference one day!
Seasonal Twists
In fall, consider adding pumpkin spice to the cake batter. It’s like autumn in every bite. Seasonal fruits are a great idea too; think peaches in summer or apples in autumn!
Regional Variations
How about trying a cream cheese swirl cake using a spice cake mix? It feels like a warm hug from Grandma, especially if you serve it with homemade applesauce.
Complete Nutrition Guide
Let’s talk about the benefits of enjoying your strawberry treats.
Detailed Breakdown
One slice of this Strawberry Earthquake Cake has around 290 calories, which is kind of like indulging in a decadent breakfast, right?
Health Benefits
Strawberries are rich in antioxidants and vitamins, so hey, a piece of cake isn’t all bad! Just consider it as a delightful way to enjoy fruits in your dessert.
Dietary Information
With its moist layers and fresh fruit, this cake can sit beautifully in your dessert repertoire for family gatherings and birthday parties alike. It’s the star of summer dessert ideas!
Portion Guidance
Remember, moderation is key! One slice is perfect, but two slices on a Sunday evening? No judgment here.
Expert FAQ Solutions
Sometimes, you just need a little reassurance while baking!
Common Concerns
You might wonder, “What if my cake doesn’t rise?” If that happens, check your baking powder. Old leavening agents can ruin the fun.
Expert Answers
If you’re not sure how to prepare your strawberries, remember: hulled means the stems and leaves are gone!
Troubleshooting Guide
And if the cream cheese swirl is more like a cream cheese block? Fear not! A bit more blending next time will give you that smoothness.
Success Tips
Always trust your instincts while baking. If something feels off, don’t be shy about reaching out for tips—sharing is caring in the kitchen!
In conclusion, the strawberry earthquake cake isn’t just a treat, it’s an experience. whether you’re baking for yourself or sharing with friends, remember that every strum of flour and sugar is a step toward delicious memories.
Happy baking!
Strawberry Earthquake Cake Card
⚖️ Ingredients:
- 1 box (15.25 oz) white or vanilla cake mix
- 1 cup water
- ½ cup vegetable oil
- 3 large eggs
- 2 cups fresh strawberries, hulled and sliced
- ½ cup granulated sugar
- 1 tablespoon lemon juice
- 8 oz cream cheese, softened
- ½ cup granulated sugar
- 1 large egg
- ½ teaspoon vanilla extract
- 1 cup shredded coconut (optional)
- ½ cup chopped pecans or walnuts (optional)
🥄 Instructions:
- Step 1: In a medium bowl, combine the sliced strawberries, ½ cup sugar, and lemon juice. Let them sit for about 10-15 minutes until the strawberries release their juices.
- Step 2: Preheat your oven to 350°F (175°C). Grease a 9x13 inch baking pan with cooking spray or butter and set aside.
- Step 3: In a large mixing bowl, combine the cake mix, water, vegetable oil, and eggs. Mix with an electric mixer on medium speed for 2 minutes until well blended.
- Step 4: In another bowl, mix the softened cream cheese, ½ cup sugar, 1 egg, and ½ teaspoon vanilla extract. Beat until smooth and creamy.
- Step 5: Pour half of the cake batter into the prepared baking pan, spreading it evenly. Use a spoon to dollop the cream cheese mixture over the batter. Pour the second half of the cake batter over the cream cheese layer. Finally, layer the strawberry mixture on top along with any juices.
- Step 6: If desired, sprinkle shredded coconut and chopped nuts over the strawberry layer.
- Step 7: Bake in the preheated oven for 40-45 minutes, or until a toothpick inserted in the center comes out clean (it may have some strawberry juices but no wet batter).
- Step 8: Allow the cake to cool in the pan for 15 minutes. Serve warm or at room temperature. Slice into squares and enjoy!
Previous Recipe: Heart for Cake: 7 Best Heartfelt Chocolate Cake Ideas
Next Recipe: Sushi Cake: 5 Creative Ways to Make This Delightful Sushi Dessert