Ultimate Crusty Crackers
Looking for a tasty snack? These homemade crusty crackers are easy to make, packed with flavor, and perfect for cheese platters or dips. Let's bake!

- Crunch Time: The Rise of the Ultimate Crusty Crackers
- A Little Bit of History
- Time and Cost Considerations
- The Perks of Homemade Crackers
- Essential Ingredients Guide
- Mastering the Art of Crusty Crackers: A Professional Cooking Guide
- Pro Tips & Secrets to Perfecting Your Crusty Crackers
- Perfect Presentation for Your Crusty Crackers
- Storage & Make-Ahead: Keep It Fresh
- Creative Variations: Spice Up Your Cracker Game
- Complete Nutrition Guide: Snack Smart
- Expert FAQ Solutions: Crack the Code to Success
- Conclusion: Time to Get Your Snack On!
- Recipe Card
Crunch Time: The Rise of the Ultimate Crusty Crackers
Oh my gosh, do you remember the crunch of a perfect cracker? it’s like a mini celebration in your mouth! i recently had a moment, sitting on my couch, snacking on some store-bought crackers while binge-watching my favorite show.
I thought, “why am i munching on these bland, pre-packaged snacks when i can whip up my own crusty cracker masterpiece?” so, that’s how this journey began.
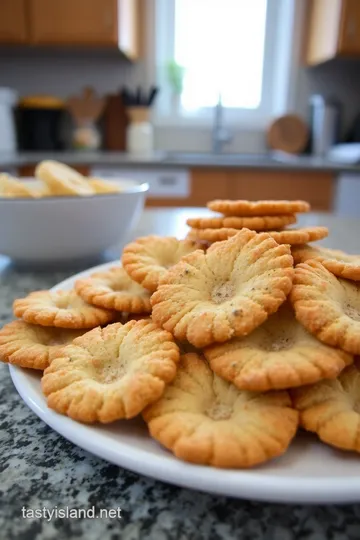
Imagine crackly, golden-brown, savory bites that you made yourself! sounds amazing, right?
Let’s dive into the world of homemade crackers—where you can customize with herbs, spices, or even cheese to match your mood.
And trust me, once you go homemade, you’ll never want to go back to those dull, store-bought versions. we’re talking about a crunchy crackers recipe that’s not just easy, but oh-so-satisfying to make!
A Little Bit of History
Crackers have a charming history that has traveled through various cultures and cuisines. originating from europe, these crispy delights were initially created as a way to preserve grains.
Today, they’ve evolved into the delicious snacks we know and love, perfect for all our snack ideas , whether it be game night, a cozy movie marathon, or a fancy soirée.
In today's world, homemade crackers are making a serious comeback. with more folks looking for health-conscious snacks, these savory snacks are the perfect fix.
Not only can you whip them up in an hour, but they also offer a fun kitchen activity. plus, they are a great way to impress your friends without breaking a sweat.
Time and Cost Considerations
Ready to give it a go? the whole process takes about 1 hour and 15 minutes: 20 minutes for active prep, 30 minutes of chill time, and 25 minutes in the oven.
In terms of cost, you’re looking at just a few bucks to whip up a batch of artisan crackers —so they’re perfect for anyone on a budget but still seeking tasty baked snacks .
You’ll yield about 24-30 crackers, depending on how big you cut them. so, plenty to share, or keep all to yourself (no judgment here!).
The Perks of Homemade Crackers
If you’re like me and not willing to compromise on flavor, these crusty crackers shine bright. they’re made with natural ingredients , making them a healthier choice.
Health benefits? sure! they are great for healthy snacking and can be tailored to fit various diets—think gluten-free options or dairy-free crackers .
You can even sneak in some whole wheat flour for a nutty twist— whole wheat snacks that are actually good for you!
Plus, they can be flavored any way you like! garlic, herbs, cheese, or even seeds—let’s not forget those delicious topping options.
These are versatile for app appetizer recipes, too. serve them with your favorite snack dipping sauces or as part of a snack platter .
They’re the kind of finger foods that bring everyone together.
Perfect for All Occasions
Want to jazz up your next party? bring these guys along! they make for perfect entertaining snacks and can easily impress guests looking for gourmet crackers without the gourmet price tag.
They’re crispy, a little savory, and a whole lot of fun to make.
So, are you ready to embrace your inner baker and take on this easy cracker recipe ? Let’s get into the ingredient list so you can create your own batch of crusty crackers ! Your taste buds are in for a tasty treat!
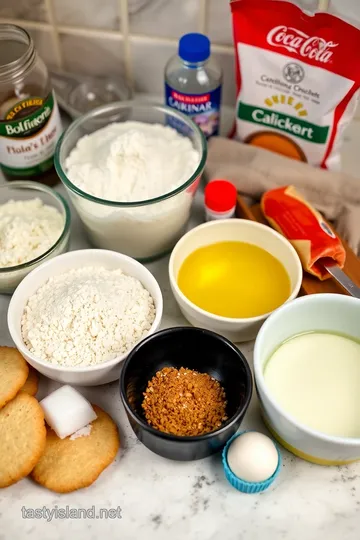
Essential Ingredients Guide
Cooking starts with good ingredients, right? when you whip up a batch of ultimate crusty crackers , having the right stuff ready to go can make all the difference.
I've learned this through more late-night snacking sessions than i care to admit!
Premium Core Components
Let’s kick things off with the basics. For these crackers, you’ll need:
- 1 ½ cups (180g) all-purpose flour
- ½ cup (60g) whole wheat flour
- 1 tsp (5g) sea salt
- ½ tsp (2g) garlic powder
- ¼ tsp (1g) onion powder
- ½ cup (120ml) cold water
- ¼ cup (60ml) olive oil
You wanna think of flour like the foundation of your cracker palace. all-purpose flour gives you that lovely crunch, while whole wheat flour adds depth.
When you’re checking for quality, look for a fine texture, and make sure it’s not clumpy. it should smell fresh—like a bakery! as for storage, keep flour in a cool, dark place, and it’ll last a good six to eight months.
Signature Seasoning Blend
Next up, let’s jazz things up! You’re gonna want to sprinkle in some magic with seasonings.
- 1 Tbsp (15g) sesame seeds
- 1 Tbsp (15g) poppy seeds
- Flaky sea salt for that final touch
These spices are your friends. they add flavor and pizzazz. as a personal touch, experiments with herbs like rosemary or thyme are fun! the world of flavor is your oyster, and those seeds also bring a nice crunch to the party.
When you’re picking out herbs, look for vibrant colors and fragrant aromas!
Smart Substitutions
Sometimes, things don’t go as planned, and that’s totally cool. Life happens! Here are some quick swaps:
- Flours: No whole wheat flour? All-purpose all the way!
- Olive oil: Melted coconut oil works like a charm if you want to shake things up.
- Seeds: Don’t have sesame or poppy seeds? Go wild with sunflower seeds or even crushed nuts.
Got specific dietary needs? These crackers can easily be gluten-free ! Just grab a cup of your favorite gluten-free flour, and you’re good to go.
Kitchen Equipment Essentials
Now, let’s chat gadgets! Here are your must-haves for making these crunchy delights:
- Mixing bowls (you know, the good ol’ trusty ones!)
- A rolling pin (or an empty bottle if you’re feeling crafty)
- Baking sheet with parchment paper for easy cleanup
- Pizza cutter or knife to slice those crackers into perfection
When rolling out the dough, a little flour on your surface can save you from a sticky situation. trust me; i’ve battled that monster before.
And if you wrap your dough up for a chill in the fridge, it'll make it easier to handle.
Now, once you’ve got your ingredients and tools ready, we’re almost there! the anticipation of those crusty crackers makes it a fun journey.
You're diving into a satisfying adventure where every ounce of effort leads to crunchy bites. before you embark on your baking journey, keep those tips in mind! monitor your baking time closely to ensure that perfect golden brown color and crispy texture.
And hey, remember the moment when you bring your crackers out of the oven? the scent wafts through your kitchen, and you can barely wait for them to cool.
Obvious snacking temptation aside, the real joy is in sharing these savory snacks with friends!
Stick around for the instructions coming up next, because you’re about to uncover how to make these artisan crackers come to life in your kitchen! trust me; you’re gonna want to make these again and again.
Mastering the Art of Crusty Crackers: A Professional Cooking Guide
So, you wanna get into the serious biz of making crusty crackers , huh? trust me, it’s easier than you think! by keeping to some essential preparation steps , you’ll set yourself up for success and those savory snacks will shine.
Essential Preparation Steps
Let’s kick things off with mise en place . it’s a fancy french term that basically means “everything in its place.
” before you even think about mixing things up, measure out your ingredients. this little step isn’t just for show; it saves time and keeps you organized.
And speaking of time management, be mindful of the clock! you want to get your dough chilled for at least 30 minutes , which is the perfect time to tidy up your kitchen or binge-watch something on netflix.
Win-win, right?
Organization is key, too! make sure your workspace is clear and all the tools you need are within arm’s reach.
This prevents last-minute panics when you can’t find your rolling pin. and don’t forget about safety! always keep fingers away from sharp tools; nobody wants a trip to the er after a baking session.
Step-by-Step Process
Here’s where the fun starts! Follow these clear, numbered instructions to create those crunchy bites:
-
Prepare the dough : mix 1 ½ cups of all-purpose flour with ½ cup of whole wheat flour, sea salt, garlic powder, and onion powder in a big bowl.
Make a well, pour in ¼ cup of olive oil and ½ cup of cold water , and stir until it forms a rough dough.
-
Chill the Dough : Wrap that dough ball up in plastic wrap and let it chill for 30 minutes . It's not just for aesthetics; it improves the texture.
-
Roll Out the Dough : Preheat your oven to 375° F ( 190° C) , then roll out your chilled dough to about 1/8-inch thickness.
-
Cut the Crackers : Take a pizza cutter or knife and cut the dough into whatever shapes tickle your fancy.
-
Add Toppings : Sprinkle with sesame and poppy seeds, plus a sprinkle of flaky sea salt for that extra crunch.
-
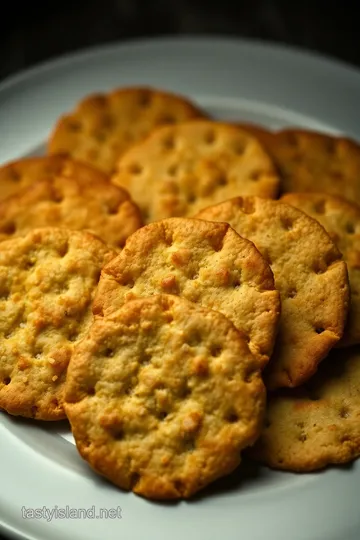
Bake : Pop it in the oven for 20- 25 minutes . Keep an eye on them halfway through; you don’t want any burnt snacks. Aim for golden brown perfection!
-
Cool and Serve : Let them cool before diving in. Trust me, the crunchiness increases as they cool down.
Expert Techniques
Now, let's elevate your cracker game. if you want a snack that truly stands out, try adding ½ cup of grated parmesan cheese to the dough.
You’ll get that cheesy goodness with every bite.
And remember, a little creativity goes a long way. experiment with herbs or spices that you love. don't be shy—make those herb-infused crackers sing with flavor! when you pull those baked beauties out, give them a taste to check for doneness.
They should be crisp, not hard!
Success Strategies
Everyone makes mistakes, even seasoned bakers. One common pitfall? Overbaking. Seriously, people! Watch that time carefully. If they start looking more golden than brown, it's time to take them out.
For quality assurance, check your dough consistency before rolling. if it’s too sticky, add a sprinkle of flour. if it’s crumbly, splash in a drop more cold water.
And, if you're like me and tend to be spontaneous, feel free to whip up a few dough variations by tossing in seeds or different flours for those gluten-free options .
Final Thoughts
Making your own crusty crackers at home not only gives you delicious snacks but also a sense of accomplishment. plus, let’s be real, it’s a foolproof way to wow your friends and family at parties! whether you nosh on them solo or turn them into gourmet snack platters , you have something everyone can enjoy.
And hey, if you're feeling like tackling more fun in the kitchen, stay tuned for additional information on making snack dipping sauces and exploring even more creative snack ideas .
Happy cooking, friends!
Pro Tips & Secrets to Perfecting Your Crusty Crackers
So, you’re ready to dive into the world of homemade crusty crackers ? awesome choice! they’re not just your average snack idea ; they’re like little bites of joy.
Here’s the scoop on how to take your cracker game to the next level.
First off, don’t be shy to play with flavors. herb-infused crackers are a crowd-pleaser, and adding some dried rosemary or thyme can totally take your easy cracker recipe from yum to wow.
And remember, precision is key! when measuring your ingredients, especially that flour, don’t just eyeball it. use a scale if you have one; it really makes a difference in texture.
Want to save some time? make two batches and freeze one! it’s a perfect little baking hack for those busy days.
Just freeze the uncooked dough after you cut it, pop it in the oven when you’re ready for a fresh snack.
You know? like having a secret stash of tasty baked snacks at your fingertips.
Perfect Presentation for Your Crusty Crackers
Okay, let’s talk about making your crackers look as good as they taste. when plating, don’t just dump them on the plate.
Create a beautiful snack platter . mix it up with colors—think vibrant veggies, mixed olives, or even some bold cheeses.
Garnish is everything! a sprinkle of flaky sea salt on top right before baking not only adds flavor but also elevates that visual appeal.
You can even drizzle a little olive oil on the crackers after they come out of the oven for a glossy finish.
Trust me, your guests will be snapping pics for instagram before they even take a bite!
Storage & Make-Ahead: Keep It Fresh
Let’s be real—nobody wants stale crackers. once they cool, pop those beauties into an airtight container. they’ll last about a week.
If you've made a thicker batch, just keep an eye on them! nutritional snacks can be kept fresh with a little tlc.
You can always revive them in the oven for a few minutes if you find them losing their crunch.
If you do decide to make them ahead of time, chilling the dough means you can bake fresh whenever you want. That’s a meal prep snack win right there!
Creative Variations: Spice Up Your Cracker Game
What’s cool about this crunchy crackers recipe is how customizable it is. feeling cheesy? toss in a cup of shredded parmesan cheese crackers for an extra flavor kick.
Want to go gluten-free? substitute almond flour instead of the regular stuff. trust me, it works remarkably well!
You can also experiment with seasonal flavors. Maybe try adding pumpkin puree and pumpkin spice for autumn crackers—so yum! The possibilities are endless, and you’ll never get bored!
Complete Nutrition Guide: Snack Smart
Now, let’s not forget about healthy snacking . each cracker has about 100 calories and packs a decent protein punch. want to keep it more wholesome? use whole wheat flour as your base—it's a simple switch that kicks the nutritional value up a notch.
If you're worried about portion sizes, remember that 24-30 crackers may sound like a lot, but keep them to a few at a time and pair them with healthy dips.
Think hummus or tzatziki. you’ll feel good about what you’re snacking on!
Expert FAQ Solutions: Crack the Code to Success
Got questions? i’ve got answers! one common issue is over-baking; nobody wants bitter crackers . just keep an eye on them in the oven.
If they look golden, it’s game over—pull them out!
Another tip? if your dough isn’t rolling out smoothly, it might be too dry; add a bit more water next time.
Make sure to always work with the right texture for the best crunchy bites .
Conclusion: Time to Get Your Snack On!
So, there you have it! with these tips, your journey into the world of artisan crackers will be smooth sailing.
It’s about enjoying the process. you’ll become a pro in no time—just relax and have fun with it! remember, these crackers are a great way to bring family and friends together, kicking off any gathering with a bang!
Happy baking, my friend! Now go whip up some of those delicious, crusty crackers . You know you want to!
Ultimate Crusty Crackers Card

⚖️ Ingredients:
- 1 ½ cups (180g) all-purpose flour
- ½ cup (60g) whole wheat flour
- 1 tsp (5g) sea salt
- ½ tsp (2g) garlic powder
- ¼ tsp (1g) onion powder
- ½ cup (120ml) cold water
- ¼ cup (60ml) olive oil
- 1 Tbsp (15g) sesame seeds
- 1 Tbsp (15g) poppy seeds
- Flaky sea salt, for sprinkling
🥄 Instructions:
- Step 1: In a large bowl, combine the all-purpose flour, whole wheat flour, sea salt, garlic powder, and onion powder.
- Step 2: Create a well in the center and add olive oil and cold water. Stir until the mixture forms a rough dough.
- Step 3: Form the dough into a ball, wrap in plastic wrap, and chill for at least 30 minutes.
- Step 4: Preheat the oven to 375°F (190°C). On a floured surface, roll out the chilled dough to about 1/8-inch thickness.
- Step 5: Using a pizza cutter or knife, cut the rolled-out dough into desired shapes (squares or rectangles) and transfer to a baking sheet lined with parchment paper.
- Step 6: Sprinkle the cut crackers with sesame seeds, poppy seeds, and flaky sea salt.
- Step 7: Bake in the preheated oven for 20-25 minutes or until golden brown and crisp, checking halfway through for even baking.
- Step 8: Remove from the oven, allow to cool, and enjoy your crusty crackers!
Previous Recipe: How to Make the Best World Class Bakery 1/4 Sheet Caribbean Cake
Next Recipe: Easy Fresh Snappy Pea Salad: 10 Minutes to Deliciousness!