Vibrant Día de los Muertos Sugar Skulls: A Sweet Tribute
Looking for dia de los muertos decorations? Discover how to create colorful sugar skulls that add charm and sweetness to your celebrations. Try it today!

- What Makes a Sugar Skull Truly Special?
- A Little History on Sugar Skulls
- The Complete Guide to Authentic Sugar Skulls
- Unique Flavors and Technique
- Health and Nutrition Highlights
- Recipe at a Glance
- Essential Components Guide
- Kitchen Equipment Essentials
- Vibrant Día de los Muertos Sugar Skulls: A Sweet Tribute
- Expert Kitchen Wisdom
- Perfect Presentation
- Storage and Make-Ahead
- Creative Variations
- Complete Nutrition Guide
- Expert FAQ Solutions
- Recipe Card
What Makes a Sugar Skull Truly Special?
Have you ever wondered why sugar skulls are more than just colorful, fun decorations? is it magic or tradition that makes them so special? let’s dive in! vibrant día de los muertos sugar skulls are not just eye-catching treats; they carry the rich heritage of mexican culture, celebrating the lives of loved ones lost.
With a moderate level of skill and a time commitment of about 1.5 hours (plus a whole day for drying), you can craft these edible artworks right in your own kitchen.
Trust me, it’s totally worth it!
The charm of these sugar skulls lies in their intricate designs and vibrant connections to family memories. traditionally crafted for the día de los muertos (day of the dead), these delightful treats aren’t just sweets; they are symbols of remembrance.
Each sugar skull reflects a unique artistic expression, making each one tell a story in its colorful icing and patterns.
A Little History on Sugar Skulls
Día de los muertos crafts like sugar skulls date back to the pre-hispanic era in mexico, where death was viewed as a return to the earth, not as something to fear.
The aztecs even honored their dead with sugar skulls made from amaranth dough. when the spanish came, the technique turned into the sweet sugar skulls we know and love today, representing the living and the deceased.
The cultural significance of sugar skulls was firmly rooted in the belief that the spirits of loved ones would return to visit at this time of year.
Sweet, huh?
Sugar skulls not only look amazing but also serve as a connection between our worlds. over the years, they’ve become popular offerings on altars for día de los muertos , adorned with vibrant colors and intricate patterns.
So, when you munch on one, you’re tasting a slice of tradition and love from generations past!
The Complete Guide to Authentic Sugar Skulls
What makes the sugar skulls so vibrant ? it’s the culinary heritage that informs every step of the process! from the choice of flavors—like hints of citrus in baking—to the creative expressions in decorating, each skull is a tiny masterpiece of edible art for día de los muertos .
They represent joy, love, and the memories of those who’ve passed away. nowadays, you’ll find them everywhere during the festivities, cheering up homes and streets alike!
These delightful sweet mexican confections are everywhere at this time of year, but nothing beats making them at home. you can gather your friends or family for a fun baking project that results in sugary decorations and a room filled with laughter.
Honestly, it’s a family-friendly cooking activity that gets everyone involved!
Unique Flavors and Technique
Now, let’s talk about what makes these sugar skulls a blast to create. the unique flavor combinations of lemon and vanilla mixed with colorful, sugary frosting literally scream festive treats for día de los muertos .
And don’t worry if you don’t have a professional’s touch; this recipe features foolproof techniques , making sure that the only thing you need to channel is your inner artist.
Here’s a fun bit: decorating sugar skulls not only allows for self-expression, but it can also be a super therapeutic activity—just getting lost in the designs as you decorate sugar skulls can help clear your mind.
Plus, if you stick to tried-and-true methods, your creations will turn out fab. it’s like art class, but with icing! who doesn’t want that?
Health and Nutrition Highlights
Of course, we can’t forget about the nutrition behind these little devils. each skull packs about 130 calories , with zero fat (thank goodness!) and a surprising amount of carbohydrates .
While we wouldn't call a sugar skull a superfood, they can add a bit of whimsy to your holiday table without going totally overboard.
Keep in mind dietary considerations too, especially if you're looking for balanced nutrition facts amidst all that sweetness.
Recipe at a Glance
- Total Preparation Time: 1.5 hours
- Skill Level Required: Medium
- Serving Size: Yields approximately 12 medium-sized sugar skulls
- Cost Efficiency: Relatively affordable and makes for a fun day with family!
So, once you’re all set with your ingredients, it’s time to move on to the fun part—the ingredients section! you won’t want to miss the juicy bits about making those sugar skulls come alive with flavor and colors.
Let’s dive right in!

Essential Components Guide
When it comes to making vibrant día de los muertos sugar skulls , the ingredients are just as essential as the colorful decorations.
I mean, we could bake just about anything, but the magic of these sugar skulls lies in their sweetness and tradition.
So let’s break down the components, from core ingredients to those sneaky substitutes you might need!
Premium Core Ingredients
First off, let’s dive into the sugar skull mixture . you’ll need 4 cups of granulated sugar, 1/2 teaspoon of powdered meringue, 1/2 teaspoon of vanilla extract, and 1 tablespoon of water.
It sounds simple, right? but the quality matters! look for a bright white sugar, which tells you it’s refined well.
For meringue, pick a brand that brings a lightness to your recipe. and when it comes to storage, keep that sugar in an airtight container—no one wants clumpy sugar when they need to create their edible art!
Signature Seasoning Blend
Ah, here’s where the personality of your skulls could really shine! while the basic recipe is straightforward, feel free to spice it up with flavor enhancers like lemon zest or even a dash of almond extract.
You could even get funky and mix in spices like cinnamon for a warm kick. the visual is just a portion of the fun; it’s all about those colorful sugar skull designs reflecting your personality or stories of loved ones.
Smart Substitutions
Let’s be real; life happens. if you find yourself missing powdered meringue, reach for some egg white powder instead. or if you’re heavy into the plant-based diet, a tablespoon of aquafaba could save the day.
And hey, if you’re short on time or ingredients, store-bought royal icing can be a lifesaver for those last-minute decorating sessions.
Keep that in your back pocket for fun family cooking activities!
Kitchen Equipment Essentials
Now, onto the tools of the trade. to whip up these sweet confections, you'll need sugar skull molds —plastic or metal, both work great.
A good mixing bowl and a whisk or fork are essential. i always keep some squeeze bottles or piping bags around for fun decorating—think of it as your paintbrush for edible art! and don’t forget a drying rack to let your creations harden up; no one likes a floppy skull.
Pro Ingredient Tips
Let me drop a little wisdom nugget here: freshness is key . check the expiration dates on your meringue and vanilla extract.
Old ingredients can lead to bland results, and that’s just such a missed opportunity during this joyous mexican holiday tradition.
Plus, when you’re baking, always be mindful of humidity—sugar and air can get a bit feisty together. if you’re in a humid environment, be prepared!
And if you're looking to avoid spending a ton, consider buying in bulk. sugar can be quite budget-friendly when you get it in larger quantities, and you can always use those leftover ingredients for festive treats for día de los muertos .
Creating these sugar skulls isn’t just about cooking; it's a celebration steeped in the cultural significance of sugar skulls . as you gather the ingredients and gear up for baking, picture the vibrant altar decorations and how they'll reflect your memories.
It’s almost like inviting your loved ones back for a sweet memory, don’t you think?
Now, with our essential components all lined up and ready to go, let’s jump into the fun part—the step-by-step instructions for crafting your own sugar skulls! You won’t want to miss it, trust me!
Vibrant Día de los Muertos Sugar Skulls: A Sweet Tribute
Oh my gosh, guys! i am so excited to share my latest adventure in the kitchen with you. if you’ve ever wondered how to capture a little piece of mexican holiday traditions in a fun and festive way, let me tell you about making sugar skulls for día de los muertos! these calaveritas de azúcar are not just sweet treats; they embody love and remembrance for our dearly departed.
Let’s dive in!
Essential Preparation Steps
First things first, we need to set ourselves up for success. this is the part called mise en place —a fancy french term that basically means gathering your ingredients and tools.
You’ll need:
- 4 cups granulated sugar
- ½ teaspoon powdered meringue
- ½ teaspoon vanilla extract
- 1 tablespoon water
Also, grab your sugar skull molds and decorate with edible colors, royal icing, and whatever sprinkles your heart desires. oh, and great news: no baking required! just keep everything on your counter, nice and tidy.
Now, time management is key. this whole project will take about 1.5 hours , but since the skulls need to dry for 24 hours, plan ahead.
Start prep, set your timing, and you’ll be golden.
Professional Cooking Method
Alright, let’s get moving! Here’s how to bring those vibrant sugar skulls to life:
-
Prepare the Molds : Lightly grease your molds with cooking spray or a bit of oil. Trust me, this can save you from a sticky situation later!
-
Mix the Sugar Combination : In a large mixing bowl, combine the sugar and powdered meringue. Add the vanilla and water, stirring until it resembles wet sand—like packing a sandcastle at the beach!
-
Fill the Molds : Pack the sugar mixture tightly into each mold, pressing firmly. Focus on your packing technique, just like it’s a sandbag competition!
-
Rest the Skulls : Let them sit for 30 minutes to 1 hour. This step is crucial for firming them up.
-
Unmold the Skulls : Carefully flip the molds and gently release each sugar skull. It’s like popping a Poppet candy wrapper!
-
Dry the Skulls : Place them on a rack and let them dry for a whopping 24 hours. Yeah, patience is key, but the anticipation makes it so rewarding!
-
Decorate the Skulls : This is the fun part! Use piping bags or squeeze bottles filled with royal icing to create colorful designs. Go wild with creativity—this is your edible art!
Expert Techniques
Trust me when I say precision makes a huge difference! Here’s what worked for me:
- Humidity Check : A dry kitchen is your best friend! Moisture can ruin the sugar mixture, leaving you with clumpy chaos.
- Press Firmly : When filling the molds, don’t be shy. Pressing firmly results in a beautiful solid skull—nobody likes a cracked crown!
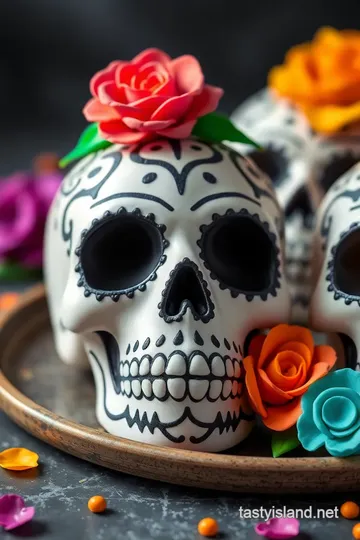
- Colorful Designs : Each skull can have its own personality—let your inner artist shine. Add edible glitter for a bit of glam!
Success Strategies
Despite my excitement when making these skulls, I faced a few challenges. One time, I rushed through the drying stage and ended up with squished skulls. Not fun . Here's my advice:
- Troubleshooting : If your mixture is too crumbly, just add a few drops more water. If it's too wet, sprinkle a bit more sugar.
- Quality Assurance : Always taste your icing before decorating. If it’s delicious, you’re golden!
And remember, your sugar skulls will symbolize the loved ones remembered during this vibrant celebration. Decorate them with heart, and they’ll be perfect!
Now that you've got those sugar skulls out of the way, the next step is positioning them among your beautiful día de los muertos altar decorations, where they'll truly shine.
Can’t wait to chat more about those colorful aspects of this rich cultural experience!
Expert Kitchen Wisdom
So, you’re ready to dive into the colorful world of vibrant día de los muertos sugar skulls i’ve got to tell you, it’s not just about mixing sugar and having fun with colors.
There’s a whole universe of professional insights that’ll make your sugar skulls turn out perfectly.
You see, technique is everything. when mixing your sugar and powdered meringue, you want it to feel like wet sand.
Too much moisture? forget it; it’ll crumble apart. too dry? good luck getting those shapes out of the mold! trust me, i faced my fair share of sugar collapse moments before honing this technique!
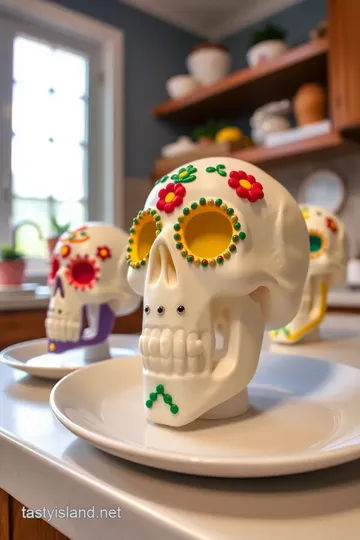
Perfect Presentation
Now, once you've successfully de-molded your sugar skulls (which is like winning the lottery), it’s decorating time! plating techniques are all about letting your creativity shine.
Imagine a vibrant array of colors on each skull—using royal icing to create intricate designs is not just a garnish; it's edible art for día de los muertos .
You can try out different sugar skull decorating ideas like adding nonpareils and edible glitter. and here’s a trick: if you want them to pop even more, consider a pastel background on your serving platter.
Trust me, your friends will be reaching for their phones to snap a pic of your edible art!
Storage and Make-Ahead
Okay, hear me out! you can totally make these bad boys ahead of time. just remember the storage guidelines : keep them in a cool, dry place, away from any humidity.
If you live in one of those steamy towns, i feel for you! those sugar skulls are just like me—can’t stand the heat!
As for reheating instructions , well, there’s none needed here since we don’t want to ruin our artistic creations. just admire them for the next few days.
And if they start to lose a bit of color? a quick spritz of edible food spray can revamp them into their former glory.
Creative Variations
You might wonder, "how can i mix things up?" well, flavor adaptations can elevate these sugar skulls to new heights! consider adding lemon zest or even orange extract for a light citrus flavor.
It's like a refreshing twist to a classic!
Or how about seasonal twists? You could give your sugar skulls a spooky Halloween vibe by adding black and purple colors! Don't forget about those regional variations —like incorporating local flavors such as chili powder for a kick!
Complete Nutrition Guide
Alright, let’s get down to the nitty-gritty. you might be asking yourself, “how many sugar skulls can i indulge in?” here’s a detailed breakdown : about 130 calories per skull.
Not too shabby, right? plus, they’re made mainly of sugar, so treat them as festive treats rather than everyday snacks.
They’re all about celebrating, after all, reflecting the cultural significance of sugar skulls .
Expert FAQ Solutions
You might have worries like, “what if my sugar skulls don’t hold together?” it happens! a quick answer is to press the sugar mixture firmly into the molds.
If you see cracks, your sugar was too dry. yikes! for a troubleshooting guide, keep a small spray bottle handy to mist the sugar slightly while mixing—just a touch, though!
So whether you’re celebrating the day of the dead with friends or creating an altar adorned with your colorful sugar skulls, there’s so much joy in this festive kitchen project.
Look into into the fun of holiday cooking, and let your creativity flow while honoring traditions. honestly, there are few things more fulfilling than transforming simple ingredients into vibrant culinary creations that bring everyone together.
Happy decorating and buen provecho!
Vibrant Día de los Muertos Sugar Skulls: A Sweet Tribute Card
⚖️ Ingredients:
- 4 cups (500 g) granulated sugar
- 1/2 teaspoon (2 g) powdered meringue
- 1/2 teaspoon (2 ml) vanilla extract
- 1 tablespoon (15 ml) water
- Edible colors or food gels (various colors)
- Royal icing (store-bought or homemade)
- Decorative elements (e.g., nonpareils, edible glitter)
🥄 Instructions:
- Step 1: Lightly grease the sugar skull molds with cooking spray or oil.
- Step 2: In a mixing bowl, combine granulated sugar and powdered meringue. Add vanilla extract and water, then mix until the sugar resembles wet sand.
- Step 3: Pack the sugar mixture tightly into each sugar skull mold, pressing firmly to hold the shape.
- Step 4: Allow the molds to sit at room temperature for at least 30 minutes to 1 hour to firm up.
- Step 5: Carefully remove the sugar skulls from the molds and place them on a drying rack.
- Step 6: Let the skulls dry for 24 hours at room temperature until fully hardened.
- Step 7: Use piping bags or squeeze bottles filled with royal icing to create intricate designs on the skulls. Add edible colors, nonpareils, and glitter as desired.
Previous Recipe: Mezcal Worm Cocktail: 5 Bold and Delicious Ways to Enjoy!
Next Recipe: Krispy Krunchy Chicken Menu: 5 Easy Steps for Homemade Fried Chicken!