Bake Tasty Crust Pizza - Delightful & Easy
Craving pizza? Join me in my kitchen as I share my favorite way to Bake Tasty Crust Pizza - Delightful & Easy! With tips for the perfect crust, it's a family favorite!

- look into into Deliciousness with Homemade Pizza
- The History Behind Pizza
- Why This Homemade Pizza Rocks
- Perfect for Any Occasion
- Ready to Get Cooking?
- Your Go-To Guide: Essential Ingredients for Epic Pizza Night
- Professional Cooking Method: Your Guide to Bake Tasty Crust Pizza - Delightful & Easy
- Pro Tips & Secrets
- Perfect Presentation
- Storage & Make-Ahead
- Creative Variations
- Complete Nutrition Guide
- Expert FAQ Solutions
- Recipe Card
look into into Deliciousness with Homemade Pizza
Oh man, i’ll never forget the first time i tried to make my own pizza. i had a couple of friends over for movie night, and i thought i’d impress them with a little cooking magic.
Let’s just say, the pizza didn’t exactly turn out perfect . it was a blob of dough with way too much sauce and barely any cheese.
But hey, it was a start! fast forward to today, and cooking homemade pizza has turned into one of my favorite weekend activities.
Seriously, if you’re looking to impress family or friends, bake tasty crust pizza - delightful & easy is your ticket to success!
The History Behind Pizza
Did you know pizza has its roots in italy? yeah, like, super-duper authentic italian! it all started in naples back in the late 18th century when locals began topping flatbreads with tomatoes and cheese.
That's right folks, pizza as we know it has been around for a while, and it has evolved into something a bit different for all of us around the world.
Today, making pizza at home is a global phenomenon!
So, here’s the scoop: whipping up a homemade pizza is perfect for a cozy family night or even for a fun kids’ pizza-making activity.
It’s a dish that fills your belly and warms your heart – comfort food at its finest! this recipe is super easy , taking just about an hour, including time for that dough to rise.
Plus, you'll only need a handful of ingredients – most you probably have lying around anyway, making it budget-friendly.
Why This Homemade Pizza Rocks
You might be wondering, what makes this pizza worth it? well, let me lay it out for you. first off, health benefits ! you can control what goes onto your pizza.
Want a veggie-loaded pizza? go for it! craving something meaty? throw on that pepperoni! even better, you can whip up a gluten-free pizza crust for those who need it.
Not to mention, bake tasty crust pizza is just plain fun! roll out the dough, toss on your favorite toppings – it’s almost like a personal art project.
Plus, let’s be real, what’s better than pulling a bubbling, cheesy pizza out of the oven? your friends and family will think you’re a total kitchen rockstar.
Perfect for Any Occasion
Whether it's a friday movie night, a birthday bash, or just a regular tuesday, pizza is always a winner. family pizza night can easily become a cherished tradition.
The added bonus? you can enjoy a quick pizza preparation , and the kids can help too. this can be such a fun bonding experience!
Thinking of celebrating something? throw in a couple of your best toppings and get creative. maybe a mediterranean-inspired pie with olives and feta next to a classic cheese? the possibilities are endless! what's especially great is that you have the advantage of making pizzas that suit everyone’s taste, with tons of pizza topping ideas .
Ready to Get Cooking?
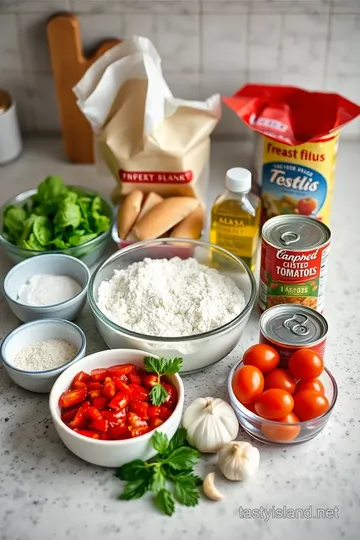
So now that i’ve hopefully convinced you that baking pizza is a delight , let’s talk about the ingredients. you’ll need some fresh pizza ingredients like all-purpose flour, yeast for that dough rising magic, and a few key toppings like mozzarella cheese and sauce.
Hop on over to the next section, and i’ll break down everything you need. whether you’re a pizza connoisseur or a beginner just figuring out how to bake pizza at home , you’ll have all the tools to create the perfect pie that rivals any pizzeria.
Get ready to unleash your culinary creativity; it’s about to get delicious!
Your Go-To Guide: Essential Ingredients for Epic Pizza Night
Hey there, pizza lovers! let’s dive into the essential ingredients you’ll need for that perfect homemade pizza experience. this is so much more than just food—it’s an experience.
Think about it. you gather around with your loved ones, everyone pitching in, tossing dough, and layering on toppings. it doesn’t get better than that!
So grab your favorite apron and let’s get cooking!
Premium Core Components
First up, let’s talk about those premium core components for your pizza.
When making a homemade pizza recipe , measurements matter . Here’s a quick rundown:
- Active dry yeast : 2 ¼ teaspoons (that’s one packet or 7 grams for all my metric friends).
- Sugar : Just 1 teaspoon (that’s 5 grams).
- Warm water : ¾ cup ( 110° F or 43° C, about 180 ml).
- All-purpose flour : 2 cups (240 grams—do you feel that dough rising?).
- Salt : 1 teaspoon (5 grams).
- Olive oil : 1 tablespoon (15 ml).
When you buy these ingredients, look for the freshest options. Yeast should be bubbly when activated, flour should be free of lumps, and your olive oil should smell rich and fruity.
Storage Guidelines ? Keep those ingredients in a cool, dry place. Flour can last about a year in the pantry, while olive oil is best used within six months after opening.
Spice Up with Signature Seasoning Blend
Now, what's pizza without the flavor explosion of seasonings? signature seasoning blends are essential. i’m talking about classic italian herbs— oregano, basil, thymes, and maybe a kick of red pepper flakes for those who like it spicy.
You can whip up a simple herb blend by combining:
- 1 tablespoon dried oregano
- 1 tablespoon dried basil
- A dash of garlic powder for that aromatic hit.
Each bite should just scream flavor, right? And don’t forget about regional variations ; you could go for a BBQ sauce topper for a unique twist!
Smart Substitutions
Now, life happens, and sometimes you might not have every ingredient on hand. that’s where smart substitutions come to play! if you're out of all-purpose flour, reach for bread flour for a chewier crust.
And if gluten's an issue? grab a gluten-free pizza crust ; the choices are endless!
For those on a special diet, swap mozzarella for vegan cheese or top your pizza with any colorful veggies you have lying around.
Cooking with whatever’s in your pantry is one of the best parts of making pizza at home!
Kitchen Equipment Essentials
You don’t need fancy stuff! Here’s your kitchen equipment essentials list:
- Mixing bowls to blend those delicious ingredients.
- Measuring cups and spoons to keep things precise (you don’t want a salty surprise!).
- A rolling pin for shaping your crust.
- A baking sheet or pizza stone —use what you can find!
Honestly, for prep, all you need is patience and a willingness to explore.
And don’t worry about storage; keep the equipment clean and dry, and it’ll last forever!
Wrapping Up
So, there you have it! with these essential ingredients , you’re all set to bake tasty crust pizza—delightful & easy .
Remember, cooking is all about creating memories as much as it is about flavors.
Whether it's a celebratory pizza night or just an ordinary Tuesday, take the time to enjoy the process. And once you’ve got your dough rising, it's time to dive into our step-by-step instructions, where the real magic happens! Who’s ready to dig in?
Professional Cooking Method: Your Guide to Bake Tasty Crust Pizza - Delightful & Easy
If you’re anything like me, pizza is one of those divine comfort foods that always hits the spot. and honestly, there’s just something magical about saying, "i made this!" when serving a homemade pie to family and friends.
So, let’s roll up our sleeves and chat about perfecting that tasty pizza crust ! spoiler: we’ll be diving into the heart of cooking with some pro methods sprinkled with my own pizza-making adventures.
Essential Preparation Steps
First up, let’s talk about mise en place . this french term means "everything in its place." it’s all about getting your fresh pizza ingredients prepped and ready to go.
Seriously, measure out your flour, salt, and toppings before you start. it makes the process smoother and more enjoyable. you don’t want to be hunting for oregano mid-recipe, right?
Next, let’s focus on time management. i like to think of cooking as a bit of a dance. you’ve got to know your moves.
While the dough is rising (let’s give it about 30 minutes ), you can prep your sauce and toppings—multitasking at its finest!
Organization strategies are key here. lay out everything you need—dough, sauce, cheese, and those cheesy pizza toppings you adore. it’ll keep you from feeling frantic when the oven timer starts counting down.
And let’s not forget about safety considerations: always keep surfaces clean and avoid cross-contamination.
Step-by-Step Process
Let’s break down the actual steps of making this pizza:
-
Activate yeast: mix ¾ cup warm water (about 110° f) with a teaspoon of sugar and 2¼ teaspoons of yeast.
Let it sit for about 5- 10 minutes until frothy.
-
Make dough: combine 2 cups of all-purpose flour and 1 teaspoon of salt in a larger bowl. add the yeast mix and 1 tablespoon olive oil .
Stir until you have a shaggy dough.
-
Knead Dough: Here comes the fun part! Transfer to a floured surface and knead for about 5- 7 minutes until it’s smooth and elastic.
-
Let Dough Rise: Pop that dough in a greased bowl, cover it, and let it rise in a warm spot for 30 minutes .
-
Preheat Oven: Set your oven to 475° F while the dough is rising.
-
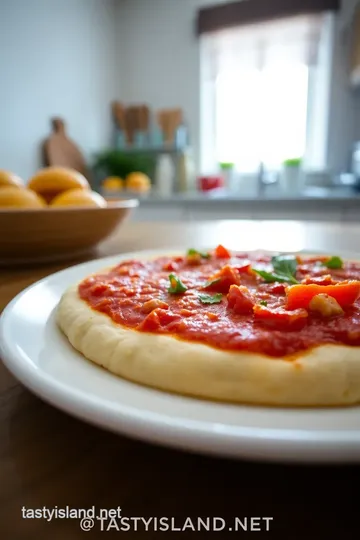
Shape Pizza: Roll it out to your desired thickness on a floured surface. Place it onto a baking sheet or pizza stone if you have one.
-
Add Sauce and Toppings: Spread some pizza sauce (about ½ cup works great ) and sprinkle 1½ cups of mozzarella cheese . Get creative with other toppings if you feel adventurous!
-
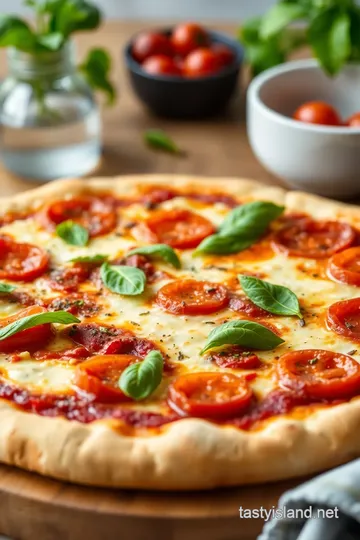
Bake Pizza: Time to put your hard work into the oven! Bake your pizza for 12- 15 minutes or until it’s a gorgeous golden brown.
-
Garnish and Serve: Cool it for just a minute, throw on some fresh basil if you like, slice, and dig in!
Expert Techniques
Let’s talk about some professional methods to level up your pizza game. one critical step is making sure your yeast activates properly.
If it doesn’t bubble and foam, it’s a no-go. also, don’t rush the dough rising process—trust me, it makes a difference for that crispy pizza crust .
When baking, keep an eye on your timings. use visual cues —look for a golden crust and bubbly cheese. if your cheese is brown but the dough isn’t quite there, you might need to lower the rack one step or two for a more even bake.
Success Strategies
Now, we’ve all made mistakes in the kitchen, right? so let me save you some heartache here. avoid over-kneading the dough; it makes for a tough pizza.
Also, don’t forget to preheat that oven! a too-cool oven will leave you with a sad, soggy crust.
For quality assurance, always test a slice when it comes out. is that crust just right? if not, keep tweaking your technique.
Also, make-ahead options are fantastic! you can prep the dough a day ahead and keep it chilled in the fridge; just let it come to room temp before you use it.
With these tips, you’ll be set to bake tasty crust pizza - delightful & easy and impress everyone at your next family pizza night .
Next up, let’s chat about some extra tips and tricks in the section additional information… . ready? let’s go!
Pro Tips & Secrets
So, let’s get into some pro tips that’ll take your pizza game from "meh" to "wow!" first off, pay attention to the yeast.
You want that warm water—think cozy bath temperature, around 110° f ( 43° c) . too hot and your poor yeast can’t recover; too cold and it’ll just sit there, unbothered.
Dough rising tips: let that dough rise in a warm spot—like on top of the fridge or near the oven while it’s preheating.
This helps develop that chewy texture we love in a tasty pizza crust . while it’s rising, you can prep your toppings.
This cuts down on the quick pizza preparation time, which is perfect for those who are calling friends over at the last minute!
For flavor, why not spread a bit of garlic-infused olive oil on your crust before adding sauce? It’s a simple way to enhance every bite.
Perfect Presentation
Now, let’s talk presentation . a pizza that looks good not only tastes better but makes everyone feel like they’ve hit the jackpot at dinner.
When you're shaping your pizza, try to leave a thicker border for a crunchy, crispy pizza crust.
Garnish with fresh basil or sprinkle some grated parmesan right before serving. don't forget about color combinations ! think vibrant reds from tomato sauce, greens from basil, and golden browns from melted cheese.
That visual appeal? total instagram bait!
Storage & Make-Ahead
Life gets busy, right? so here’s how to make your pizza experience a breeze. if you're prepping for a family pizza night , you can make the dough ahead of time.
Just keep it in the fridge for about 24 hours . when you’re ready to bake, let it come to room temp, then shape it up and go!
For leftover pizza, let it cool completely before wrapping it in foil or placing it in an airtight container. it’ll stay fresh for about 3-4 days .
When you go to reheat, toss it in a preheated oven at 375° f ( 190° c) for about 10 minutes for that oven-baked pizza vibe.
The aim is to bring back that cheesy, sunny flavor without ending up with a soggy slice, y'know?
Creative Variations
Oh, pizza is all about creativity! you can spice things up by introducing seasonal ingredients. in the summer, how about a fresh garden pizza loaded with zucchini and tomatoes? or for fall, throw on some roasted butternut squash and crumbled feta for an italian twist.
Got dietary needs? no worries—there’s always a way around it! a gluten-free pizza crust made from almond flour is super easy and delicious.
And if you’re looking for vegetarian options, load it up with your favorite veggies, like bell peppers and olives. don’t forget to experiment with sauces too—think pesto or even a smoky bbq sauce for something different!
Complete Nutrition Guide
Now, onto figuring out if this really fits in your new healthy lifestyle. the great news is that pizza can be a balanced meal! with the right toppings, like veggies and lean proteins, you can nail down your nutrition goals.
To give you an idea: one slice of this homemade pizza packs around 300 calories, 12g of protein, and 10g of fat .
If you divide the pizza into four generous slices, it's a meal that feels comforting without dropping the food coma hammer.
Just make sure to keep your portion sizes in check, especially if you’re going back for seconds!
Expert FAQ Solutions
Lastly, let’s tackle some common questions. ever wonder why your pizza doesn’t turn out quite right? a typical culprit is the oven temperature .
Not hot enough and you’ll end up with a sad, floppy pizza. preheat that oven to 475° f ( 245° c) and watch closely!
If the cheese isn’t melting but the crust looks done, it might be a cooking time issue. keep that cornmeal handy, too—sprinkling it on your baking sheet prevents sticking and adds that nice crunch.
So, remember, baking pizza at home doesn't have to be intimidating. with these insights, you’ll be ready to bake tasty crust pizza - delightful & easy and wow your friends and family at your next gathering.
Conclusion
So, there you have it! crafting your own pizza at home is not only doable but super fun! don’t stress too much—enjoy the process and shoot for those delicious flavors! remember to play around with toppings and share the love.
Make it a fun night in with the kids or a cozy date night. your pizza journey is just getting started, and i can’t wait to see what you come up with! 🍕
Bake Tasty Crust Pizza - Delightful & Easy Card

⚖️ Ingredients:
- 2 ¼ teaspoons active dry yeast (1 packet or 7 grams)
- 1 teaspoon sugar (5 grams)
- ¾ cup warm water (110°F or 43°C, approximately 180 ml)
- 2 cups all-purpose flour (240 grams)
- 1 teaspoon salt (5 grams)
- 1 tablespoon olive oil (15 ml)
- ½ cup pizza sauce (120 ml)
- 1 ½ cups shredded mozzarella cheese (150 grams)
- ½ cup sliced pepperoni or vegetables (optional)
- ¼ cup grated Parmesan cheese (30 grams)
- Fresh basil leaves (for garnish, optional)
🥄 Instructions:
- Step 1: In a bowl, mix warm water, sugar, and yeast; let it sit for 5-10 minutes until frothy.
- Step 2: In a larger bowl, combine flour and salt. Add the yeast mixture and olive oil; stir until a shaggy dough forms.
- Step 3: Transfer the dough to a floured surface; knead for about 5-7 minutes until smooth and elastic.
- Step 4: Place the dough in a greased bowl, cover, and let rise in a warm place for 30 minutes.
- Step 5: Preheat oven to 475°F (245°C) while the dough rises.
- Step 6: Roll out the dough to your desired thickness on a floured surface. Transfer to a baking sheet lined with parchment if desired.
- Step 7: Spread pizza sauce over the crust, then sprinkle mozzarella and arrange additional toppings.
- Step 8: Bake for 12-15 minutes or until the crust is golden brown and the cheese is bubbly.
- Step 9: Let cool slightly, garnish with fresh basil, cut into slices, and serve.
Previous Recipe: How to Bake Tasty Crab Skokie in 35 Minutes: A Delicious Family Favorite
Next Recipe: Ultimate Grilled Beef Kebabs - Juicy & Flavorful: 5 Easy Steps!